When to Use Checkboxes and Radio Buttons in BoldSign Forms
 Yvone Atieno Odhiambo
TL;DR: Use a checkbox when a signer may tick several options, or none. Use radio buttons when the signer must pick exactly one option from a group. Both are among the BoldSign eSignature features you can add to any document before you send it.
A signature is often only part of what you need back. A client may also need to accept your terms, choose a payment method or tick the services they want. Without the right fields, they write notes in the margin or email you separately.
Checkboxes and radio buttons collect those answers inside the document. This guide explains when to use each one and how to add both in BoldSign.
What is the difference between checkboxes and radio buttons?
A checkbox lets the signer select any number of options from a list. A radio button lets the signer select exactly one option from a group.
Think of a coffee shop order card. You tick every extra you want, such as milk, sugar and cinnamon, so those are checkboxes. You pick one cup size, so small, medium and large form a radio button group.
When should you use a checkbox?
Use a checkbox when the signer can pick more than one answer, or when one box records a single agreement. Our help article on using the checkbox form field covers every setting.
A single checkbox for an agreement
One checkbox works well for a statement such as “I have read the privacy policy”. Keep it required when the signer must agree before they finish signing. Turn on Checked by default only when a ticked box is the expected answer.
A checkbox group with a selection rule
A group suits lists such as services, add-ons or contact preferences. You can set a rule for how many boxes the signer ticks:
- A minimum, such as “pick at least one”.
- A maximum, such as “pick up to three”.
- An exact number, such as “pick exactly two”.
When should you use radio buttons?
Use radio buttons when the signer must make one choice, such as Yes or No. Choosing one button clears the others in the same group.
A signer cannot clear a radio button once they choose it. They can only switch to another option in the group. So always offer at least two buttons, or the signer is forced into the one answer you gave them.
Radio buttons suit questions like a preferred payment method, a contract term or a delivery option.
How do you add checkboxes and radio buttons in BoldSign?
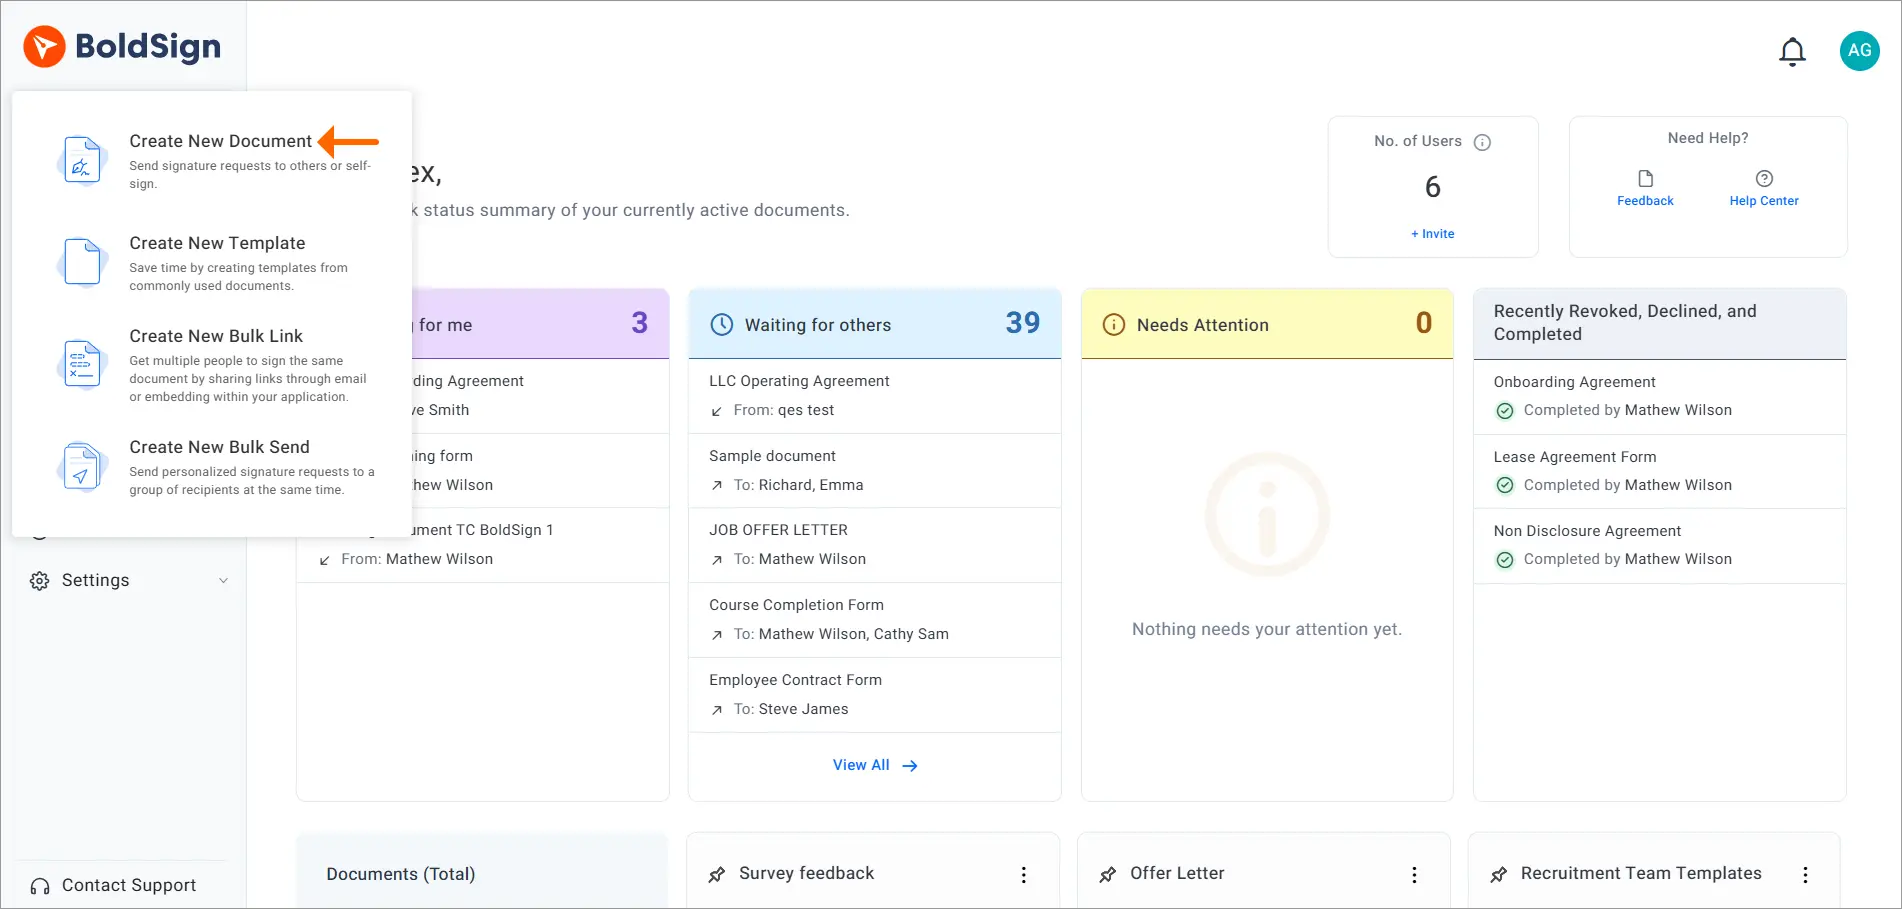
You add both fields on the Configure Fields page, after you upload a document and add recipients. Start with these steps.
- Log in to your BoldSign account, or create a new one.
- Select Create New, then Create New Document.
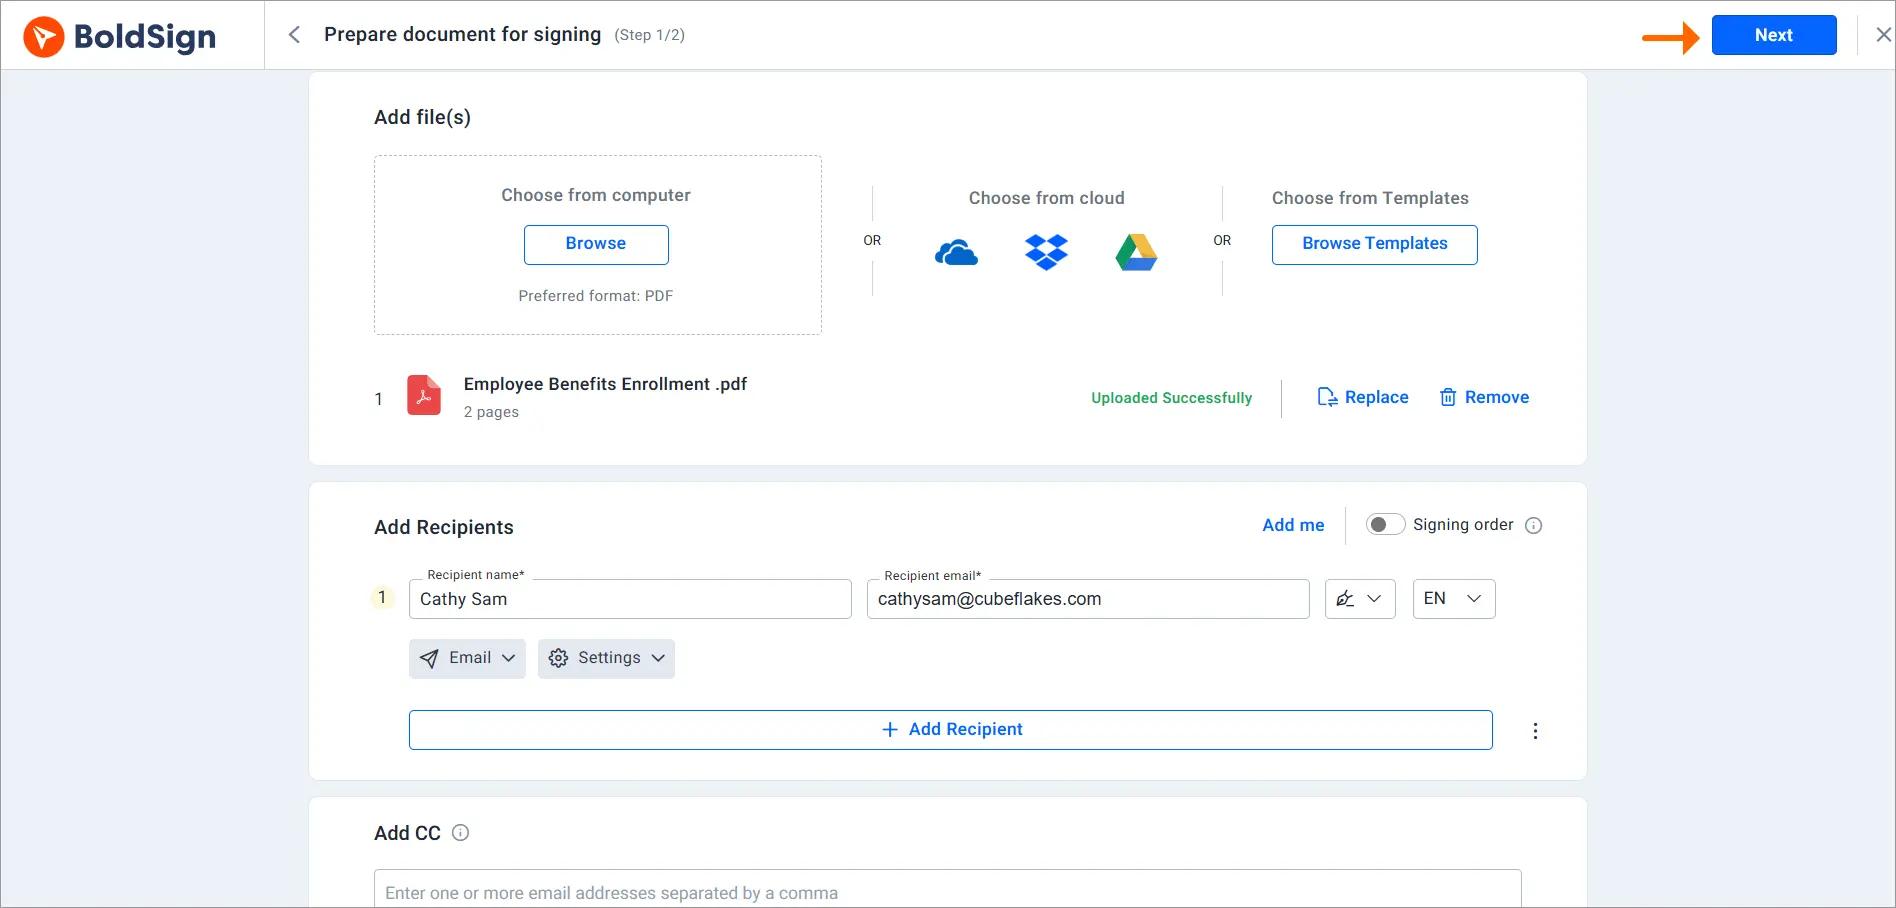
- Upload your document in Add Files and enter each signer’s name and email in Add Recipients.
- Select Next to open the Configure Fields page.
How do you set up radio buttons?
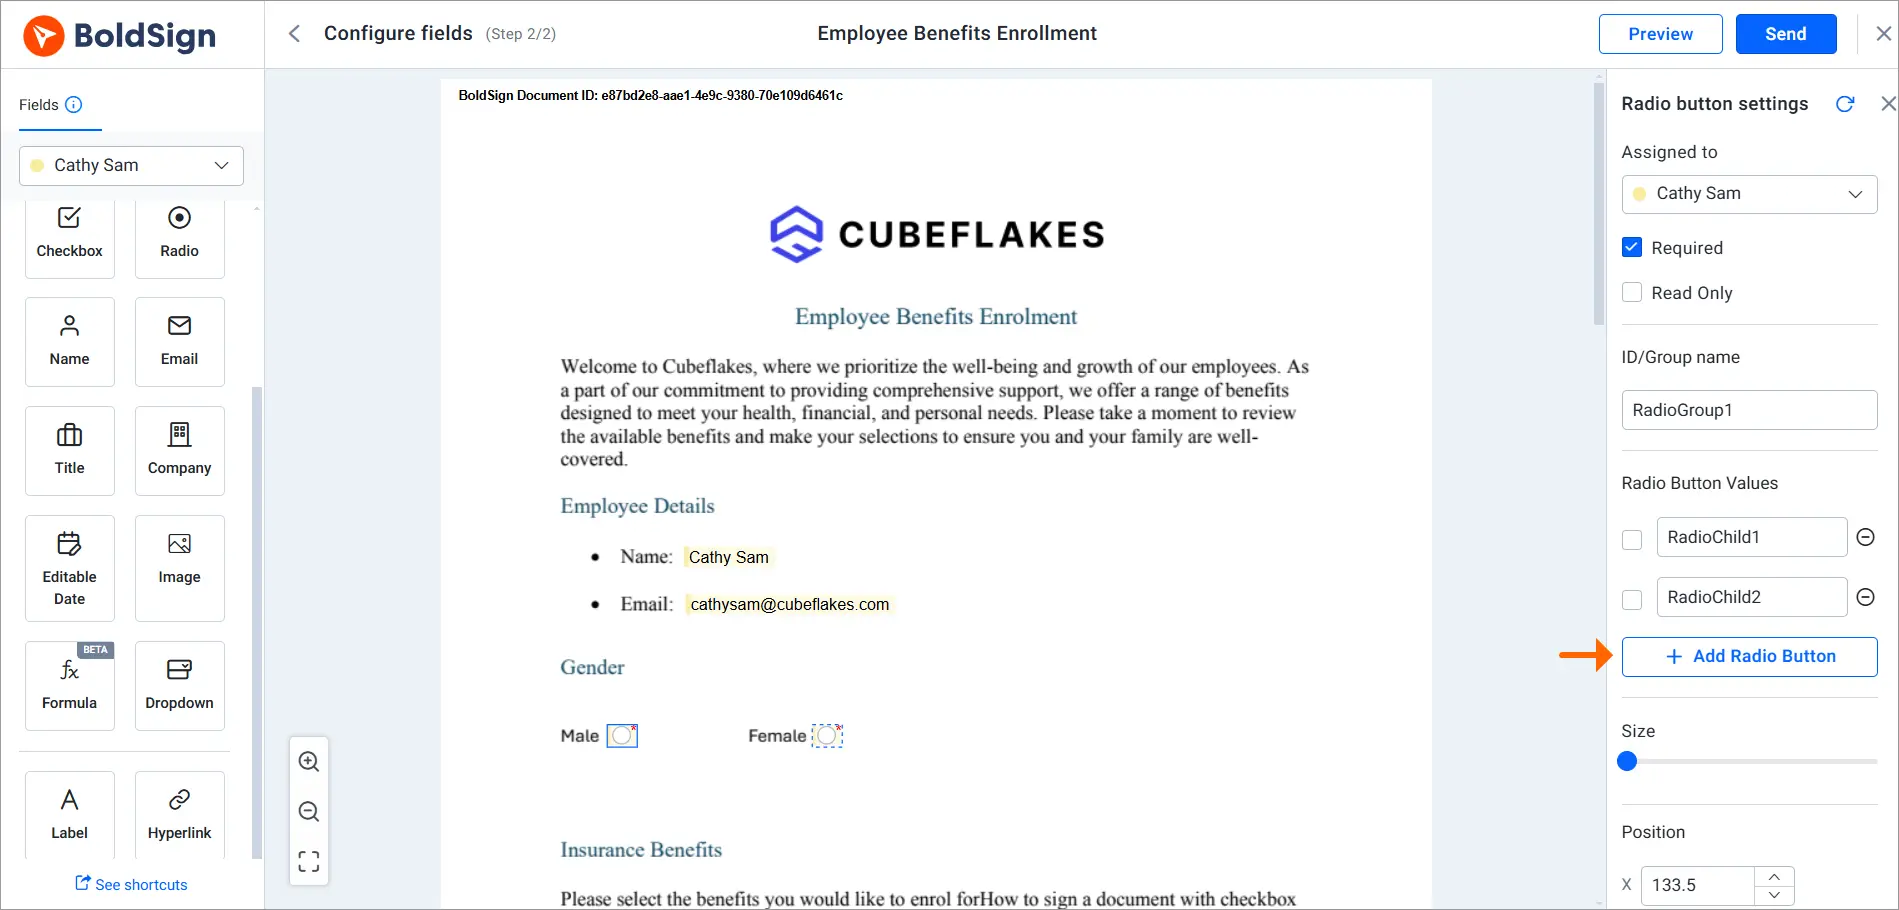
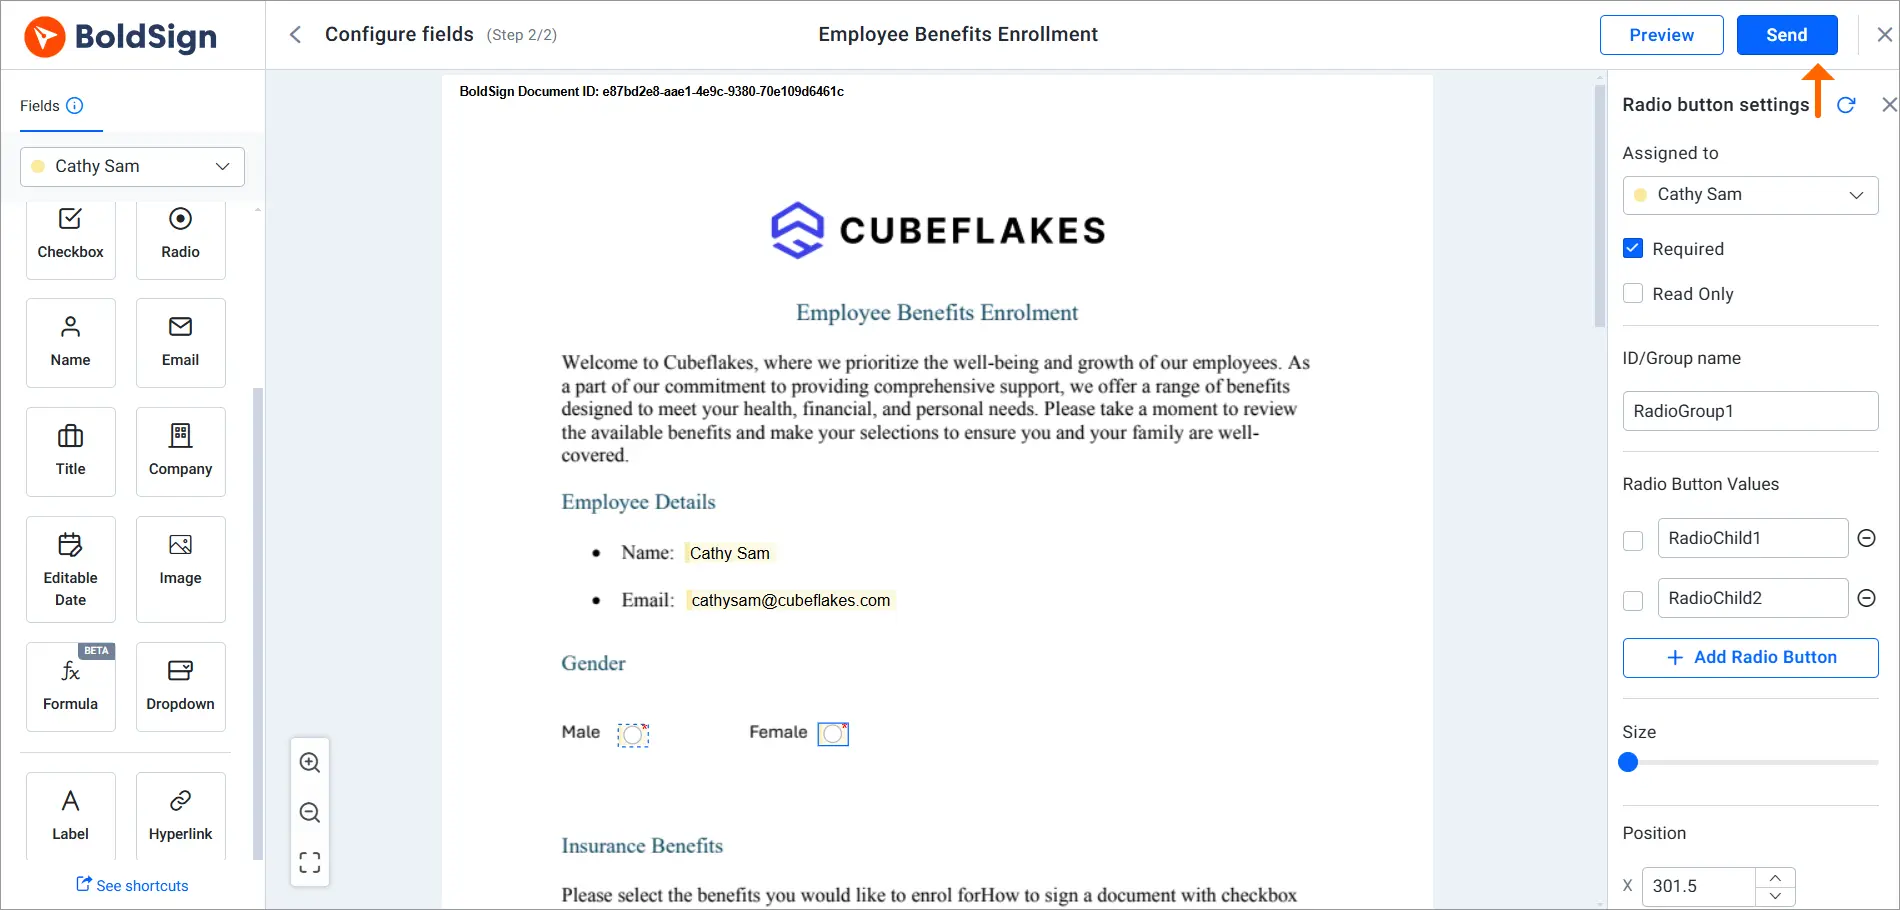
Drag the radio button field onto the document, and its settings open on the right. The field starts as required, so the signer cannot skip it.
- Place the radio button field where the first option sits.
- Select Add Radio Button for each extra option in the group.
- Check that each button lines up with its answer on the page.
How do you set up checkboxes?
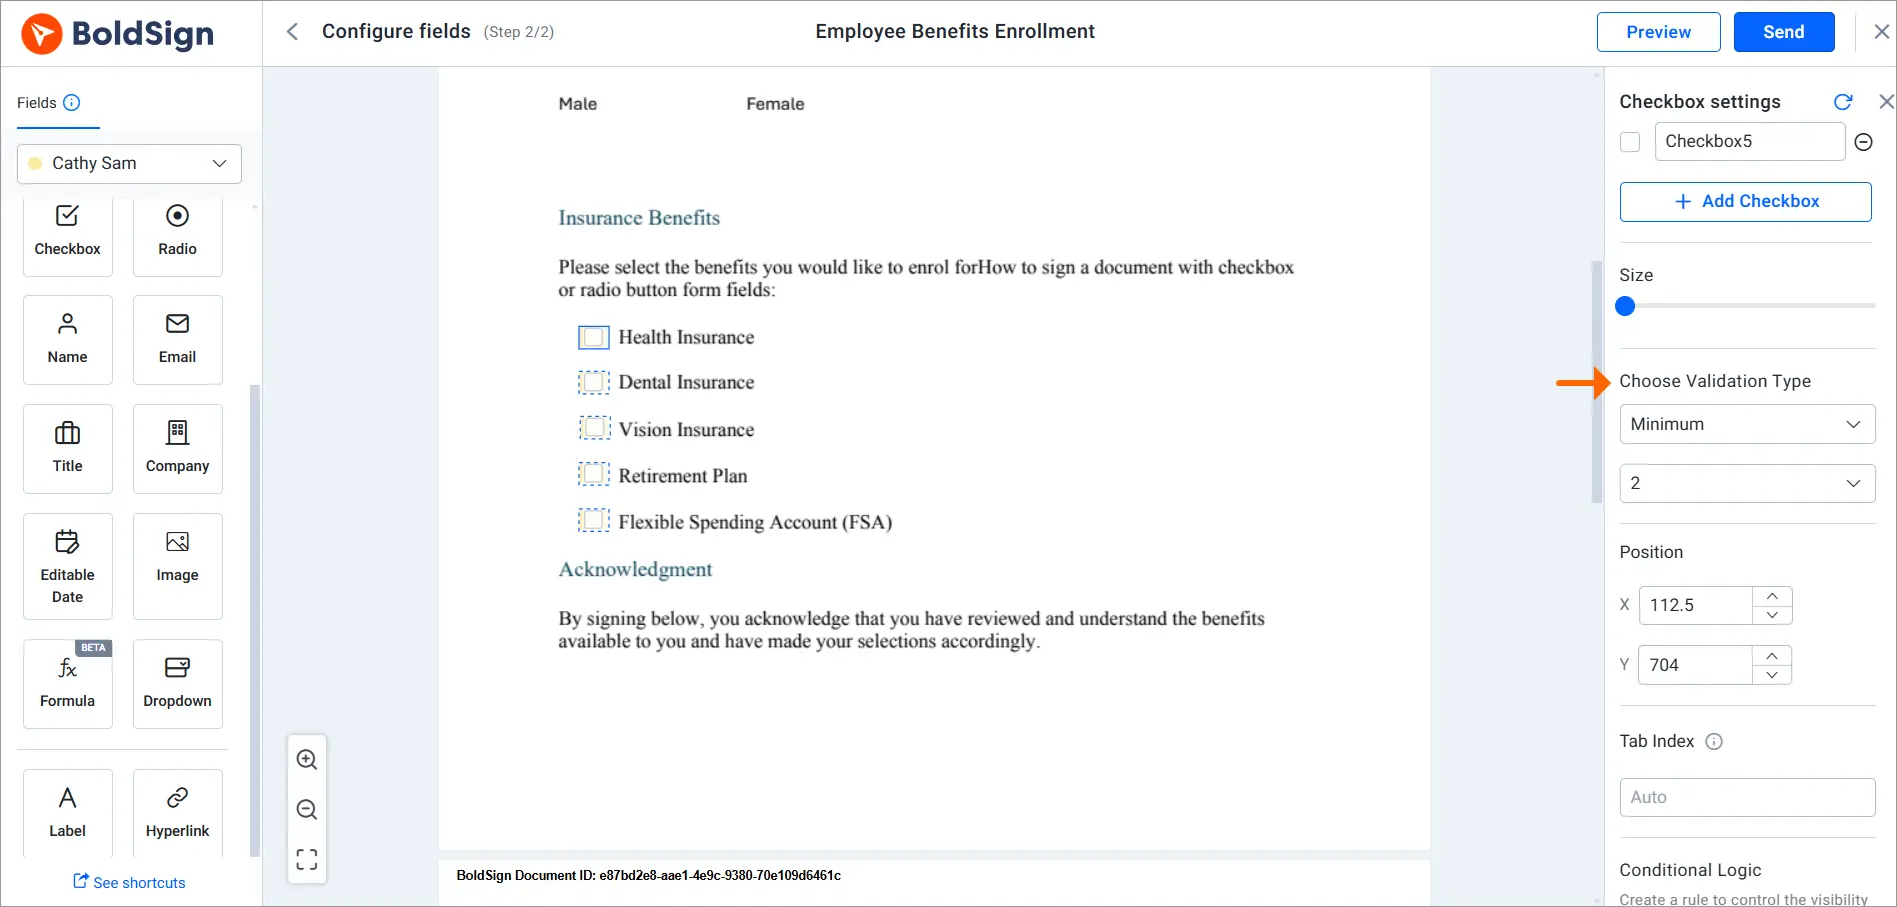
Drag the checkbox field onto the document, and its settings open on the right. Required is on by default, and you can also turn on Read Only or Checked by default.
- Place the checkbox field next to the first option.
- Select Add Checkbox for each extra option in the group.
- Move each checkbox next to the option it stands for.
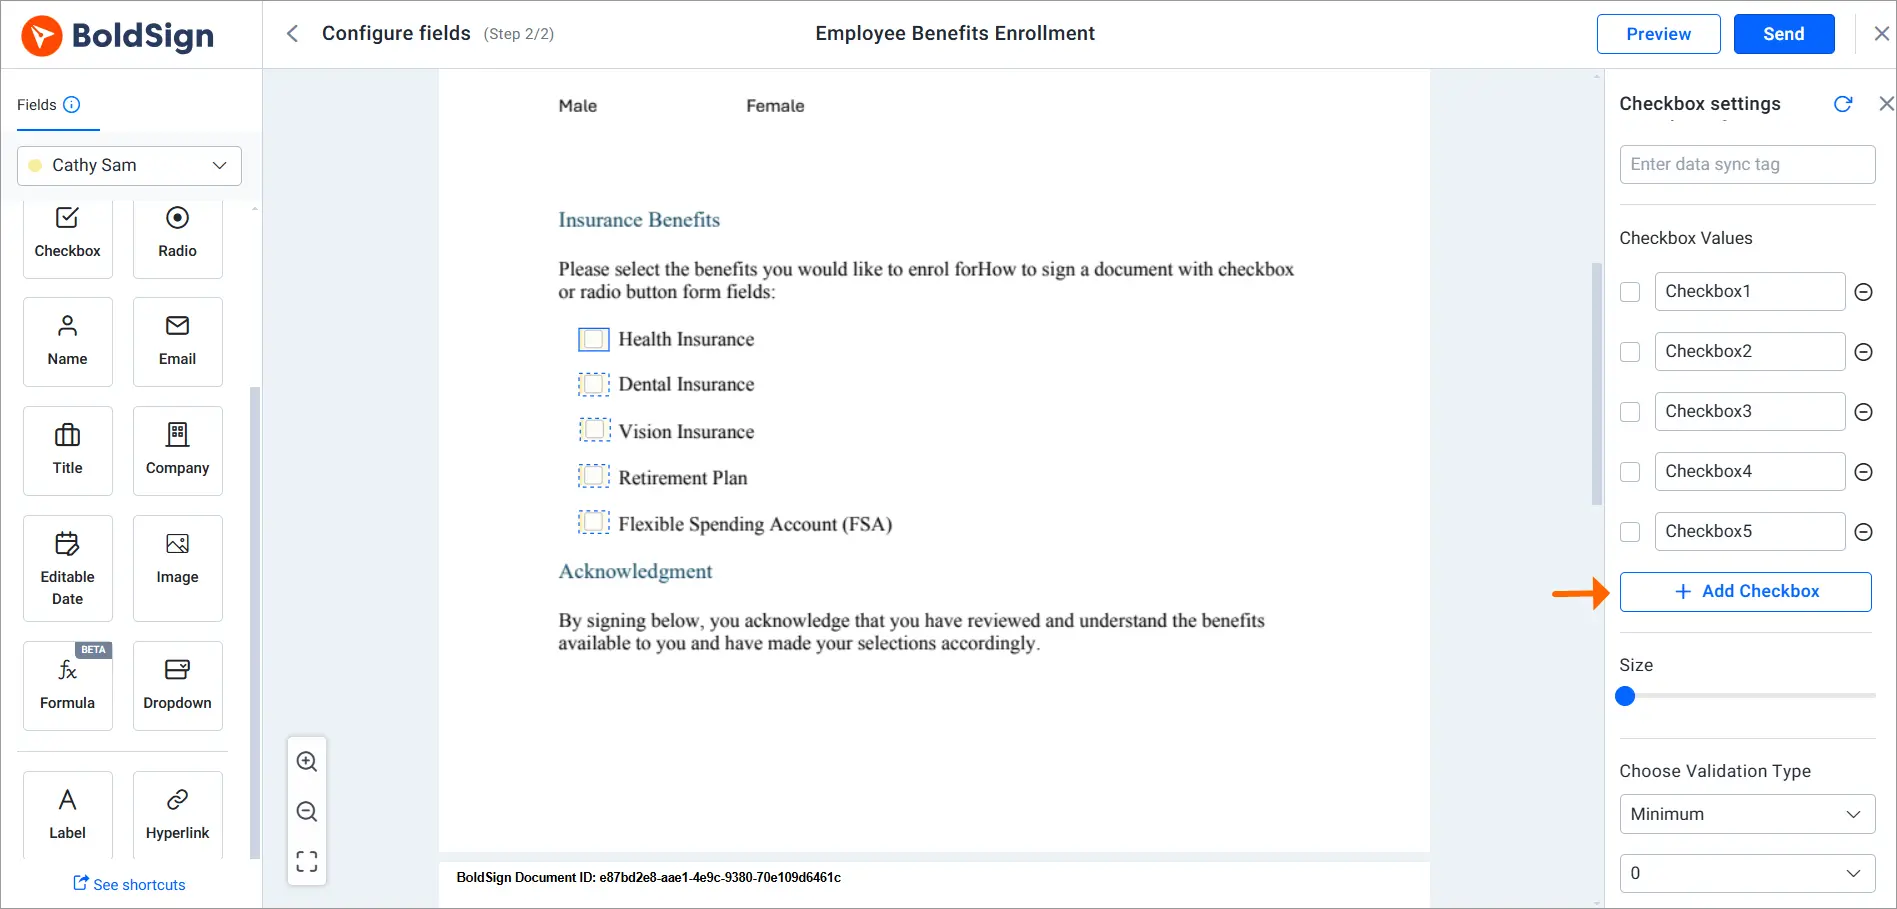
Limit how many boxes the signer can tick in the Choose Validation Type section. Pick the type, enter the number of checkboxes, then select Send.
How can a checkbox show or hide other fields?
Add conditional logic to a checkbox, and other fields appear only when the box is ticked or left clear. A signer then fills in only what applies to them.
- Select the checkbox to open its settings.
- In the Conditional Logic section, select Create Logic.
- Choose Checked and select the field to show when the box is ticked.
- Choose Unchecked and select the field to show when it is clear.
- Select Preview to test both states, then send.
Give several checkboxes the same Data Sync Tag to keep them in step with each other. Our guide to creating conditional fields shows the same idea with radio buttons.
Do you need optical character recognition (OCR) for checkboxes, signatures and radio buttons?
You do not need OCR to read answers from a BoldSign form. Each tick, choice and signature is saved as data the moment the signer adds it.
Placing the fields is a separate job. Our artificial intelligence (AI) field detection places checkboxes, radio buttons, text boxes, date signed and signature fields for you. It reads PDF and Word files that hold layout text, but a scanned page with no text layer is beyond it.
What should you watch out for with these fields?
Most problems come from picking the wrong field or leaving a rule out. Check these points before you send:
- Use a radio button group, not checkboxes, when a single answer makes sense.
- Give every radio button group at least two options.
- Set a selection rule on checkbox groups that need a set number of ticks.
- Turn off Required on any checkbox the signer may leave clear.
- Write a short label next to each field, so the signer knows what it means.
Which BoldSign plan do you need for checkboxes and radio buttons?
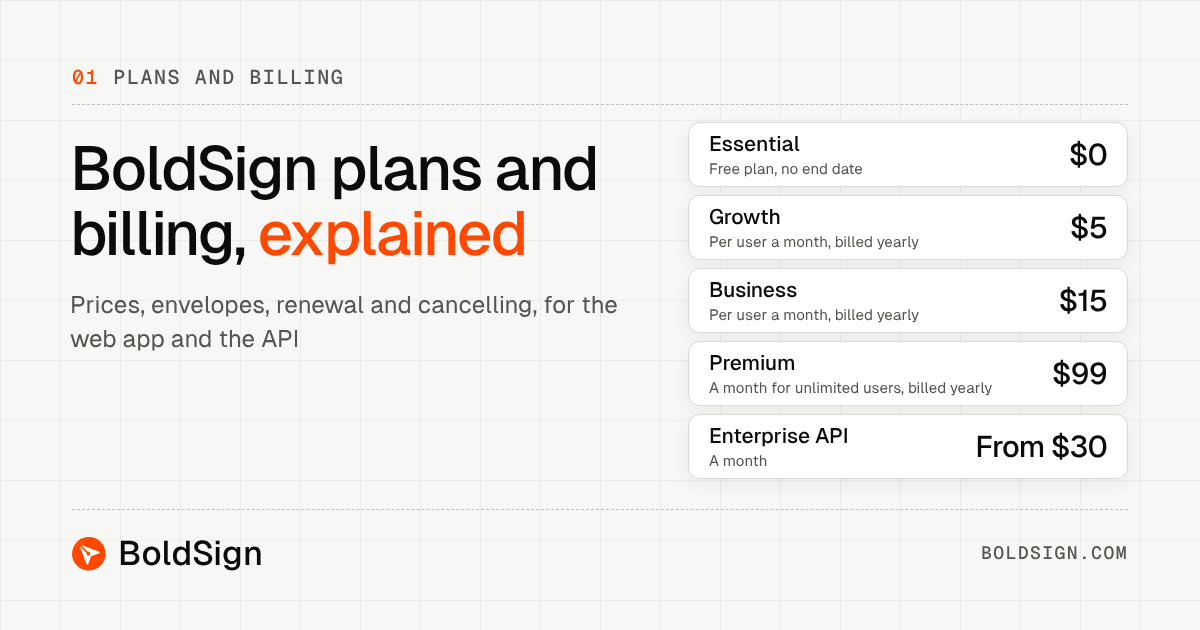
Every plan includes checkboxes and radio buttons, as listed on the BoldSign pricing page in November 2026. That includes our free Essential plan, which also covers conditional fields and field data validation.
AI-powered field detection starts on the Business plan, at $15 per user a month billed yearly. The Growth plan costs $5 per user a month, and the Premium plan costs $99 a month for unlimited users, both billed yearly.
Prices are in USD. You can try a paid plan with a 30-day free trial.
Where do you go next with form fields?
You now know which field fits each question. Pick the next step for your documents.
- Start a 30-day free trial and add a checkbox group to your next contract.
- Book a demo to see form fields set up for your team’s documents.
- Contact our support team with a question about a field in your forms.
Frequently asked questions
What is the difference between a checkbox and a radio button?
A checkbox lets a signer tick any number of options, including none. A radio button lets them pick exactly one option from a group.
Can a signer uncheck a radio button?
Only by picking another option in the same group. Once one button is chosen, the group always keeps one answer.
Can I make a checkbox required?
Yes. In BoldSign, a new checkbox field has Required turned on by default. Turn it off in the field settings when the box is optional.
How do I limit how many checkboxes a signer can tick?
Put the checkboxes in a group and set a validation type. You can ask for a minimum, a maximum or an exact number of ticks.
Is a ticked checkbox legally binding?
Yes, when it is part of a document the signer agrees to sign electronically. The tick is saved in the signed document, like any other field you add.
Can a checkbox show or hide other fields?
Yes. Add conditional logic to the checkbox and link fields to its Checked and Unchecked states. The signer only sees the fields that match their answer.
Does BoldSign use OCR for checkboxes, signatures and radio buttons?
No. Our fields are digital, so each answer is saved as data with no character reading needed. To place fields for you, our AI field detection reads the text layer of PDF and Word files.
Are checkboxes and radio buttons free in BoldSign?
Yes. Our free Essential plan includes basic and advanced form fields, conditional fields and field data validation. AI field detection starts on the Business plan.

Yvone Atieno Odhiambo
Yvone is a Technical Assistant at BoldSign who specializes in creating clear documentation and engaging videos. She combines her technical skills and creativity to deliver user-focused solutions. Connect with her on LinkedIn.
More posts by Yvone Atieno Odhiambo