How to Add eSignatures to a .NET MAUI App with the BoldSign API
 Pavle Davitkovic
TL;DR: You can add digital signatures to a cross-platform mobile app in three steps. Install our BoldSign.API NuGet package, add an API key and send a document from your code. The signer gets an email and signs on any device. Our eSignature API page lists everything else the API can do.
A freelancer opens a new contract on their phone between client calls. The contract waits whenever they have to find a laptop to sign it. Your app can remove that wait.
Every screen a user taps is part of the user interface (UI). This guide builds a small app in C# with .NET (Microsoft’s free developer platform) and its MAUI (Multi-platform App UI) framework. The app creates a PDF, sends it for signing through our API and lets the signer finish on any device.
Why use the BoldSign API in a mobile app?
Our API lets your app upload a document, place signature fields in code and send it for signing. You write the signing flow once, and every device your app runs on can use it.
The send document reference lists every option a send request accepts. Use an embedded signing link instead of the email when you want signers to stay inside your app. You can read about the rest of our product on the BoldSign home page.
What is .NET MAUI?
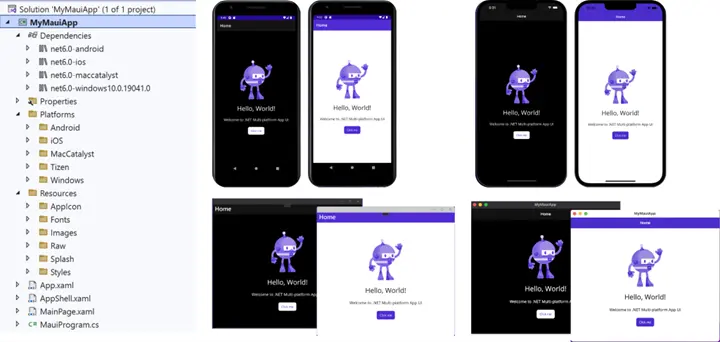
.NET MAUI is Microsoft’s framework for native apps. You write each app once, in one shared codebase of C# and Extensible Application Markup Language (XAML).
Think of it as one recipe that every kitchen can cook. The same app runs on:
- Android
- iOS
- macOS
- Windows
How does .NET MAUI help with mobile e-signing?
You build the signing screen and logic once and share them across every platform. You can still add platform-specific code where one device needs it.
- Shared code: business logic, screens and API calls live in one project for all platforms.
- Native controls: MAUI builds each screen from the platform’s own controls, so the app looks and feels native.
- Device features: the Microsoft.Maui.Essentials library gives you features such as location and Bluetooth.
The framework will feel familiar if you have used Xamarin.Forms or Windows Forms.
What do you need before you start?
You need the .NET software development kit (SDK), an editor with MAUI support and a BoldSign account with API access. The sample in this guide targets .NET 9.
- The .NET 9 software development kit
- Visual Studio 2022 or Rider, which is free for noncommercial use
- The MAUI workload for Visual Studio or Rider
We use Visual Studio in the steps below. Rider works almost the same way, so pick the one you prefer.
How do you create the .NET MAUI project?
Start from the built-in template in Visual Studio. It gives you a working app for every platform in a few clicks.
- Open Visual Studio and type MAUI in the template search bar.
- Select the first option, .NET MAUI App.
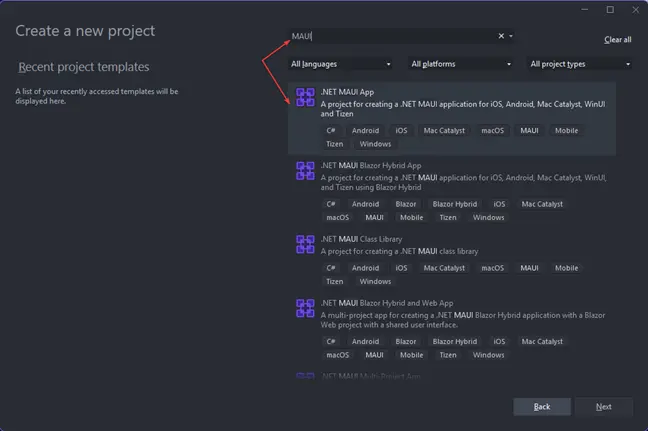
- Enter a project name, choose the folder and select Next.
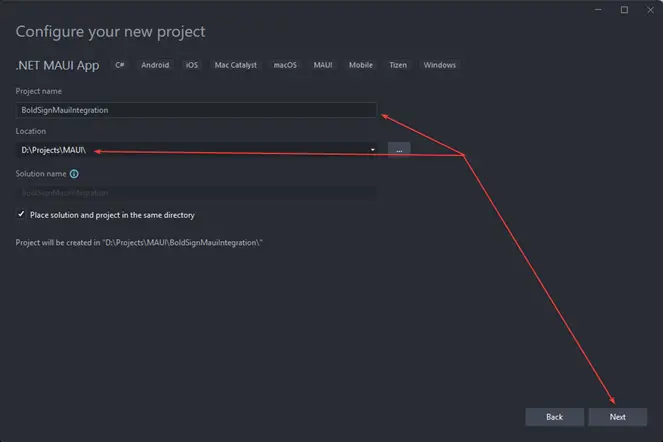
- Select .NET 9 as the framework.
How does the Model-View-ViewModel pattern fit in?
Most MAUI apps use the Model-View-ViewModel (MVVM) pattern. It works like the Model-View-Controller pattern you may know from web apps.
- Model: holds the business logic.
- ViewModel: connects the view to the model.
- View: shows the user interface.
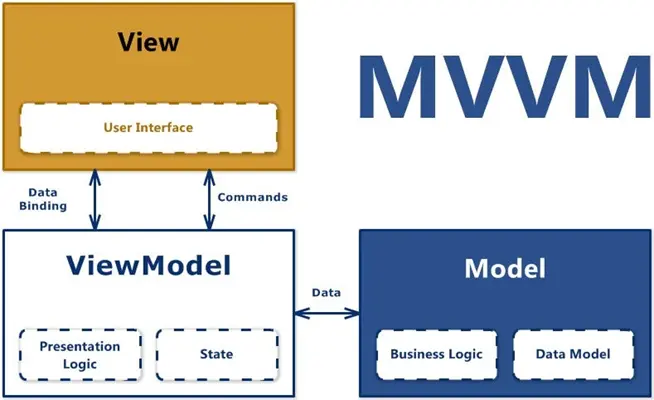
We use the .NET Community Toolkit in this guide. Microsoft’s guide to Model-View-ViewModel (MVVM) explains the pattern in more depth.
How do you add the view and view model?
Add the toolkit package, remove the default pages and create one view with its view model. Then register both so the app can create them.
- Add the CommunityToolkit.Mvvm package to your solution.

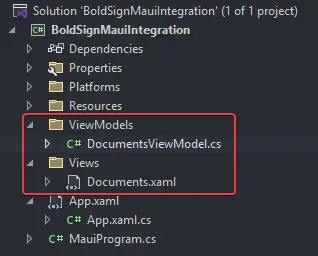
- Delete the AppShell, MainPage.xaml and MainPage.xaml.cs files. This app does not need them.
- Add a ViewModels folder with a DocumentsViewModel.cs file.
- Add a Views folder with a Documents.xaml file.
How do you register the page and set it as the main page?
Register the view model and the view in the dependency injection container in MauiProgram.cs. Then make Documents.xaml the first page the app opens.
public static class MauiProgram
{
public static MauiApp CreateMauiApp()
{
var builder = MauiApp.CreateBuilder();
builder
.UseMauiApp<App>()
.ConfigureFonts(fonts =>
{
fonts.AddFont("OpenSans-Regular.ttf", "OpenSansRegular");
fonts.AddFont("OpenSans-Semibold.ttf", "OpenSansSemibold");
});
#if DEBUG
builder.Logging.AddDebug();
#endif
// Documents
builder.Services.AddTransient<DocumentsViewModel>();
builder.Services.AddTransient<Documents>();
return builder.Build();
}
}
Set the main page in App.xaml.cs.
public partial class App : Application
{
    public App() => InitializeComponent();
    protected override Window CreateWindow(IActivationState? activationState) => new(new Documents(new ViewModels.DocumentsViewModel()));
}
How do you connect the app to BoldSign?
Install the BoldSign.API NuGet package and add an API key from the BoldSign web app. The key tells our API which account sends each document.

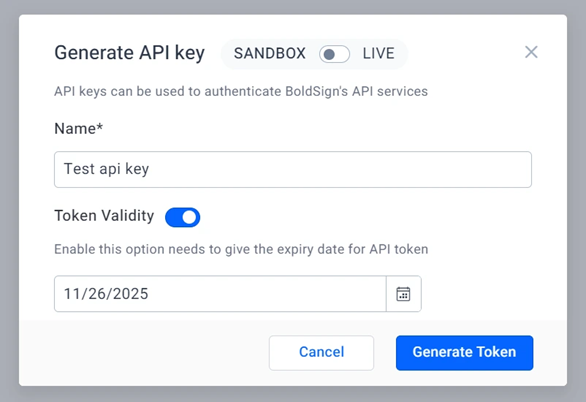
- Open the API Key page under API > API Key in the BoldSign web app.
- Select Generate API Key.
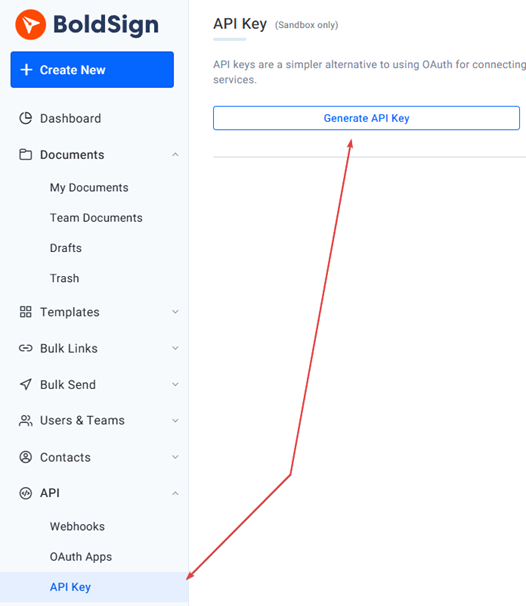
- Enter a token name. Turn on Token Validity when you want the key to expire on a set date.
- Select Generate Token and copy the key.
Where do you keep the API key in the app?
For this test app, keep the key in a static class called Constants. In a released app, keep it on your own server so nobody can read it from the app package.
public static class Constants
{
    /// <summary>
    /// Copy and paste your BoldSign API key from your BoldSign dashboard
    /// </summary>
    public const string BOLDSIGN_API_KEY = "YOUR_BOLDSIGN_API_KEY";
}
How do you create a PDF to send for signing?
The app needs a document to sign, so it builds one from a template with aPDF (a free PDF API). You can copy the template file used in this guide.
Sign up on aPDF, then add these values to Constants.cs:
/// <summary>
/// Copy and paste your BoldSign API URL
/// </summary>
public const string BOLDSIGN_BASE_URL = "https://api.boldsign.com";

/// <summary>
/// Set the authorization scheme for aPDF
/// </summary>
public const string aPDF_AUTHORIZATION_SCHEME = "Bearer";

/// <summary>
/// Copy and paste your aPDF API token
/// </summary>
public const string aPDF_TOKEN = "YOUR_APDF_TOKEN";

/// <summary>
/// Copy and paste your aPDF API endpoint for creating a PDF
/// </summary>
    public const string aPDF_CREATE_PDF_ENDPOINT = "https://apdf.io/api/pdf/file/create";

/// <summary>
/// Copy and paste your aPDF template HTML
/// </summary>
public const string aPDF_TEMPLATE_HTML = "<!-- HTML template for the file here -->";
Next, add a method that calls aPDF and returns the path of the new file. It adds your aPDF token to the request and sends the template in the body.
private static async Task<string> GetGeneratedPDFDownloadLinkAsync()
{
    HttpClient httpClient = new();

    httpClient.DefaultRequestHeaders.Authorization = new AuthenticationHeaderValue(Constants.aPDF_AUTHORIZATION_SCHEME, Constants.aPDF_TOKEN);

    FormUrlEncodedContent requestData = new(
        [
            new KeyValuePair<string, string>("html", Constants.aPDF_TEMPLATE_HTML)
        ]);

    HttpResponseMessage response = await httpClient.PostAsync(Constants.aPDF_CREATE_PDF_ENDPOINT, requestData);

    PDFResponse? deserializedResponse = JsonSerializer.Deserialize<PDFResponse>(await response.Content.ReadAsStreamAsync());

    (bool isValid, string correctedUrl)? isUrlValid = deserializedResponse?.File.ValidateAndCorrectUrl();

    if (isUrlValid.Value.isValid)
    {
        var path = await DownloadAndSaveFile(isUrlValid.Value.correctedUrl, "Freelance-contract.pdf");

        return path;
    }

    return string.Empty;
}
How do you read the aPDF response?
Add a record that turns the response into a typed result. Put it in the same folder as your API client class.
public record PDFResponse(
    [property: JsonPropertyName("file")] string File,
    [property: JsonPropertyName("expiration")] DateTime Expiration,
    [property: JsonPropertyName("pages")] int Pages,
    [property: JsonPropertyName("size")] int Size
);
The response has several properties, but this app only needs file, which holds the download link. This extension method checks that the link is a valid address before the app uses it:
public static (bool isValid, string correctedUrl) ValidateAndCorrectUrl(this string url)
{
    if (Uri.IsWellFormedUriString(url, UriKind.Absolute))
    {
        return (true, url);
    }

    string corrected = url.Replace(@"\/", "/");

    if (Uri.IsWellFormedUriString(corrected, UriKind.Absolute))
    {
        return (true, corrected);
    }

    var s3Pattern = new Regex(@"^https:\\/\\/[\w\-]+\.s3\.[\w\-]+\.amazonaws\.com\\/[\w\-\.]+$");

    if (s3Pattern.IsMatch(url))
    {
        string s3Corrected = url.Replace(@"\", "");
        if (Uri.IsWellFormedUriString(s3Corrected, UriKind.Absolute))
        {
            return (true, s3Corrected);
        }
    }

    return (false, url);
}
How do you save the PDF on the device?
Download the file and save it in the app’s data folder. The send request then reads it from there.
private static async Task<string> DownloadAndSaveFile(string fileUrl, string fileName)
{
    string downloadsPath = FileSystem.AppDataDirectory;

    string filePath = Path.Combine(downloadsPath, fileName);

    HttpClient httpClient = new();

    byte[] fileBytes = await httpClient.GetByteArrayAsync(fileUrl);

    await File.WriteAllBytesAsync(filePath, fileBytes);

    return filePath;
}
The method asks the platform for its app data folder and builds the file path from it. Then it downloads the file and writes it to that path.
How do you send the document for signing from .NET MAUI?
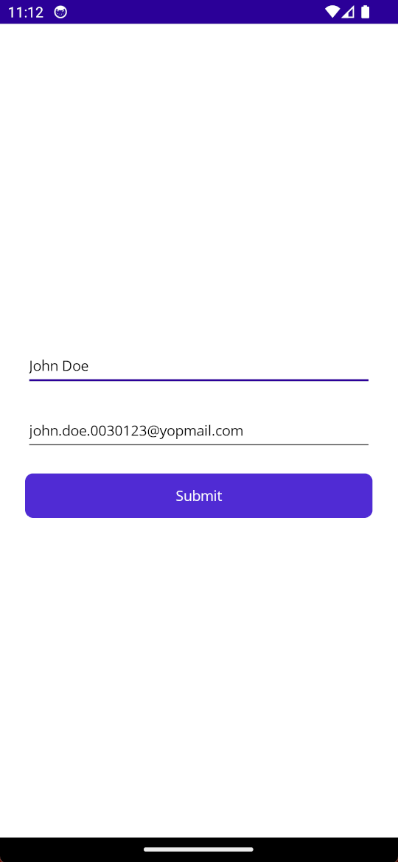
Call SendDocumentAsync with the file, one signature field and the signer’s name and email address. Our API emails the signer a link to the document.
The method below places the signature field at fixed coordinates on page 1. It also sets the email title and message that the signer sees.
public static async Task<string> SignDocumentAsync(string name, string email)
{
    ApiClient apiClient = new(Constants.BOLDSIGN_BASE_URL, Constants.BOLDSIGN_API_KEY);

    DocumentClient documentClient = new(apiClient);

    string filePath = await GetGeneratedPDFDownloadLinkAsync();

    DocumentFilePath documentFilePath = new()
    {
        ContentType = "application/pdf",
        FilePath = filePath
    };

    FormField signatureField = new(
        id: "signature",
        isRequired: true,
        type: FieldType.Signature,
        pageNumber: 1,
        bounds: new Rectangle(570, 855, 150, 50));

    List<FormField> formFields = [signatureField];

    DocumentSigner signer = new()
    {
        Name = name,
        EmailAddress = email,
        FormFields = formFields
    };

    SendForSign sendForSign = new()
    {
        Message = "Please sign this document",
        Title = "Freelance Contract",
        Signers = [signer],
        Files = [documentFilePath]
    };

    DocumentCreated response = await documentClient.SendDocumentAsync(sendForSign);

    return response.DocumentId;
}
How do you connect the screen to the send method?
The view model calls the send method and shows a status message on the screen. Copy this code into DocumentsViewModel.
public partial class DocumentsViewModel : ObservableObject
{
    public DocumentsViewModel() => SignDocumentCommand = new AsyncRelayCommand(SignDocumentAsync);

    [ObservableProperty]
    private string _documentSinged;

    [ObservableProperty]
    private string _name;

    [ObservableProperty]
    private string _email;

    [ObservableProperty]
    private string _statusMessage;

    [ObservableProperty]
    private bool _isStatusVisible;

    public IAsyncRelayCommand SignDocumentCommand { get; }

    private async Task SignDocumentAsync()
    {
        IsStatusVisible = false;

        if (string.IsNullOrWhiteSpace(Name) || string.IsNullOrWhiteSpace(Email))
        {
            StatusMessage = "Please fill in all fields";

            IsStatusVisible = true;

            return;
        }

        try
        {
            DocumentSinged = await BoldSignApiClient.SignDocumentAsync(Name, Email);

            StatusMessage = "Document signed successfully!";

            IsStatusVisible = true;
        }
        catch (Exception ex)
        {
            StatusMessage = $"Error: {ex.Message}";

            IsStatusVisible = true;
        }
    }
}
The view needs two entry fields, one button and one label. Add this layout to Documents.xaml.
<VerticalStackLayout
Spacing="20"
Padding="25"
VerticalOptions="Center">

<Entry x:Name="NameEntry"
Placeholder="Name"
Text="{Binding Name}" />

<Entry x:Name="EmailEntry"
Placeholder="Email"
Keyboard="Email"
Text="{Binding Email}" />

<Button Text="Submit"
Command="{Binding SignDocumentCommand}"
HorizontalOptions="Fill" />

<Label Text="{Binding StatusMessage}"
IsVisible="{Binding IsStatusVisible}"
HorizontalOptions="Center" />
</VerticalStackLayout>
What happens when you run the app?
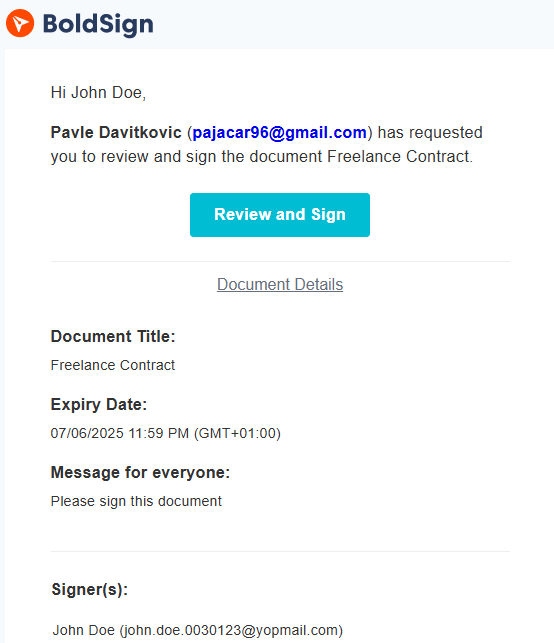
The signer gets an email from us and signs the document in a browser. You can follow the same steps yourself with your own email address.
- Run the app, enter a name and email address and select Submit.
- Open the signing request in your inbox and select Review and Sign.
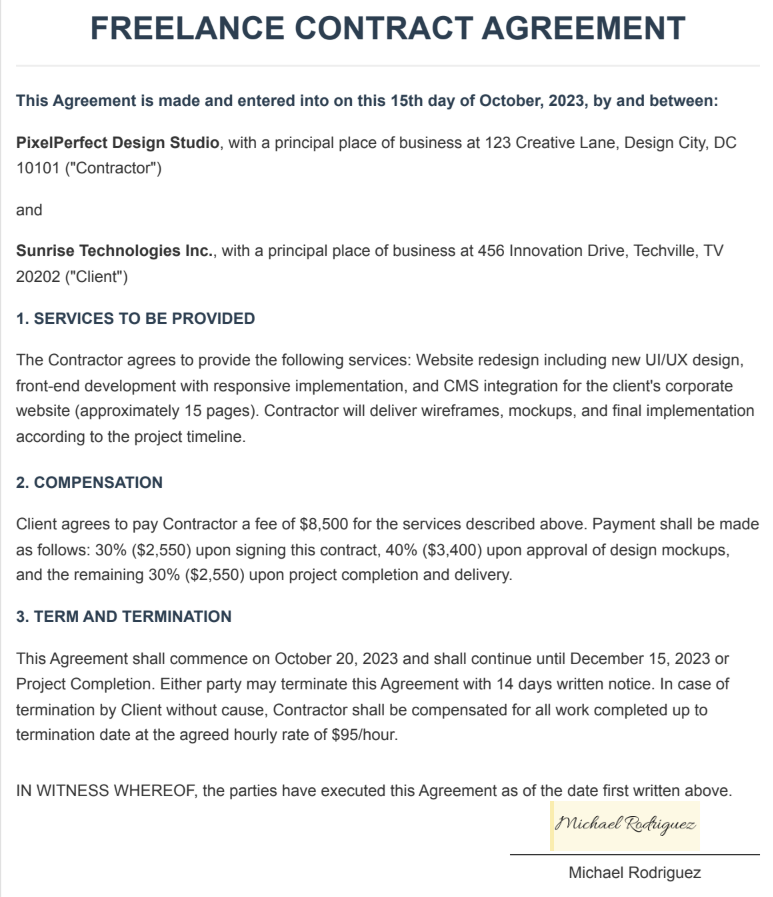
- Add your signature in the yellow box on the contract and select Finish.
Download the full sample from our GitHub repository to see the complete project.
Which BoldSign plan do you need for the API, and what does it cost?
Live API access comes with the Enterprise API plan, which starts at $30 a month with 40 envelopes. Extra envelopes cost $0.75 each, and the plan includes embedded signing.
You can build and test this whole app first in our free sandbox. Prices are in USD, as listed on the BoldSign pricing page in November 2026.
Where do you go next with your .NET MAUI signing app?
Get the sample running in the sandbox first. Then move the API key to your server and add the signing options your users need.
- Create a free API sandbox account and run the sample app.
- Schedule a demo to walk through your mobile signing flow with our team.
- Read our guide to embedded signing to let users sign inside the app.
Frequently asked questions
Can I add digital signatures to a .NET MAUI app?
Yes. Install the BoldSign.API NuGet package, add your API key and call SendDocumentAsync from your view model. The signer then gets an email and signs in a browser.
Does the BoldSign API work on Android and iOS?
Yes. The API is a web service, so the same C# code runs on every platform your app targets, including Android, iOS, macOS and Windows.
Where do I find my BoldSign API key?
Open the API section in the BoldSign web app and select API Key. Choose Generate API Key, then Generate Token, and copy the key into your app.
Do I need the Model-View-ViewModel pattern to use the BoldSign API?
No. The API calls work from any class. The pattern keeps the signing code out of the page, which makes it easier to test.
Can users sign inside the app instead of by email?
Yes. Request an embedded signing link from the API and show it in a web view. The signer then finishes without leaving your app.
Are documents signed through a mobile app legally binding?
Yes, when the signing meets the same rules as any other electronic signature, such as consent and a clear record of who signed. The device a signer uses does not change that.
Should I store the API key in the app code?
Only while you test. In a released app, keep the key on your own server and let the app call that server, so nobody can read the key from the app package.
Can I test the BoldSign API for free?
Yes. Our free sandbox lets you build and test the whole flow before you go live. Live sending needs a plan that includes API access.

Pavle Davitkovic
Pavle Davitkovic is a software engineer with over 5 years of experience. He has developed various types of applications, from web to mobile. Pavle has a passion for books and martial arts.
More posts by Pavle Davitkovic