API Key vs OAuth: Choosing the Right Authentication Method
 BoldSign Team
TL;DR: An API key is one secret string your server sends with each request, so it suits internal tools and quick tests. OAuth gives an app short-lived, limited tokens that a user approves, so it suits apps where customers connect their own accounts. The BoldSign eSignature API accepts both.
Say you are adding contract signing to your app, so people sign without leaving it. Your first technical choice is OAuth vs API key: how the app proves who it is to the e-signature service. Pick a method that is too loose and a leaked secret opens up every document.
This guide explains OAuth vs API keys in plain terms for developers new to the topic. We compare them, then show both in the BoldSign API with working Node.js samples.
What is API key authentication?
API key authentication means your app sends one secret string, such as xyz123abc456, with every request. The server checks the string and lets the request through when it matches.
Think of an API key as the key to your front door. It opens the door every time, for anyone who holds it.
The flow has three steps:
- The service you connect to generates the key for you.
- You add the key to each request, usually in a header.
- The server checks the key and allows or blocks the request.
How do you make an API key safer?
You can add a few layers of protection around a key. Each one limits the harm a stolen key can do.
- Set the key to expire after a fixed time.
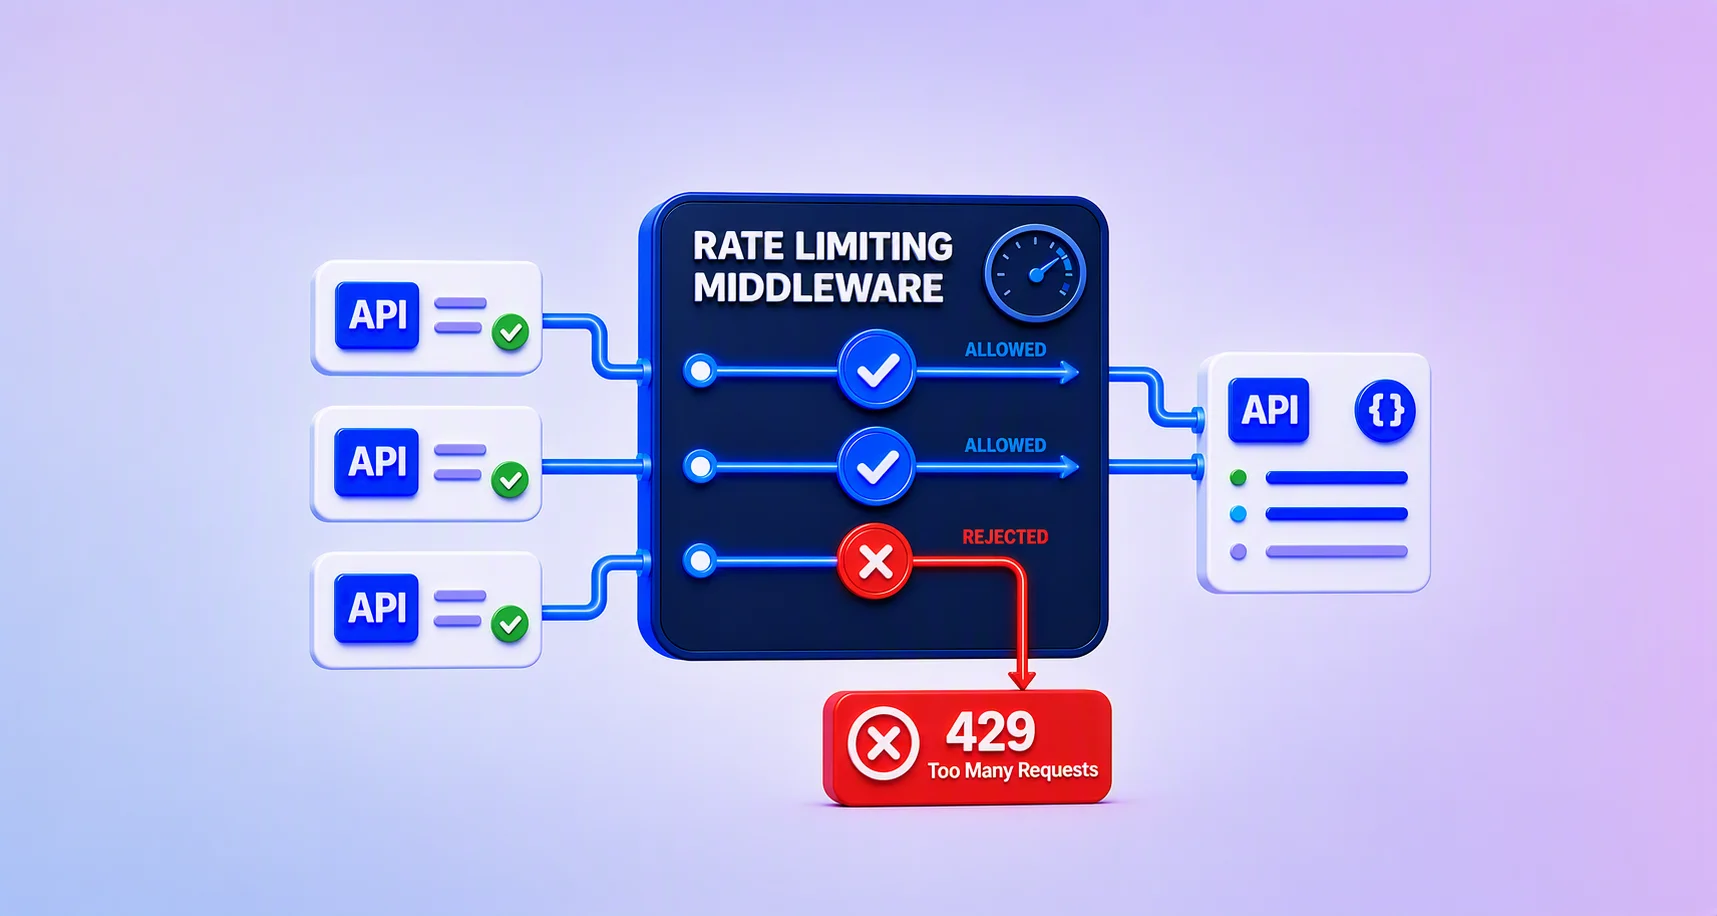
- Add a rate limit on the number of calls.
- Allow calls only from known internet protocol (IP) addresses.
- Give the key only the permissions it needs.
- Keep the key on your server, out of browser code.
When should you use API keys?
Use API keys when one trusted back end talks to one account, such as an internal dashboard. They also suit quick tests and prototypes, where speed matters more than fine-grained access.
What is OAuth API authentication?
OAuth is a standard that lets a user give an app limited access to their account. The app gets a temporary access token with set permissions and never sees the user’s password.
Picture a hotel keycard. It opens your room for the length of your stay, and the front desk can cancel it at any time.
- The user signs in to the service that holds their data.
- The user approves what the app may do, such as send documents.
- The service gives the app a short-lived access token.
- The token unlocks only the approved actions until it expires.
When should you use OAuth?
Use OAuth when your app acts for other people, such as a customer portal where each user connects their own account. OAuth also helps when you need to limit what an app can do, or revoke its access later.
What are the OAuth best practices?
Follow these habits in any OAuth setup.
- Use authorization code flow with Proof Key for Code Exchange (PKCE) for browser and mobile apps.
- Send every call over Hypertext Transfer Protocol Secure (HTTPS) and keep tokens short-lived.
- Register exact redirect addresses and check each one on return.
- Add a random state value to block cross-site request forgery (CSRF).
- Keep secrets and tokens out of logs, URLs and source code.
What is the difference between OAuth and API key?
In API key authentication vs OAuth, the main difference is who grants access and for how long. An API key is a fixed secret tied to your own account, while OAuth issues tokens that a user approves and that expire.
| Point | API key | OAuth |
|---|---|---|
| Set-up | One string, ready in minutes | More steps and a redirect flow |
| Who approves access | You, as the account owner | Each user, on a consent screen |
| Lifetime | Until it expires or you delete it | Short-lived tokens, renewed with refresh tokens |
| Access control | Usually all or nothing | Scopes per token |
| User context | None: every call acts as your account | Each token belongs to one user |
| Fits | Internal tools, scripts, tests | User-facing apps, sensitive data |
The same split holds for OAuth 2.0 vs API key, or API key vs OAuth2, since OAuth 2.0 is the current version. Platforms supporting third-party developers via API keys and OAuth 2.0 scopes often offer both for this reason.
API vs OAuth is a slightly mixed-up comparison. OAuth is one way to prove access to an API, and an API key is another.
Which one fits two common projects?
Here are two everyday cases that settle most OAuth2 vs API key choices.
- An internal dashboard lists BoldSign document statuses for your own team. An API key on your server is quick to set up.
- In a customer portal, customers sign in and sign their own contracts. OAuth gives each user a token limited to their own actions.
What else can you use for API authentication?
API keys are the most common of the alternatives to OAuth for server-to-server calls. Other options include basic authentication with a username and password, and signed tokens your own server issues.
Many APIs accept an API key, OAuth2 or both. The BoldSign API accepts an API key or an OAuth 2.0 bearer token. The BoldSign authentication overview lists the OAuth scopes you can request.
How do you use API key authentication with BoldSign?
Generate a key in the BoldSign web app, then send it in the X-API-KEY header of each request. The steps below follow our API key documentation.
- In the left menu, open API and select API Key.
- Select Generate API Key.
- In the dialog, select Generate Token.
- Copy the key and store it on your server.
You can hold up to four keys at once, with no more than two each for live and sandbox use. Keys stay valid until you delete them, unless you turn on Token Validity and set an end date. Each key carries every scope, so use OAuth when you need narrower access.
What does an API key request look like?
Say your platform helps people hire freelancers, and each hire needs a signed contract. Your Node.js back end can send a document with the key in the header.
const axios = require("axios");
const fs = require("fs");

//Create the payload object
const payload = {
  title: "Freelance Gig Agreement",
  files: ["data:application/{{fileType}};base64,{{base64FileContent}}"], // Your file in base64 format,
  signers: [
    {
      name: "Customer Name",
      emailAddress: "customer@example.com",
      signerOrder: 1,
      formFields: [
        {
          id: "signature1",
          fieldType: "Signature",
          pageNumber: 1,
          bounds: { x: 100, y: 100, width: 200, height: 50 },
          isRequired: true,
        },
      ],
    },
  ],
};

// function to send contract
async function sendContract() {
  const response = await axios.post("https://api.boldsign.com/v1/document/send", payload, {
    headers: {
      "Content-Type": "application/json",
      "accept": "application/json",
      "X-API-KEY": "{your BoldSign API key}",
    },
  });
  console.log("Contract sent! Document ID:", response.data.documentId);
}

sendContract();
The freelancer gets an email with a link to sign. Your app can learn when the contract is signed through webhooks, if you set them up.
How does OAuth work in BoldSign?
Users sign in to their BoldSign account and approve what your app may do, such as send or view documents. Your app then gets an access token limited to those scopes.
- The token stops working when it expires, after one hour in our sample responses.
- It allows only the scopes the user approved.
- Your app never sees the user’s password.
To get credentials, an account admin opens API, selects OAuth Apps and then Create App. After saving, copy the Client ID and Client Secret Key from the app’s details page.
Which BoldSign API OAuth flows can you use?
BoldSign supports three OAuth 2.0 flows. Each fits a different kind of app.
| OAuth flow | How it works | Fits | BoldSign example |
|---|---|---|---|
| Authorization code | The user signs in, your server gets a code and swaps it for a token | Web and mobile apps with a back end | A customer signing portal |
| Implicit | The token comes back to the browser in the URL | Browser-only apps with no back end | A quick signing widget |
| Client credentials | Your server swaps its client ID and secret for a token, with no user step | Back-end jobs and scripts | Automated contract sending |
How does authorization code flow work in BoldSign?
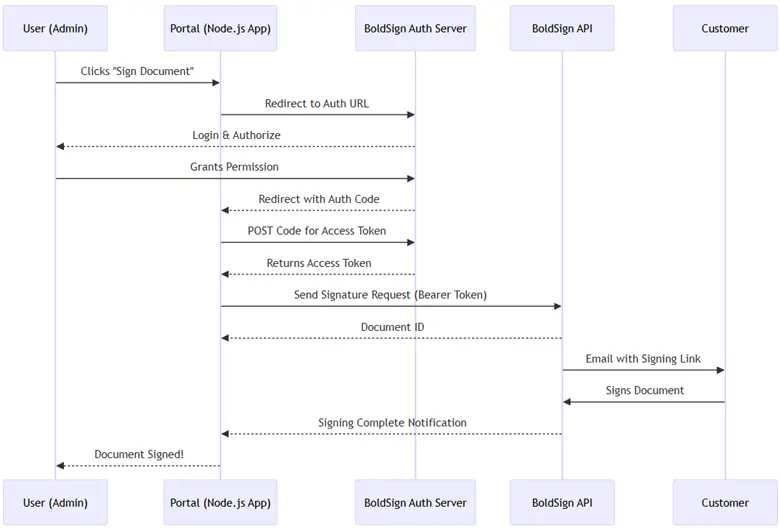
The user signs in to BoldSign in a browser and approves your app. Your server receives a short-lived code and swaps it for an access token.
This flow keeps tokens on your server, and it supports PKCE for apps that cannot keep a secret. Add the offline_access scope to get a refresh token as well.
How does the customer portal use it?
Picture a web app where customers log in, view pending documents and sign them.
- The user selects Sign Documents and goes to the BoldSign sign-in page.
- The user approves the app, and BoldSign sends a code to your server.
- Your server swaps the code for a token and sends the document.
What does the authorization code sample do?
Express vs OAuth is a common mix-up: Express is the Node.js web framework running this server, and OAuth is the sign-in protocol it uses.
The Express server below sends users to the BoldSign sign-in page, swaps the code for a token, then sends a document. We corrected one variable name in the token request, so the sample now runs as written.
const express = require("express");
const axios = require("axios");
const qs = require("querystring");
require("dotenv").config();
const crypto = require("crypto");
function generatePkcePair() {
  // Generate a code verifier
  const codeVerifier = crypto.randomBytes(32).toString("base64url");
  // Create a code challenge based on codeVerifier
  let codeChallenge = crypto.createHash("sha256").update(codeVerifier).digest("base64url");
  // Return both the code verifier and the code challenge
  return { codeVerifier, codeChallenge };
}
const app = express();
const PORT = process.env.PORT || 3000;

// BoldSign OAuth credentials (stored in .env)
const CLIENT_ID = process.env.BOLDSIGN_CLIENT_ID;
const CLIENT_SECRET = process.env.BOLDSIGN_CLIENT_SECRET;
const REDIRECT_URI = "http://localhost:3000/callback";
const AUTH_URL = "https://account.boldsign.com/connect/authorize";
const TOKEN_URL = "https://account.boldsign.com/connect/token";
const API_URL = "https://api.boldsign.com/v1/document/send";
const { codeVerifier, codeChallenge } = generatePkcePair();

// Middleware to parse URL-encoded bodies
app.use(express.urlencoded({ extended: true }));

// Step 1: Redirect to BoldSign Authorization URL
app.get("/login", (req, res) => {
  const authUrl = `${AUTH_URL}?response_type=code&client_id=${CLIENT_ID}&redirect_uri=${REDIRECT_URI}&scope=openid profile email offline_access BoldSign.Documents.All&code_challenge=${codeChallenge}&code_challenge_method=S256`;
  res.redirect(authUrl);
});

// Step 2: Handle Callback and Exchange Code for Token
app.get("/callback", async (req, res) => {
  const { code } = req.query;
  if (!code) {
    return res.status(400).send("Authorization code not provided");
  }
  try {
    const response = await axios.post(
      TOKEN_URL,
      qs.stringify({
        grant_type: "authorization_code",
        code,
        redirect_uri: REDIRECT_URI,
        client_id: CLIENT_ID,
        client_secret: CLIENT_SECRET,
        code_verifier: codeVerifier,
      }),
      { headers: { "Content-Type": "application/x-www-form-urlencoded" } },
    );
    const { access_token } = response.data;

    // Step 3: Use the access token to send a signature request
    const signatureRequest = await sendSignatureRequest(access_token);
    res.send(`Document sent for signature! Request ID: ${signatureRequest.documentId}`);
  } catch (error) {
    console.error(error.response?.data || error.message);
    res.status(500).send("Error during authorization");
  }
});

// Function to send a signature request using BoldSign API
async function sendSignatureRequest(accessToken) {
  const documentData = {
    title: "Customer Agreement",
    files: ["data:application/{{fileType}};base64,{{base64FileContent}}"], // Your file in base64 format
    signers: [
      {
        name: "Customer Name",
        emailAddress: "customer@example.com",
        signerOrder: 1,
        formFields: [
          {
            id: "signature1",
            fieldType: "Signature",
            pageNumber: 1,
            bounds: { x: 100, y: 100, width: 200, height: 50 },
            isRequired: true,
          },
        ],
      },
    ],
  };

  const response = await axios.post(API_URL, documentData, {
    headers: { Authorization: `Bearer ${accessToken}`, "Content-Type": "application/json" },
  });
  return response.data;
}

// Start the server
app.listen(PORT, () => {
  console.log(`Server running on http://localhost:${PORT}`);
});
The authorization code flow documentation covers each parameter.
How does implicit flow work in BoldSign?
The user signs in and approves your app, and BoldSign returns the access token in the browser’s URL fragment. There is no server-side swap, so everything runs in the browser.
To use it, turn on implicit flow when you create the OAuth app and add the web addresses allowed to call it. Implicit flow uses no client secret. It also has no PKCE support.
Is implicit flow safe enough?
Implicit flow suits low-risk, browser-only tools, such as a small signing widget on a static page. The token sits in the browser URL, so keep tokens short-lived, use HTTPS and send a random state value.
We suggest authorization code flow with PKCE wherever you can. It keeps the token out of the browser address bar.
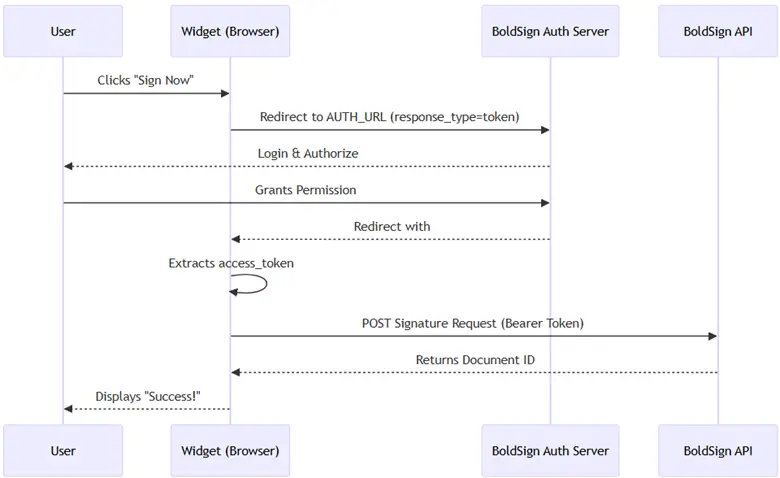
What does the implicit flow sample do?
The page below starts the sign-in, reads the token from the URL fragment and opens a signing page.
<!DOCTYPE html>
<html lang="en">
<head>
   <meta charset="UTF-8">
   <meta name="viewport" content="width=device-width, initial-scale=1.0">
   <title>BoldSign Quick Signature Widget - OAuth Implicit Flow</title>
   <style>
      #signature-widget { width: 100%; height: 400px; border: none; }
      button { padding: 10px 20px; margin: 10px 0; }
   </style>
</head>
<body>
   <h2>Quick Signature Widget with BoldSign</h2>
   <button onclick="startOAuthFlow()">Sign Document</button>
   <iframe id="signature-widget" style="display: none;"></iframe>

   <script>
       const clientId = 'YOUR_CLIENT_ID';
       const redirectUri = 'https://yourapp.com/callback';
       const scope = 'BoldSign.Documents.Create';
       const authorizeUrl = 'https://account.boldsign.com/connect/authorize';
       const documentId = 'YOUR_DOCUMENT_ID';

       function startOAuthFlow() {
           const authUrl = `${authorizeUrl}?response_type=token&client_id=${clientId}&redirect_uri=${redirectUri}&scope=${scope}&state=xyz123&nonce=abc456`;
           window.location.href = authUrl;
       }

       function handleCallback() {
           const hash = window.location.hash.substring(1);
           const params = new URLSearchParams(hash);
           const accessToken = params.get('access_token');

           if (accessToken) {
               openSignatureWidget(accessToken);
           } else {
               console.error('No access token found in URL');
           }
       }

       function openSignatureWidget(accessToken) {
           const widgetUrl = `https://app.boldsign.com/document/sign?access_token=${accessToken}&documentId=${documentId}`;
           window.open(widgetUrl, '_blank');
       }

       if (window.location.hash) {
           handleCallback();
       }
   </script>
</body>
</html>
The implicit flow documentation lists the settings this flow needs.
How does client credentials flow work in BoldSign?
Your server sends its client ID and client secret to the BoldSign token endpoint and gets an access token back. No user signs in, so it suits back-end jobs that run on their own.
The client secret is the weak point here, so treat it like a password. Store it in a secrets vault and rotate it often. This flow returns no refresh token, so your job asks for a new access token when the old one expires.
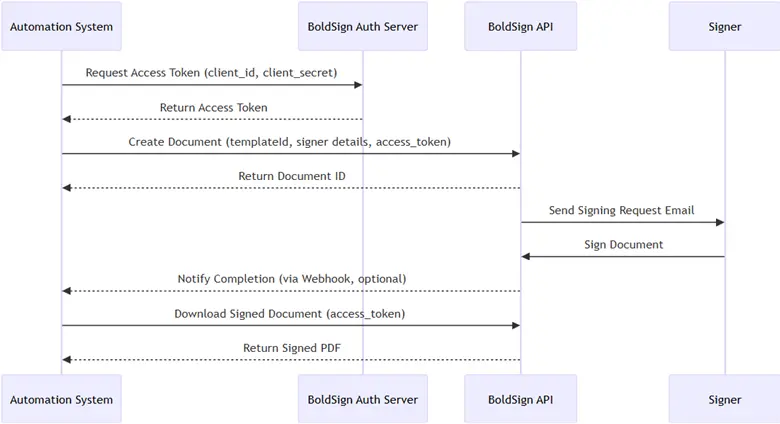
What does the client credentials sample do?
Picture a company that creates and sends contracts for its clients with no person in the loop. Its script gets a token, then sends a document for signature.
const axios = require("axios");

// Configuration
const clientId = "your-client-id"; // Replace with your BoldSign Client ID
const clientSecret = "your-client-secret"; // Replace with your BoldSign Client Secret
const tokenUrl = "https://account.boldsign.com/connect/token";
const apiUrl = "https://api.boldsign.com/v1/document/send";

// Function to get access token using Client Credentials flow
async function getAccessToken() {
  try {
    const authString = Buffer.from(`${clientId}:${clientSecret}`).toString("base64");
    const response = await axios.post(
      tokenUrl,
      new URLSearchParams({
        grant_type: "client_credentials",
        scope: "BoldSign.Documents.All BoldSign.Templates.All",
        client_id: clientId,
        client_secret: clientSecret,
      }),
      {
        headers: {
          Authorization: `Basic ${authString}`,
          "Content-Type": "application/x-www-form-urlencoded",
        },
      },
    );
    return response.data.access_token;
  } catch (error) {
    console.error("Error fetching access token:", error.response?.data || error.message);
    throw error;
  }
}

// Function to create and send a document
async function createAndSendDocument(accessToken) {
  try {
    const response = await axios.post(
      apiUrl,
      {
        title: "Customer Agreement",
        files: ["data:application/{{fileType}};base64,{{base64FileContent}}"], // Your file in base64 format,
        signers: [
          {
            name: "Customer Name",
            emailAddress: "customer@example.com",
            signerOrder: 1,
            formFields: [
              {
                id: "signature1",
                fieldType: "Signature",
                pageNumber: 1,
                bounds: { x: 100, y: 100, width: 200, height: 50 },
                isRequired: true,
              },
            ],
          },
        ],
      },
      { headers: { Authorization: `Bearer ${accessToken}`, "Content-Type": "application/json" } },
    );
    console.log("Document created successfully:", response.data.documentId);
    return response.data.documentId;
  } catch (error) {
    console.error("Error creating document:", error.response?.data || error.message);
    throw error;
  }
}

// Main function to execute the flow
async function automateDocumentProcessing() {
  try {
    // Step 1: Get access token
    const accessToken = await getAccessToken();
    // Step 2: Create and send document
    const documentId = await createAndSendDocument(accessToken);
    console.log("Document processing initiated. Document ID:", documentId);
  } catch (error) {
    console.error("Automation failed:", error);
  }
}
// Run the automation
automateDocumentProcessing();
You could extend the script to loop over a list of recipients, and add webhooks to react when each contract is signed. The client credentials flow documentation has the full request format.
Which API key flow or OAuth flow should you choose?
Match the method to who is acting and where your code runs.
- Pick an API key when your own server talks to your own account.
- Pick authorization code flow when users sign in to an app with a back end.
- Pick implicit flow for a small, low-risk tool that runs only in the browser.
- Pick client credentials flow for a back-end job with no user present.
The BoldSign OAuth 2.0 guide has the full setup for each flow. Our post on OAuth 2.0 application integration walks through a complete app.
Which BoldSign plan do you need for API access?
Every BoldSign plan, including the free one, includes sandbox API access for testing. Live API calls need the Enterprise API plan, from $30 a month with 40 envelopes, billed yearly.
The Enterprise API plan also includes webhooks and embedded signing. Prices are in USD, as of November 2026, and the pricing page lists every plan.
How do you start testing API keys vs OAuth with BoldSign?
The quickest way to compare is to try both against the sandbox. Here are three next steps.
- Create a free API sandbox account and generate a sandbox key.
- Request a demo to talk through your integration with our team.
- Read how BoldSign for e-signatures fits the rest of your stack, or visit the BoldSign home page.
Frequently asked questions
Which is better, API key or OAuth?
Neither wins in every case. An API key suits a back-end tool that talks to your own account. OAuth suits an app where other people connect their own accounts and approve what it may do.
Is there such a thing as an OAuth API key?
Not quite. OAuth uses a client ID and client secret to identify your app, then hands out short-lived access tokens. People often call these OAuth keys, but they work differently from a single static API key.
What is an OAuth consumer key?
Consumer key is the older OAuth 1.0 name for the public ID of an app. OAuth 2.0 calls it the client ID. In BoldSign, you copy the Client ID and Client Secret Key from your OAuth app's details page.
What changed in OAuth vs OAuth 2.0?
OAuth 2.0 replaced the first version with a simpler design built on bearer tokens sent over HTTPS. It also added named flows, such as authorization code and client credentials. BoldSign uses OAuth 2.0.
API key vs client ID and secret: what is the difference?
An API key is sent as is with every request. A client ID and secret are swapped for a short-lived access token first, and only the token travels with each API call.
API token vs OAuth token: what is the difference?
In the OAuth vs API token comparison, people use API token to mean a static key, like a BoldSign API key. An OAuth token is issued for a set time and a set of scopes, and you can get a new one with a refresh token.
Do BoldSign API keys expire?
Only if you set an end date. Keys stay valid until you delete them by default, and you can turn on Token Validity to give a key an expiry date.
Does BoldSign support refresh tokens?
Yes, in the authorization code flow. Add the offline_access scope to get one. Each refresh token works once, and every refresh returns a new one.

BoldSign Team
The official team behind BoldSign—the simple, secure eSignature solution trusted by businesses worldwide. Our platform helps individuals and teams create, sign, and manage documents effortlessly while maintaining full compliance. Experience BoldSign yourself with a free trial or request a personalized demo to see it in action.
More posts by BoldSign Team