How to Use BoldSign OAuth 2.0 for Application Integration
 Mohan Ravi
TL;DR: OAuth 2.0 lets your app call BoldSign with short-lived access tokens instead of passwords. Use the authorization code flow with PKCE (Proof Key for Code Exchange) when users sign in, and the client credentials flow for server jobs. The BoldSign eSignature API accepts both.
Say your app needs to list a customer’s contracts or send an offer letter for signature. Asking customers for their BoldSign password is risky, and storing it is worse.
OAuth 2.0 solves that. This guide explains the idea in plain terms. Then it builds a small Python and Flask app that uses BoldSign OAuth 2.0 to read documents and send a template.
What is OAuth 2.0?
OAuth 2.0 is an authorization framework that gives one app limited access to your account in another app. The app gets a token with set permissions and never sees your login details.
You have probably used it already. Sign in to a new app with your Google account, and the app sends you to Google.
You sign in there and approve what the app may see, such as your email address. Google then hands the app an access token for just that data.
Who are the four roles in OAuth 2.0?
Every OAuth exchange has the same four parties. Here is how they map to BoldSign.
- Resource owner: you, the person who owns the BoldSign account and approves access.
- Client: the app that wants to act for you. It must be registered with the authorization server first.
- Resource server: the BoldSign API, which holds your documents and answers only requests with a valid token.
- Authorization server: our sign-in service, which checks who you are, then issues and revokes tokens.
Think of the authorization server as the front desk of a hotel. It checks your ID and hands out a key card that opens only your room.
Which OAuth 2.0 flows does BoldSign support?
We support three OAuth 2.0 flows, also called grant types. Each one is a different way for an app to get an access token.
- Authorization code flow with PKCE, for apps with a server where users sign in.
- Client credentials flow, for server-to-server jobs with no user present.
- Implicit flow, for single-page apps that run only in the browser.
This guide covers the first two with Python. Our guide on OAuth vs sender identities walks through all three flows in Node.js, including the implicit flow.
How do you create a BoldSign OAuth app?
Every flow starts with an OAuth app, which gives you a client ID and client secret. You need an account admin role to create one.
No account yet? Sign up for a free sandbox account to test without paying.
1. In the BoldSign web app, open API in the left menu, select OAuth Apps, then select Create App in the top-right corner.
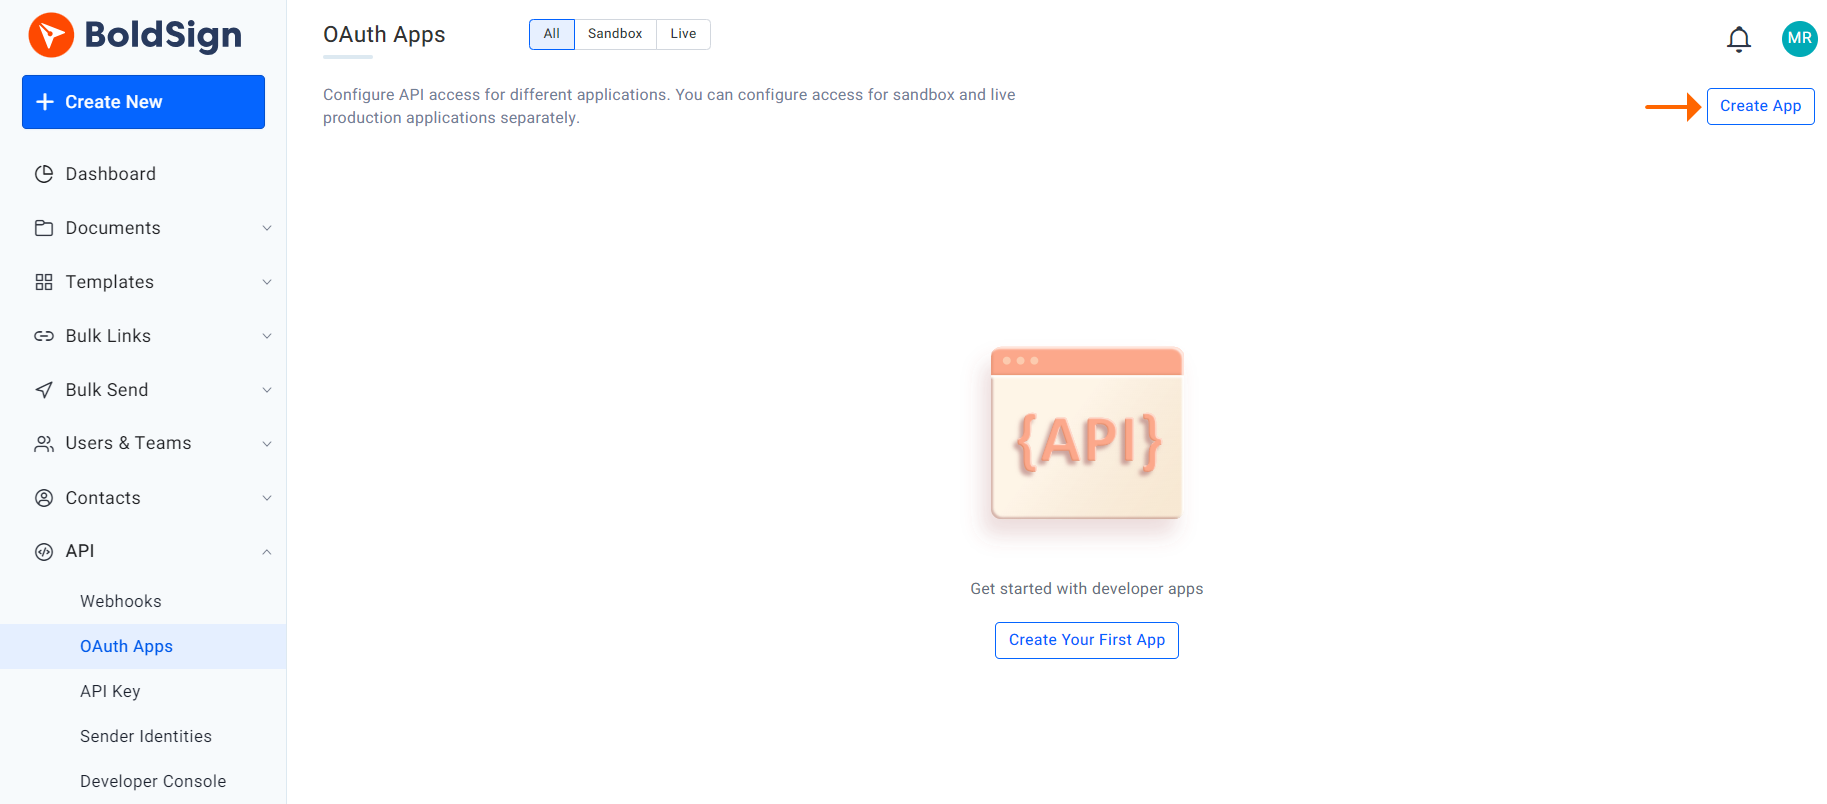
2. Enter an Application Name and a Redirect URL, then select Save. Our local app runs on port 3000, so we use http://localhost:3000/redirect.
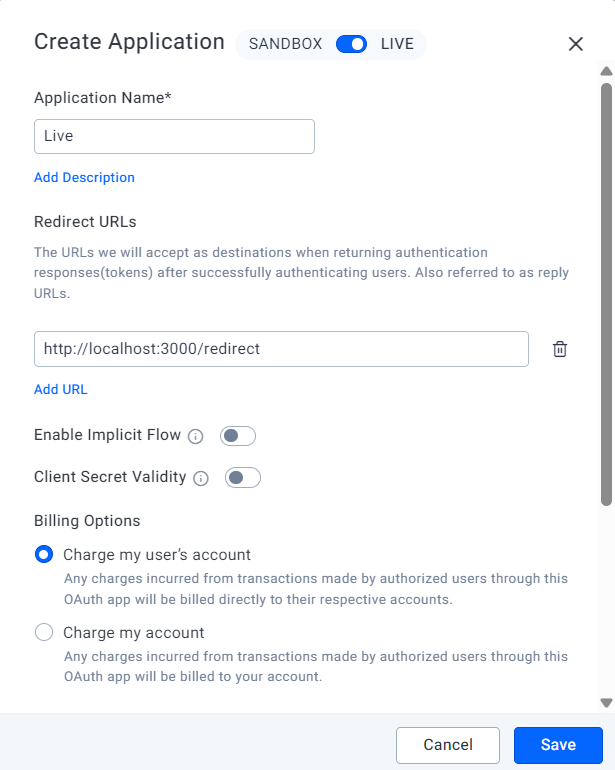
The dialog also sets Client Secret Validity and a Billing option. “Charge my account” bills you for API use, and “Charge my user’s account” bills each user who signs in.
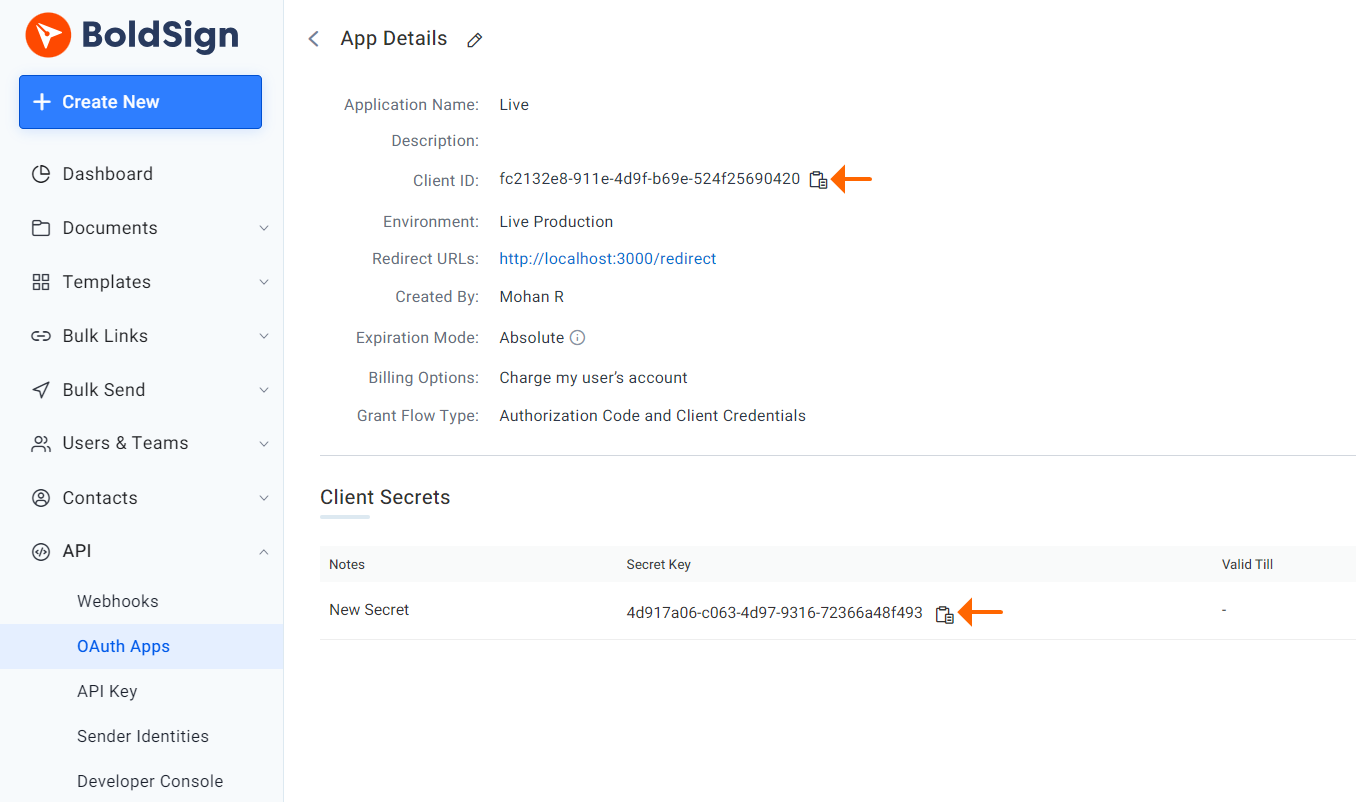
3. Copy the Client ID and Client Secret Key from the app details page. Store them on your server, never in browser code.
How does the authorization code flow work in BoldSign?
The user signs in to BoldSign and approves your app, and we send a short code back to your server. Your server then swaps that code for an access token.
This flow suits server-side and mobile apps that call the BoldSign API for their users. PKCE is required. Your app sends a hashed secret at the start and the plain secret at the end, so a stolen code is useless on its own.
We will build a small Flask app. The user signs in with their BoldSign account, and the app lists the documents in that account.
How do you create the PKCE code verifier and challenge?
The code verifier is a random string, and the code challenge is its Secure Hash Algorithm (SHA) 256 hash. Both are encoded in URL-safe Base64 so they can travel in the sign-in link.
def generate_pkce_pair():
    code_verifier = secrets.token_urlsafe(32)
    code_challenge = base64.urlsafe_b64encode(
        hashlib.sha256(code_verifier.encode("utf-8")).digest()
    ).decode("utf-8")
    code_challenge = code_challenge.replace("=", "")
    return code_verifier, code_challenge
How do you set up the Flask app?
Install Flask and Requests with pip install flask requests. Then create app.py for the server code, and a templates folder that holds home.html and documents.html.
The samples below show only the important parts. Start with the Flask app and a home route that returns the home page.
app = Flask(__name__)
app.secret_key = secrets.token_hex(16)  # Set a secret key for session management


@app.route("/")
def home():
    return render_template("home.html")


if __name__ == "__main__":
    app.run(debug=True, port=3000)
How do you send the user to BoldSign to sign in?
Add a login route that builds the authorization link and redirects the user to it. The route also saves the code verifier and state in the session.
The link carries these parameters:
response_typeset tocode, plus yourclient_id.state, a random value that blocks cross-site request forgery (CSRF).scope, the permissions your app asks for.redirect_uri, the uniform resource identifier (URI) saved in your OAuth app.code_challengeandcode_challenge_methodset toS256.
Our sample asks for openid, profile, email, offline_access and BoldSign.Documents.All, which gives full control over documents. The scopes list shows narrower options, such as template read access.
CLIENT_ID = os.environ.get("CLIENT_ID")
CLIENT_SECRET = os.environ.get("CLIENT_SECRET")
AUTHORIZE_URL = "https://account.boldsign.com/connect/authorize"
TOKEN_URL = "https://account.boldsign.com/connect/token"
DOCUMENT_LIST_URL = "https://api.boldsign.com/v1/document/list"
USER_AGENT = "YourAppName/1.0"


def generate_pkce_pair():
    code_verifier = secrets.token_urlsafe(32)
    code_challenge = base64.urlsafe_b64encode(
        hashlib.sha256(code_verifier.encode("utf-8")).digest()
    ).decode("utf-8")
    code_challenge = code_challenge.replace("=", "")  # Remove padding
    return code_verifier, code_challenge


@app.route("/login")
def login():
    code_verifier, code_challenge = generate_pkce_pair()
    state = secrets.token_urlsafe(16)

    session["code_verifier"] = code_verifier
    session["state"] = state

    params = {
        "response_type": "code",
        "client_id": CLIENT_ID,
        "state": state,
        "scope": "openid profile email offline_access BoldSign.Documents.All",
        "redirect_uri": url_for("auth_redirect", _external=True),
        "code_challenge": code_challenge,
        "code_challenge_method": "S256",
    }

    authorize_url = f"{AUTHORIZE_URL}?{urllib.parse.urlencode(params)}"
    return redirect(authorize_url)
Next, add a login button to home.html.
<a
    href="{{ url_for('login') }}"
    class="login-button"
>
    Login
</a>
The button opens the BoldSign sign-in page. After signing in, the user sees a consent screen that lists the permissions your app wants.
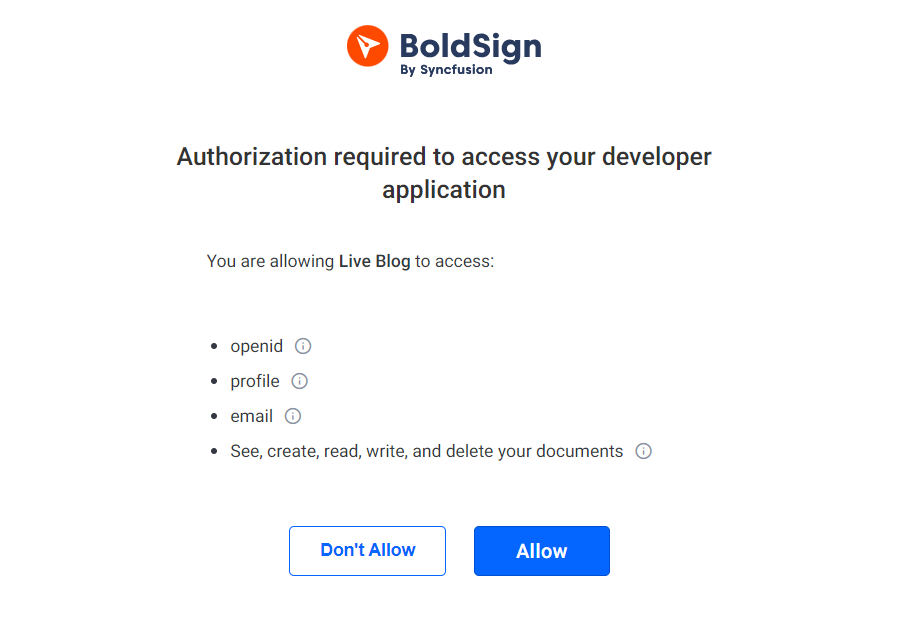
Once the user allows access, we send them back to your redirect URI with a code.
How do you swap the code for an access token?
The redirect route first checks that the returned state matches the saved one. A mismatch can mean a CSRF attack, so the route stops with an error.
With a valid state, the route sends the code to the token URL. The request also carries the client ID, client secret, redirect URI and code verifier. On success, the route saves the access token and refresh token and opens the documents page.
@app.route("/redirect")
def auth_redirect():
    if request.args.get("state") != session.get("state"):
        return "State mismatch. Possible CSRF attack.", 400

    code = request.args.get("code")
    token_response = requests.post(
        TOKEN_URL,
        data={
            "grant_type": "authorization_code",
            "client_id": CLIENT_ID,
            "client_secret": CLIENT_SECRET,
            "code": code,
            "redirect_uri": url_for("auth_redirect", _external=True),
            "code_verifier": session.get("code_verifier"),
        },
        headers={"User-Agent": USER_AGENT},
    )

    if token_response.status_code == 200:
        token_data = token_response.json()
        access_token = token_data.get("access_token")
        session["access_token"] = access_token
        session["refresh_token"] = token_data.get("refresh_token")
        return redirect(url_for("documents"))
    else:
        return f"Error exchanging code for token: {token_response.text}", 400
How do you list the user’s documents?
Send the access token in the Authorization header with the Bearer scheme. Here, a fetch_documents route calls the document list endpoint, /v1/document/list, and returns the document titles.
@app.route("/documents")
def documents():
    return render_template("documents.html")


@app.route("/fetch_documents")
def fetch_documents():
    access_token = session.get("access_token")
    if not access_token:
        return jsonify({"error": "No access token found. Please log in again."}), 401

    headers = {"Authorization": f"Bearer {access_token}", "User-Agent": USER_AGENT}

    response = requests.get(DOCUMENT_LIST_URL, headers=headers)

    if response.status_code == 200:
        documents = response.json().get("result", [])
        document_titles = [doc.get("messageTitle", "Untitled") for doc in documents]
        return jsonify(document_titles)
    else:
        return (
            jsonify({"error": f"Failed to fetch documents: {response.text}"}),
            response.status_code,
        )
Then add a Fetch Documents button to documents.html that calls the route and shows the titles.
<h1>Your Documents</h1>
<button id="fetchDocuments">Fetch Documents</button>
<div id="documentList"></div>

<script>
    document.getElementById('fetchDocuments').addEventListener('click', function () {
        fetch('/fetch_documents')
            .then((response) => response.json())
            .then((data) => {
                const listDiv = document.getElementById('documentList');
                listDiv.innerHTML = '';

                if (Array.isArray(data)) {
                    data.forEach(title => {
                        const p = document.createElement('p');
                        p.textContent = title;
                        listDiv.appendChild(p);
                    });
                } else if (data.error) {
                    listDiv.textContent = data.error;
                }
            })
            .catch((error) => {
                document.getElementById('documentList').textContent = 'An error occurred while fetching documents.';
                console.error('Error:', error);
            });
    });
</script>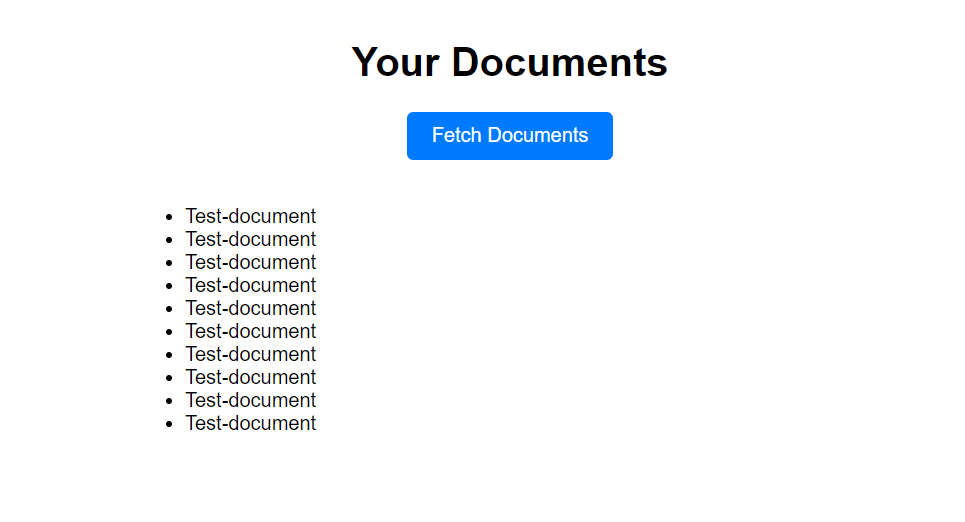
How do you refresh an expired BoldSign access token?
Send the refresh token to the token URL with grant_type set to refresh_token. We return a new access token, so the user stays signed in.
You get a refresh token only when you ask for the offline_access scope. Each refresh token works once, and every refresh returns a new one, so the sample saves it each time.
def refresh_token():
    refresh_token = session.get("refresh_token")
    if not refresh_token:
        return None

    refresh_response = requests.post(
        TOKEN_URL,
        data={
            "grant_type": "refresh_token",
            "client_id": CLIENT_ID,
            "client_secret": CLIENT_SECRET,
            "refresh_token": refresh_token,
        },
        headers={"User-Agent": USER_AGENT},
    )

    if refresh_response.status_code == 200:
        token_data = refresh_response.json()
        session["access_token"] = token_data.get("access_token")
        if "refresh_token" in token_data:
            session["refresh_token"] = token_data.get("refresh_token")
        return session["access_token"]
    else:
        # If refresh fails, clear the session and require re-login
        session.clear()
        return None
Call refresh_token() when an API call reports an expired token. The user signs in again when the refresh token has expired too.
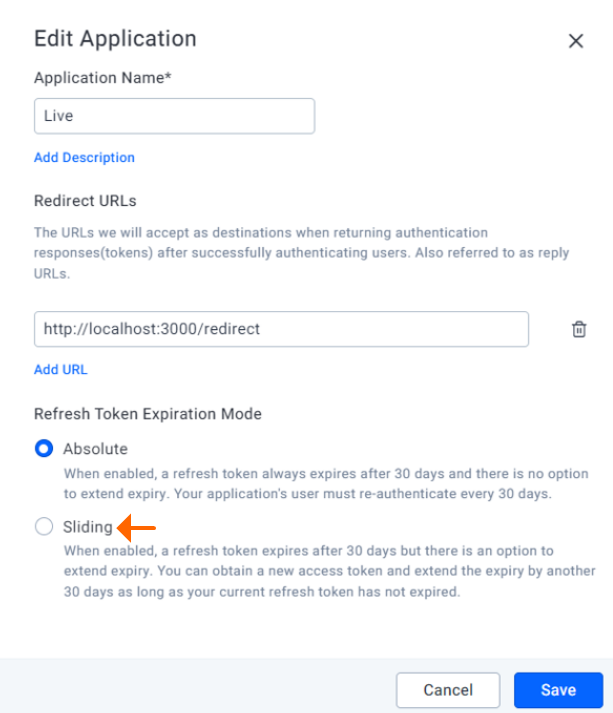
By default, a refresh token expires 30 days after we issue it. Switch your OAuth app to sliding expiration, and each refresh adds another 30 days.
What can go wrong with BoldSign OAuth tokens?
Most token problems come from three causes: a dead refresh token, server clocks that drift, or a request sent to the wrong place. Each one has a clear sign to look for.
What happens when a refresh fails with no user present?
In a web app, a failed refresh is easy to spot. The sample clears the session and the user sees the login page again.
A background job is different. A scheduled task with a stored refresh token runs with nobody watching. When refresh_token() returns None, the job quietly stops sending signature requests.
Treat that None as an alert. Log it and notify someone the same day, before a customer asks why nothing went out.
Why is a valid token rejected as expired?
Clock drift is a common cause. Token expiry times are checked against the clock of whichever server reads them, so a few seconds of drift can reject a valid token.
This matters only when your own code checks token expiry. Allow a small tolerance there, and keep your servers synced to a time service. A token rejected seconds before its expected expiry points to the clock, not the token lifetime.
What do the 400 and 401 errors mean?
Our troubleshooting guide covers both. A 400 means the request had bad data, with malformed JavaScript Object Notation (JSON) or missing fields.
A 401 means the API key or OAuth token is invalid or expired. It also appears when you call the wrong data center for the account, so check the API address before you rotate secrets.
OAuth 2.0 token endpoints report errors in an error field. Two common values are invalid_grant, for a code or refresh token that no longer works, and invalid_client, for a wrong client ID or secret.
{
  "error": "invalid_grant"
}
How does the client credentials flow work in BoldSign?
Your server sends its client ID and client secret to the token URL and gets an access token back. No user signs in, and the token works as the account that owns the OAuth app.
Use it for automation between your own systems. For example, your HR software can send offer letters from a BoldSign template whenever you add a new hire.
How do you get a token with client credentials?
Reuse the client ID and client secret from the earlier example. This flow skips the authorization link, because no user needs to approve anything.
Set up the token URL and the template send URL first.
CLIENT_ID = os.environ.get("CLIENT_ID")
CLIENT_SECRET = os.environ.get("CLIENT_SECRET")
TOKEN_URL = "https://account.boldsign.com/connect/token"
TEMPLATE_SEND_URL = "https://api.boldsign.com/v1/template/send"

USER_AGENT = "YourAppName/1.0"
The get_access_token function then sends the client ID and secret with grant_type set to client_credentials. This flow returns no refresh token, so call the function again when the token expires.
def get_access_token():
    params = {
        "grant_type": "client_credentials",
        "client_id": CLIENT_ID,
        "client_secret": CLIENT_SECRET,
    }

    headers = {"User-Agent": USER_AGENT}

    response = requests.post(TOKEN_URL, data=params, headers=headers)
    response_data = response.json()

    if "error" in response_data:
        raise Exception(response_data["error"])

    access_token = response_data["access_token"]

    return access_token
How do you send a template for signature with the token?
The add_employee route gets a token, then sends a signature request from a template. The template already holds the fields, so the request names only the signer.
@app.route("/add_employee")
def add_employee():
    access_token = get_access_token()

    headers = {"Authorization": f"Bearer {access_token}", "User-Agent": USER_AGENT}

    payload = {
        "roles": [
            {
                "roleIndex": 1,
                "signerName": "Alex",
                "signerEmail": "alex@example.com",
            }
        ],
    }

    url = TEMPLATE_SEND_URL + "?templateId=130cced2-9749-4692-953a-ca623135fefd"
    response = requests.post(url, headers=headers, json=payload)

    if response.status_code == 201:
        return jsonify(response.json())

    return jsonify({"error": response.json()}), 400
Our sample template has one signer role. Swap in your own template ID and roles. Then add an Add button to home.html that calls the route.
<h1>Add employee</h1>
<button
    id="send_document"
    class="send_document"
>
    Add
</button>
<div id="status"></div>

<script>
    document.getElementById('send_document').addEventListener('click', function () {
        fetch('/add_employee')
            .then((response) => response.json())
            .then((data) => {
                // handle response
            })
            .catch((error) => {
                // handle error
            });
    });
</script>
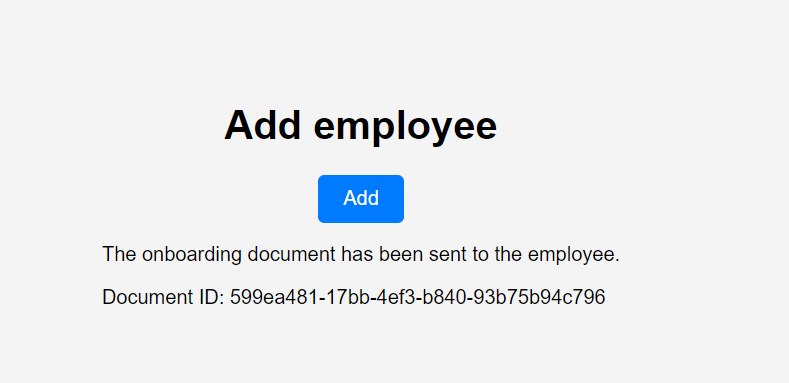
A click sends the signature request, and the response holds the ID of the new document.
For more Python samples, our Angular and Python example repository on GitHub shows how to send documents and embed signing with an API key.
Which BoldSign plan do you need for OAuth API access?
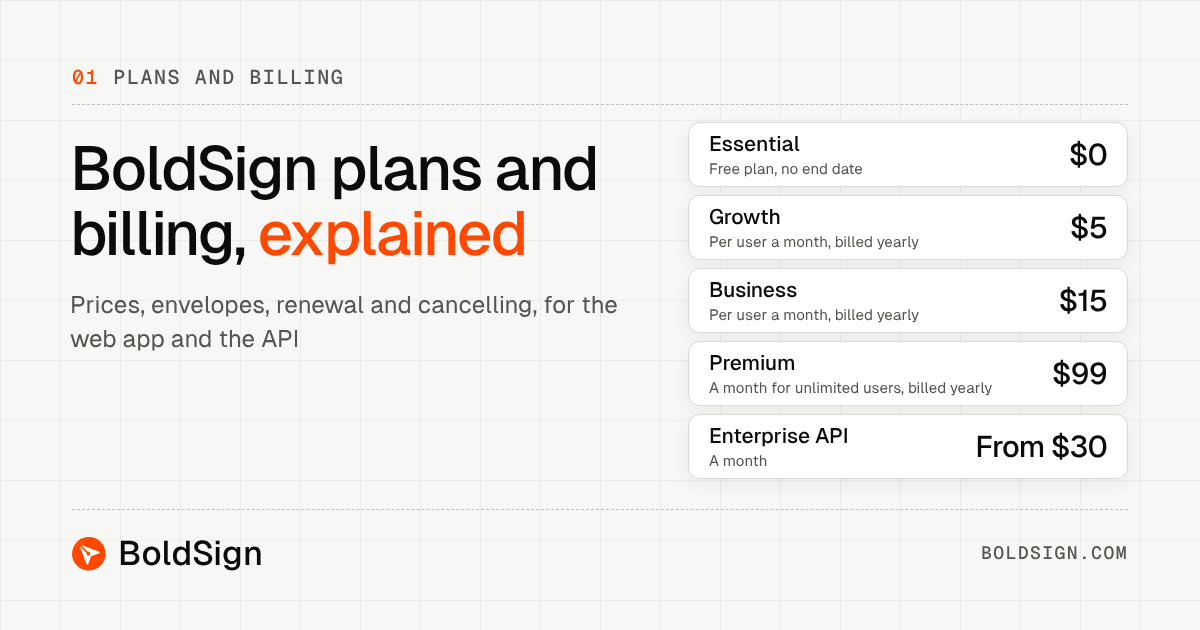
Every BoldSign plan, including the free one, includes sandbox API access for testing. Live API calls need the Enterprise API plan, from $30 a month with 40 envelopes, billed yearly.
Extra envelopes on the Enterprise API plan cost $0.75 each, and templates are unlimited. Prices are in USD, as of November 2026, and the pricing page lists every plan.
How do you start building with BoldSign OAuth 2.0?
The quickest path is to run the sample against the sandbox. Here are three next steps.
- Create a free API sandbox account and set up your first OAuth app.
- Request a demo to talk through your integration with our team.
- Read API key vs OAuth to check which method fits your app.
Frequently asked questions
What is OAuth 2.0 used for in BoldSign?
OAuth 2.0 lets your app call the BoldSign API with a short-lived access token instead of a password. A user approves the access, or your server signs in with its own client ID and secret.
Is PKCE required for the BoldSign authorization code flow?
Yes. Our authorization code flow asks for a code challenge in the sign-in link and the matching code verifier at the token step. Proof Key for Code Exchange (PKCE) stops a stolen code from being swapped for tokens.
How long does a BoldSign access token last?
Our documentation examples show an expires_in value of 3600 seconds, which is one hour. Read expires_in from each token response rather than hard-coding a lifetime.
How do I get a refresh token from BoldSign?
Add the offline_access scope when you send the user to sign in. Refresh tokens come only with the authorization code flow, and each one works for a single refresh.
Does the client credentials flow need a user to sign in?
No. Your server sends its client ID and client secret to the token endpoint and gets an access token straight back. The token works as the account that owns the OAuth app.
Which scopes can a BoldSign OAuth app request?
You can ask for full or partial access to documents, templates, users, teams and sender identities, such as BoldSign.Documents.All. Ask for the smallest set your app needs.
Why does BoldSign return a 401 error for my OAuth token?
A 401 means the token is invalid or expired, or the request went to the wrong data center. Renew the token, then check that your API address matches the region of the account.
Can I test BoldSign OAuth for free?
Yes. A free developer sandbox account lets you create OAuth apps and call the API. Signed sandbox documents carry a watermark, and we delete them 14 days after creation.

Mohan Ravi
A seasoned tech enthusiast with over 5 years of hands-on experience in the ever-evolving world of software development. From mastering the intricacies of .NET to harnessing the power of JavaScript, Mohan’s expertise extends across the realms of full-stack development. A true problem-solver and a passionate coder at heart, he is always eager to explore new technologies and bring innovative ideas to life.
More posts by Mohan Ravi