Automate BoldSign User Provisioning with Microsoft Entra ID
 Ranjitha Vazhivittan
TL;DR: You can connect Microsoft Entra ID to BoldSign so it creates, updates and turns off user accounts for you. You generate a token in BoldSign, add a custom app in Entra ID and start provisioning. Our eSignature for enterprise page shows the other admin controls you get.
A company rolls out new electronic signature software to 200 staff. Each new hire needs an account, each promotion changes a job title, and each leaver must lose access on their last day. Doing that by hand in two systems is slow, and a missed leaver is a security gap.
Automatic user provisioning hands that work to the identity system you already run, using System for Cross-domain Identity Management (SCIM). This guide explains what it means, then walks through the setup between Microsoft Entra ID and BoldSign.
What does SCIM provisioning mean?
SCIM provisioning means your identity system keeps user accounts in other apps up to date for you. SCIM is an open standard that apps use to share user details.
Think of a staff badge office. When someone joins, the office prints a badge; when they leave, it switches the badge off. You never visit each door to add or remove a name.
User provisioning works the same way. Microsoft Entra ID is the badge office, and BoldSign is one of the doors. Entra ID sends each change to BoldSign over SCIM 2.0.
What does user provisioning do in BoldSign?
Once it is set up, Entra ID manages the whole user lifecycle in BoldSign. You add, change or remove a person in one place.
- We email each new user an invitation to join BoldSign.
- Names, job titles, phone numbers and departments update when they change in Entra ID.
- People you remove in Entra ID lose access to BoldSign.
- Roles such as Admin, Member and TeamAdmin can come from Entra ID app roles.
What do you need before you start?
You need admin access on both sides and a token from BoldSign. Our help article on how to set up Microsoft Entra ID in BoldSign covers the BoldSign side.
- An account administrator login for BoldSign.
- Access to the Microsoft Entra admin center.
- The tenant URL and secret token, which you generate in BoldSign.
How do you connect Microsoft Entra ID to BoldSign?
The setup has six short stages, from the token to the first sync. Our help article on installing and configuring Microsoft Entra ID lists every setting.
Step 1: Generate the tenant URL and token in BoldSign
- Sign in to BoldSign and go to Settings > Identity Management > User Provisioning.
- Find the tenant URL and select Generate Token.
- Copy the token straight away and store it somewhere safe.
- Keep up to two active tokens for rotation, and delete a token to switch off its endpoint.
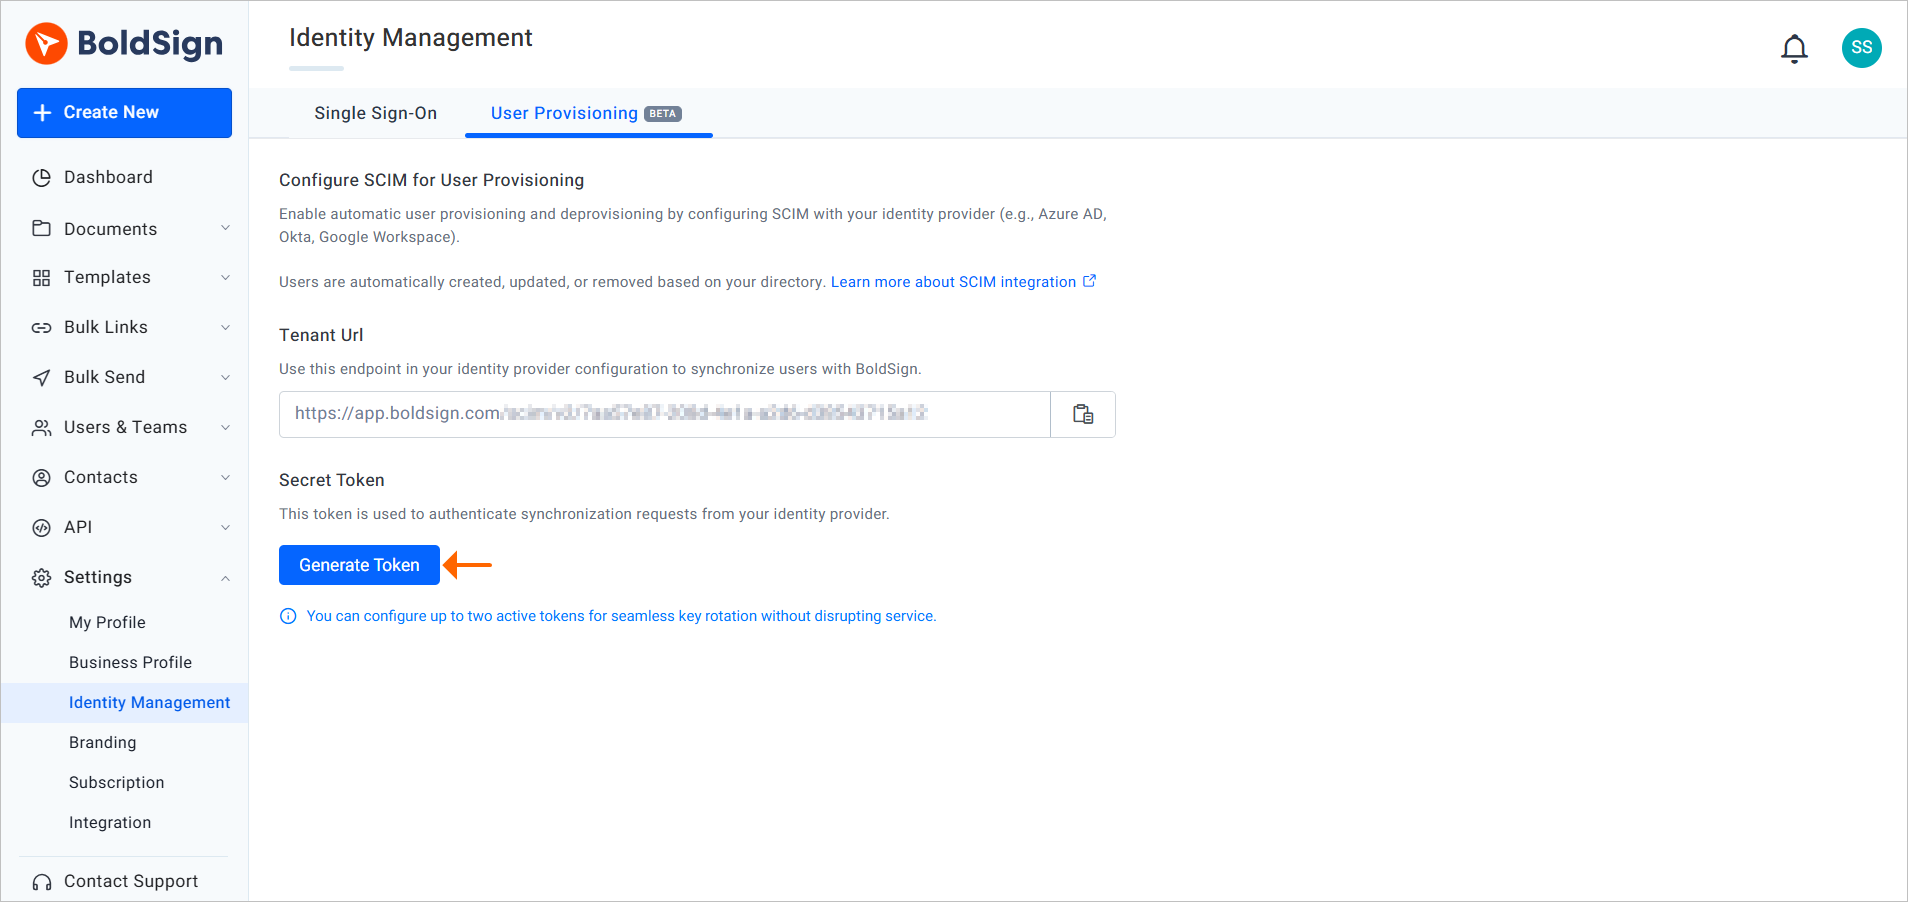
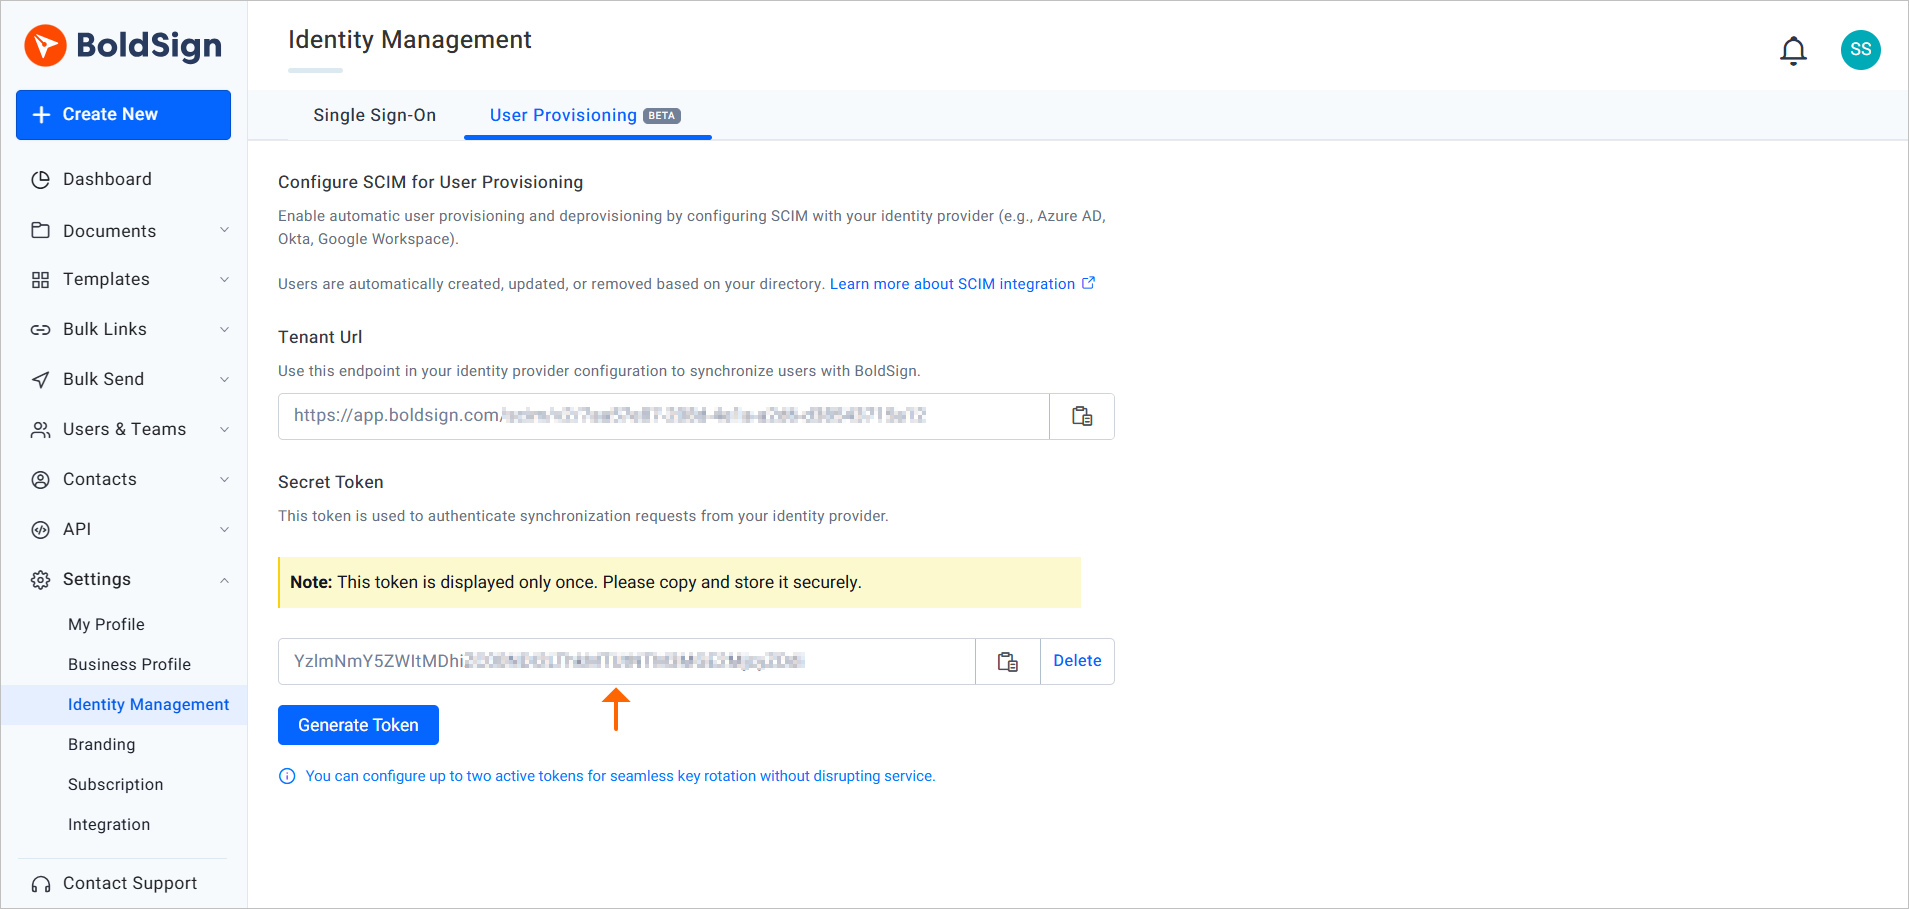
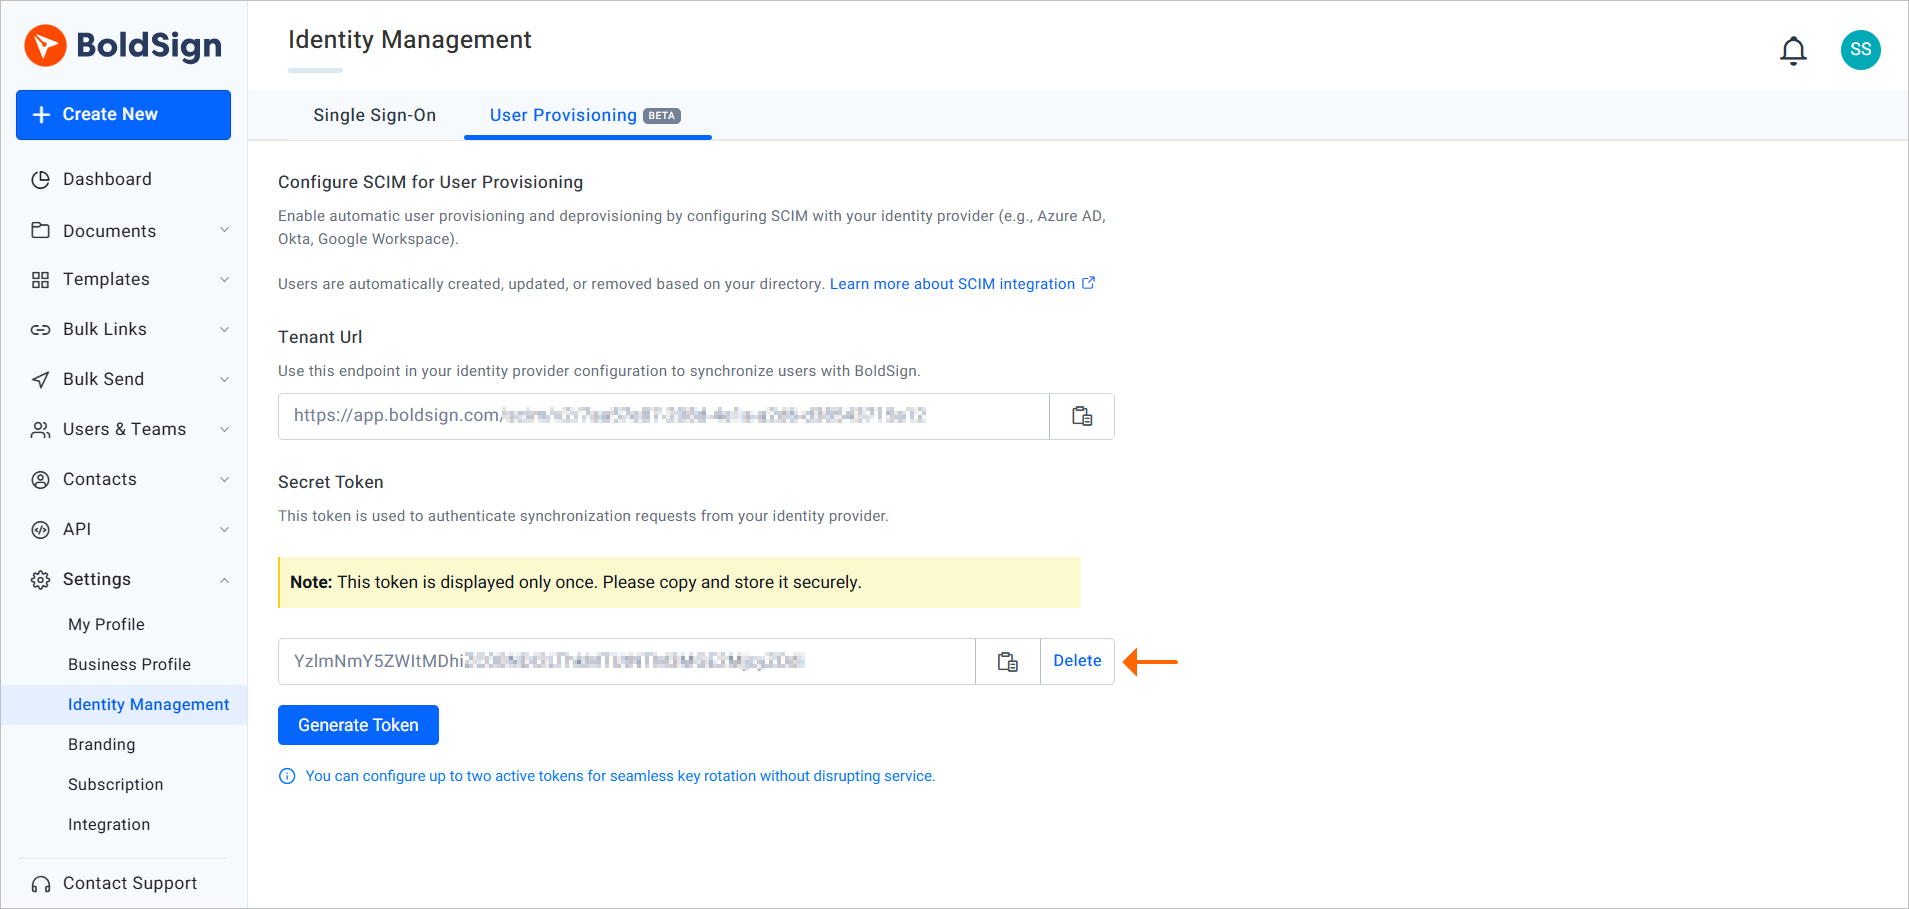
We show the token only once. After you leave the page, you see only a hashed value, so generate a new token if you lose it.
Step 2: Create a custom app in Entra ID
- In the Microsoft Entra admin center, go to Enterprise applications and select New application.
- Select Create your own application, then the option to integrate an app you do not find in the gallery.
- Enter a name and select Create.
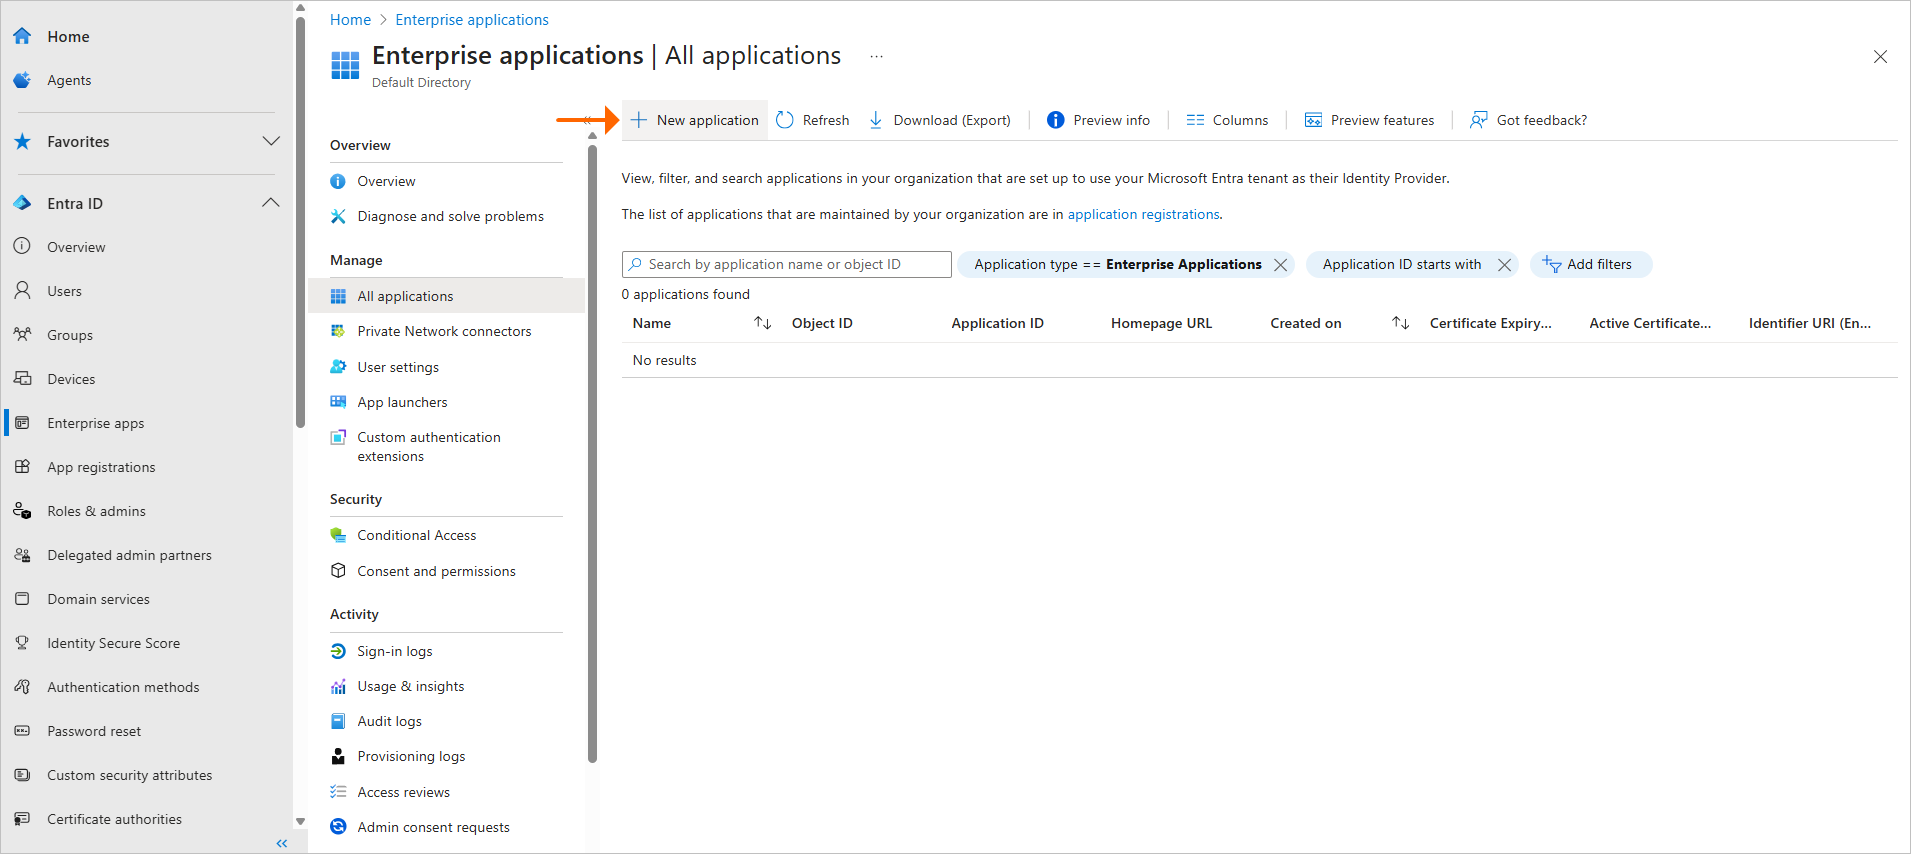
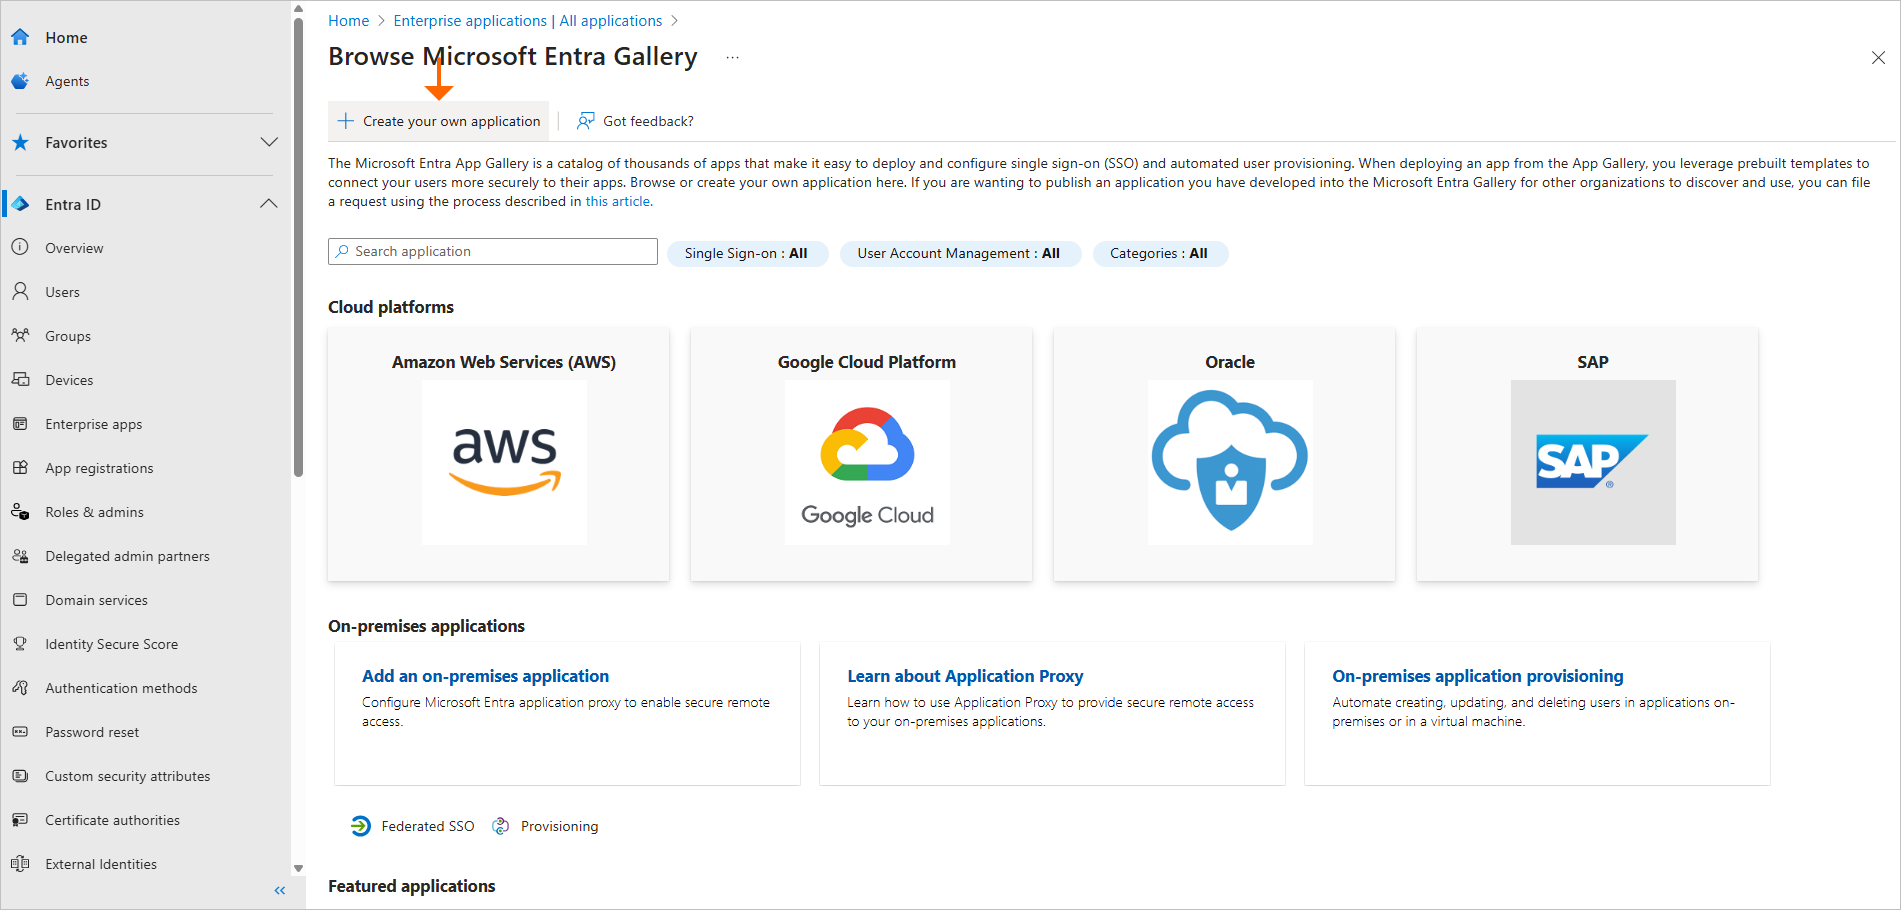
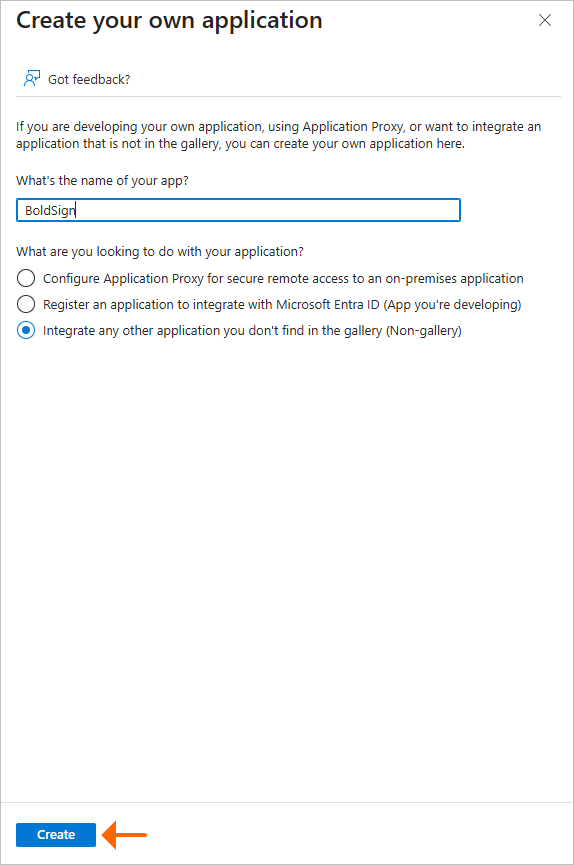
Entra ID uses this app to send user changes to BoldSign.
Step 3: Link the app to BoldSign
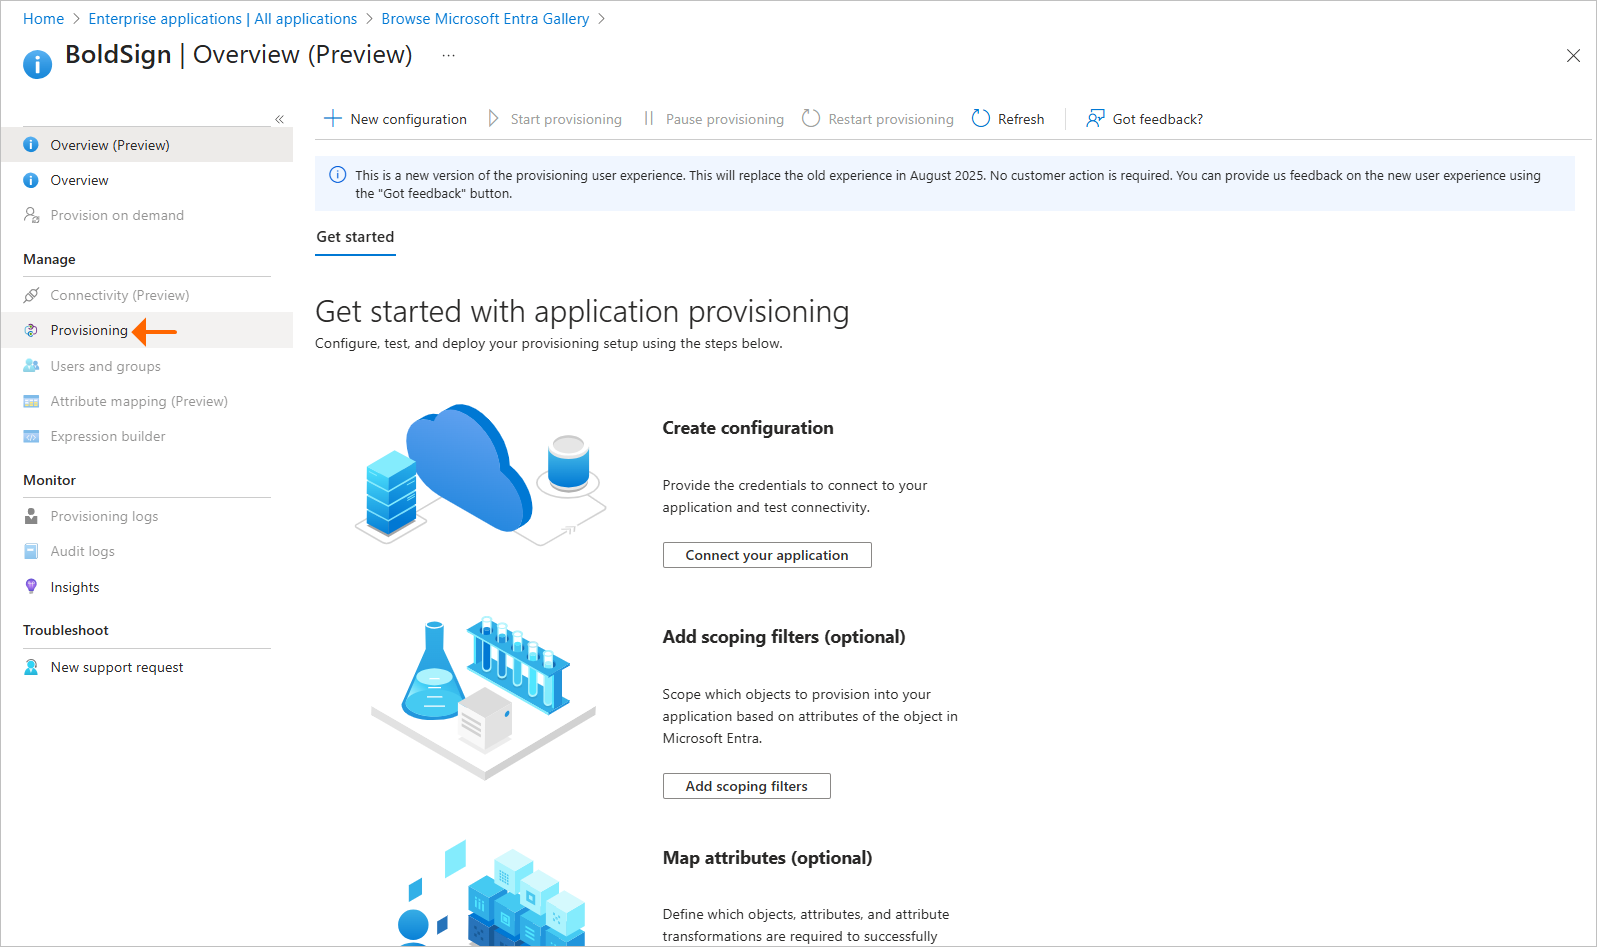
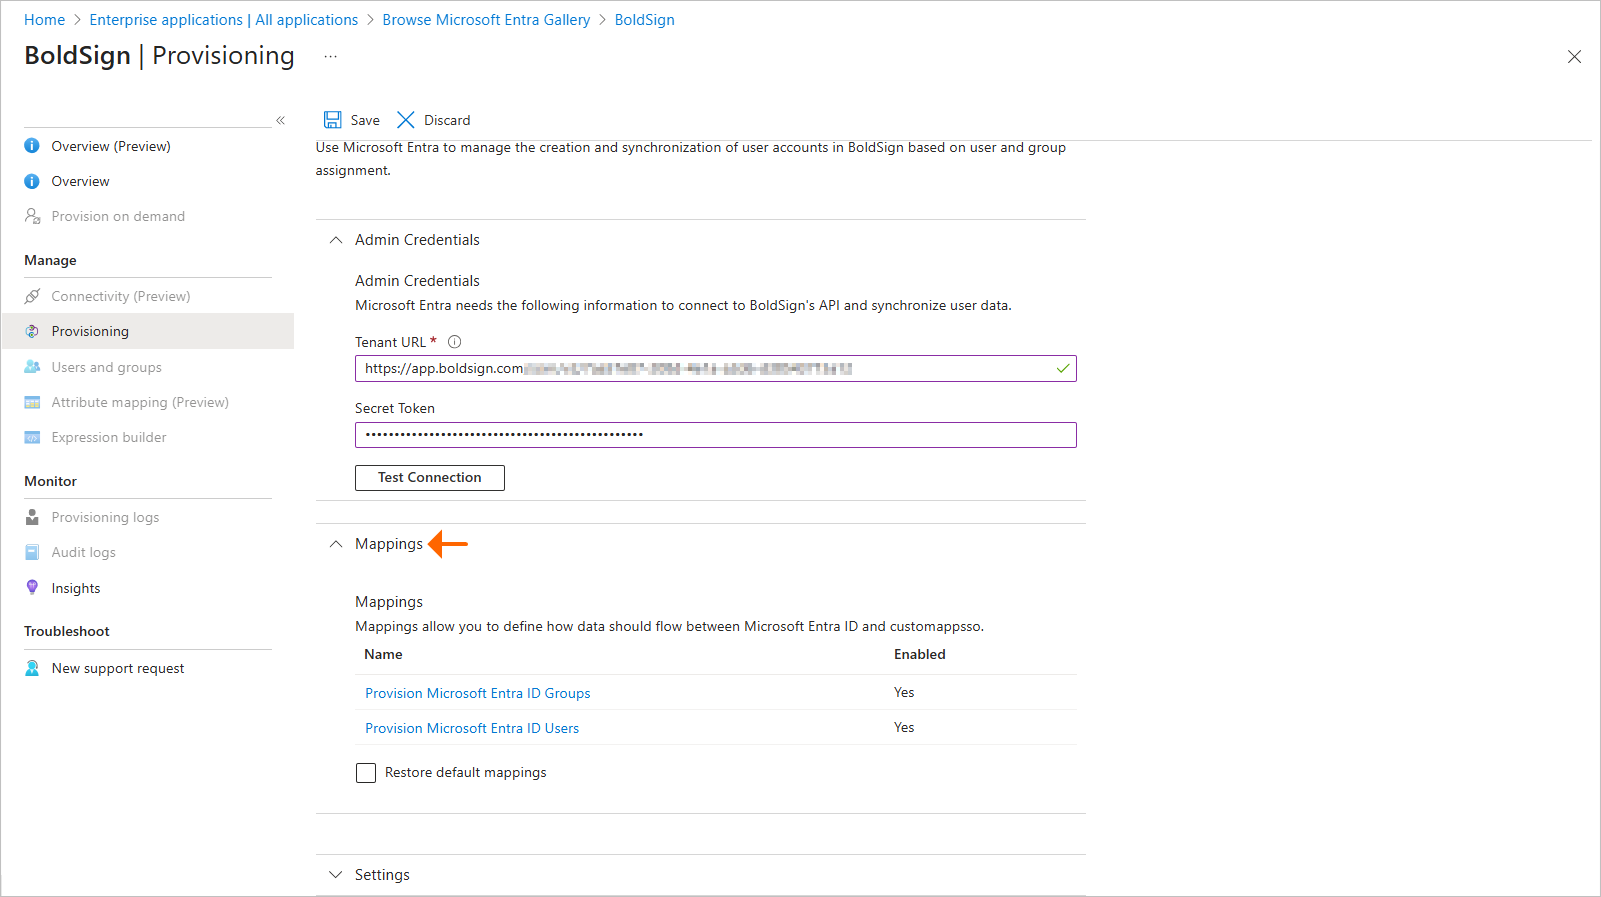
- Open the new app and select Provisioning.
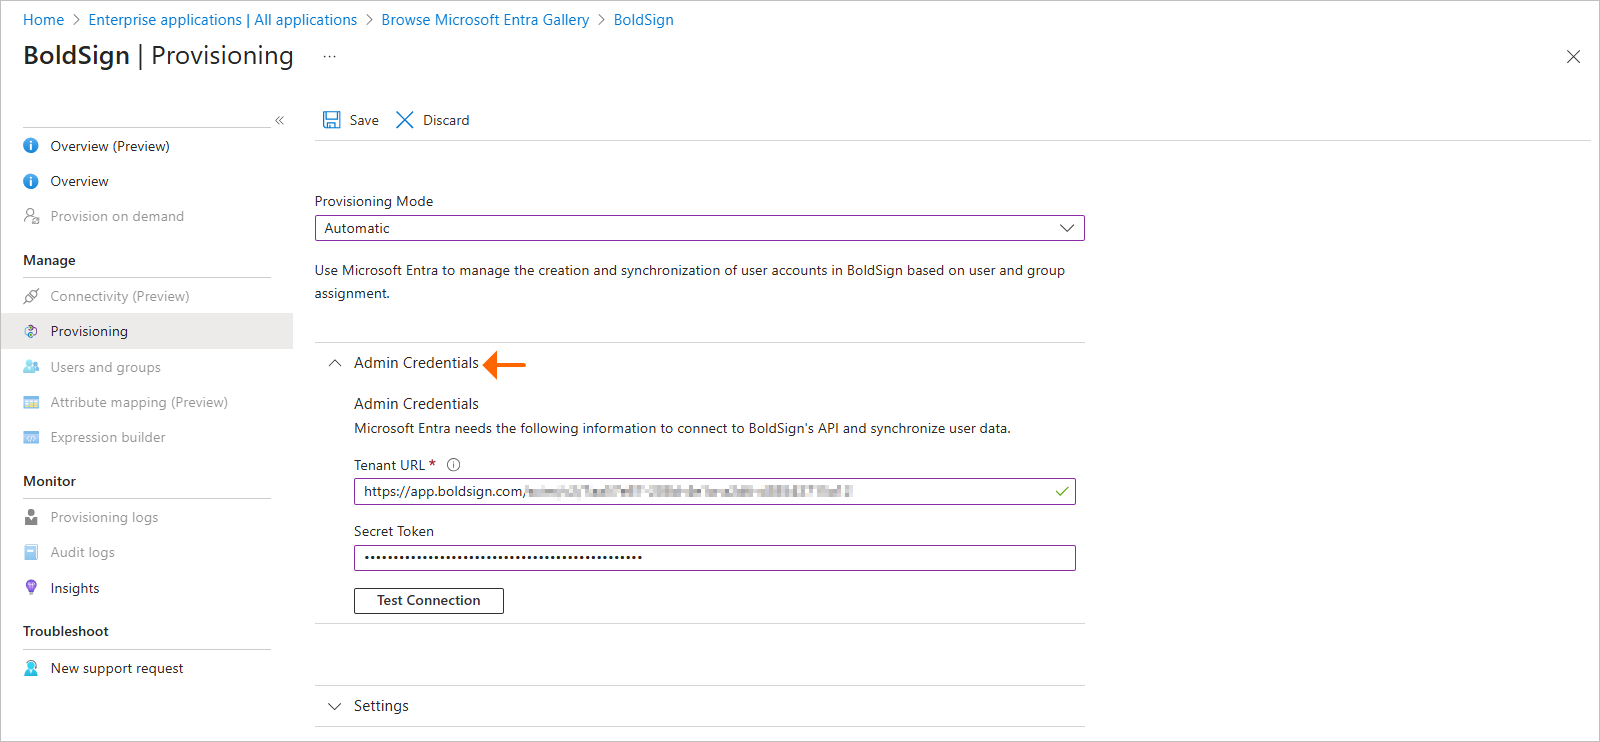
- Set Provisioning Mode to Automatic.
- Paste the tenant URL and secret token from BoldSign.
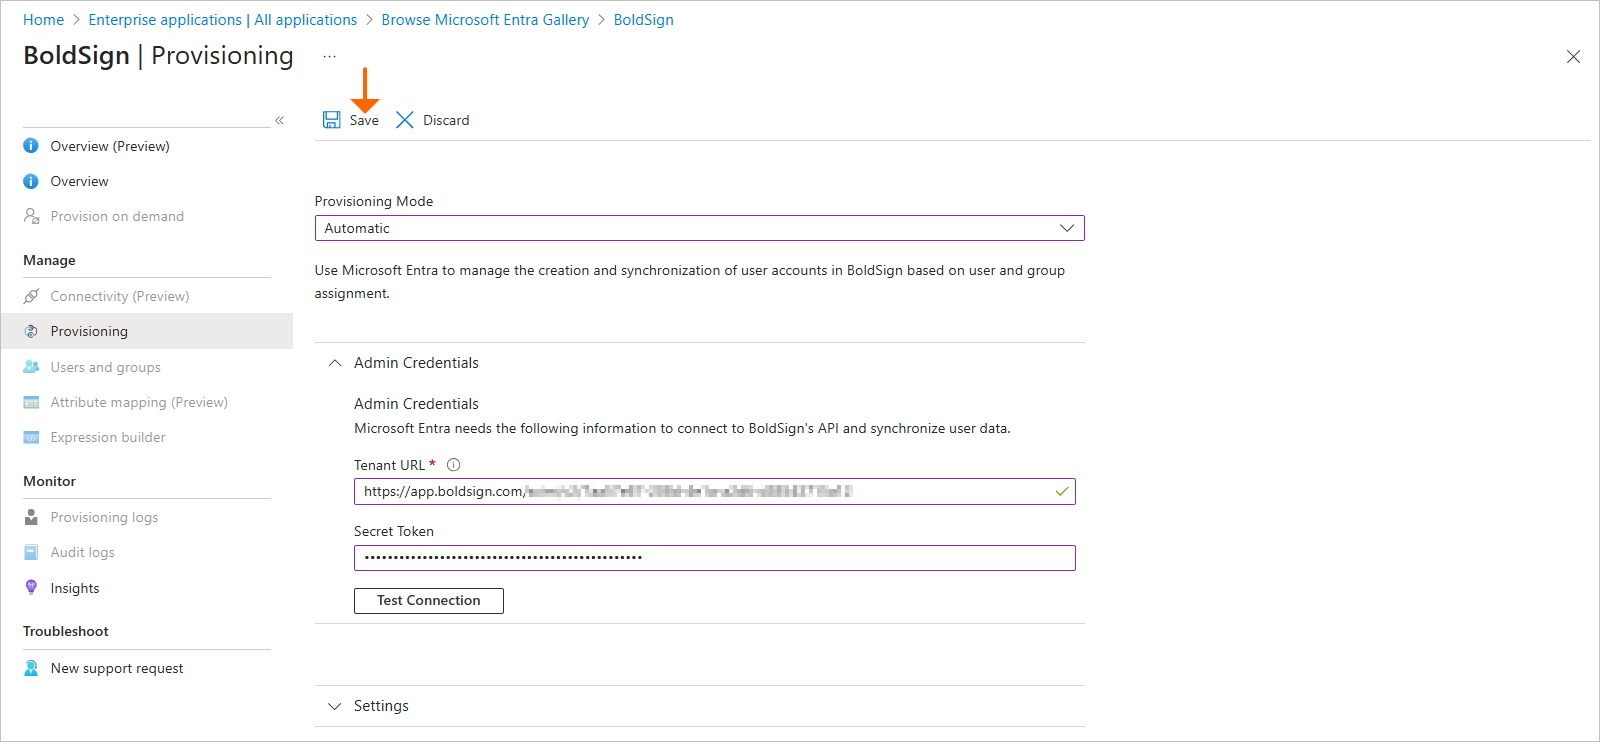
- Select Test Connection, then Save once the test passes.
Step 4: Set up attribute mappings
Mappings tell Entra ID which user details to send to BoldSign. In the same Provisioning area, expand Mappings.
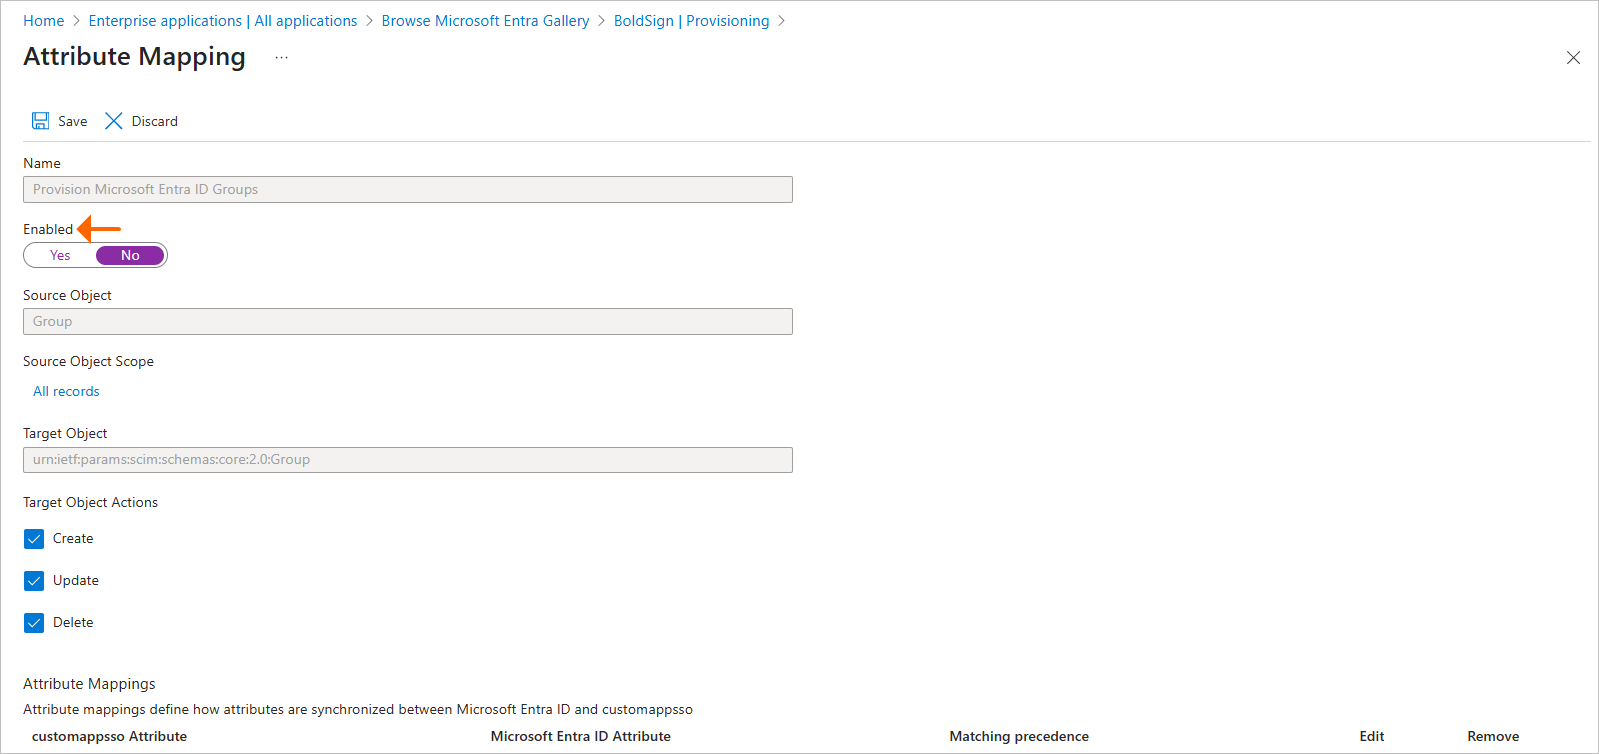
- Turn off the mapping for groups, as BoldSign does not need it.
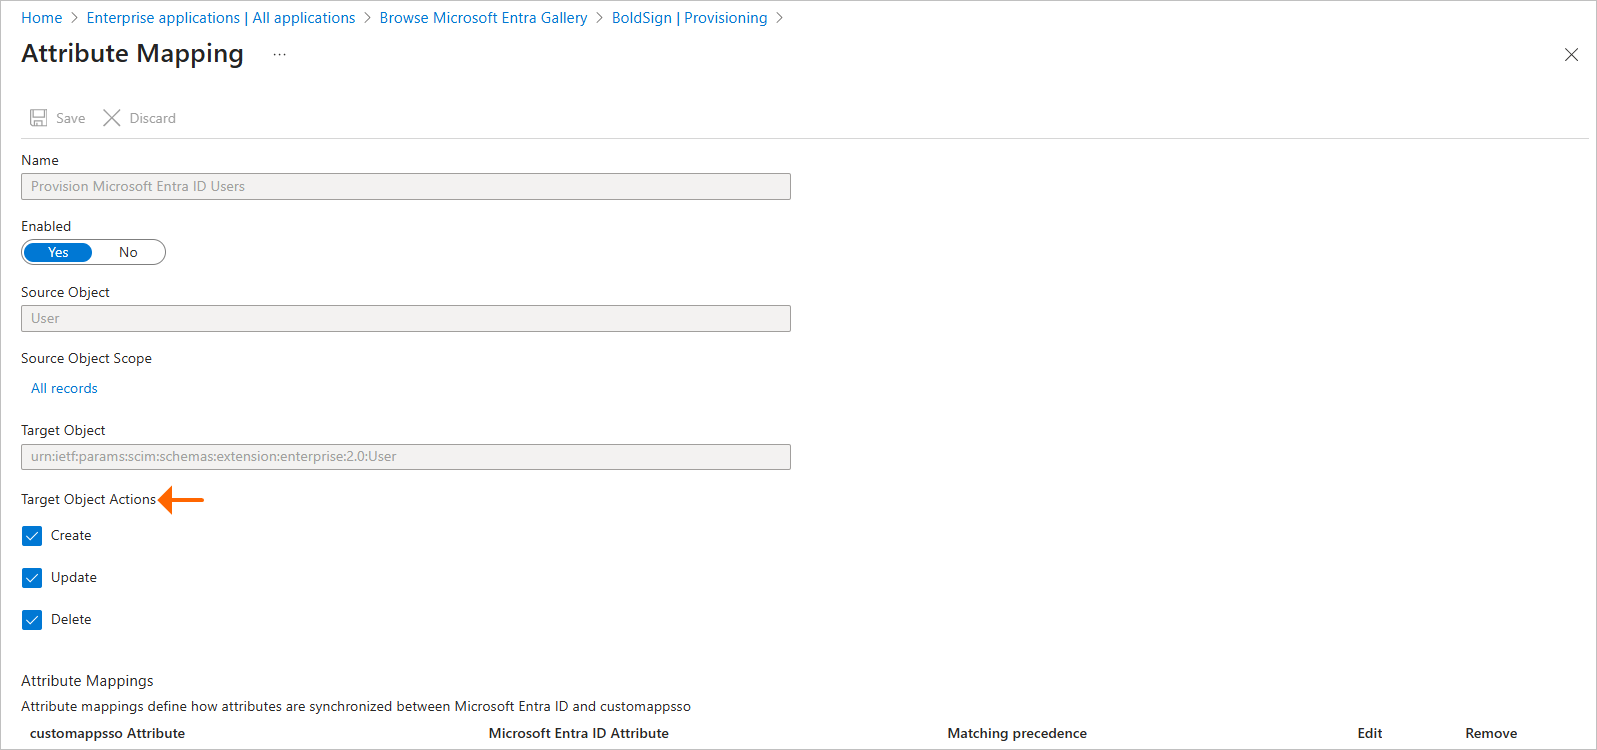
- Turn on the mapping for users.
- Set the target object actions to Create, Update and Delete.
- Remove the default attributes and keep only those in the table below.
Which attributes should you map?
Map these ten attributes, each set to apply always. The userName attribute is the one Entra ID uses to match users, with precedence 1.
| BoldSign (customappsso) attribute | Microsoft Entra ID attribute | Mapping type |
|---|---|---|
| userName | userPrincipalName | Direct |
| active | Switch([IsSoftDeleted], , "False", "True", "True", "False") |
Expression |
| title | jobTitle | Direct |
| name.givenName | givenName | Direct |
| name.familyName | surname | Direct |
| phoneNumbers[type eq “mobile”].value | mobile | Direct |
| roles[primary eq “True”].value | SingleAppRoleAssignment([appRoleAssignments]) |
Expression |
| urn:ietf:params:scim:schemas:extension:enterprise:2.0:User:department | department | Direct |
| externalId | objectId | Direct |
| emails[type eq “work”].value | Direct |
Start with these ten and add more only when you have a clear use for them.
Step 5: Choose notifications and scope
- Expand Settings, turn on failure notifications and enter the email address that should get them.
- Under Scope, choose to sync all users and groups, or only assigned users and groups.
- Select Save.
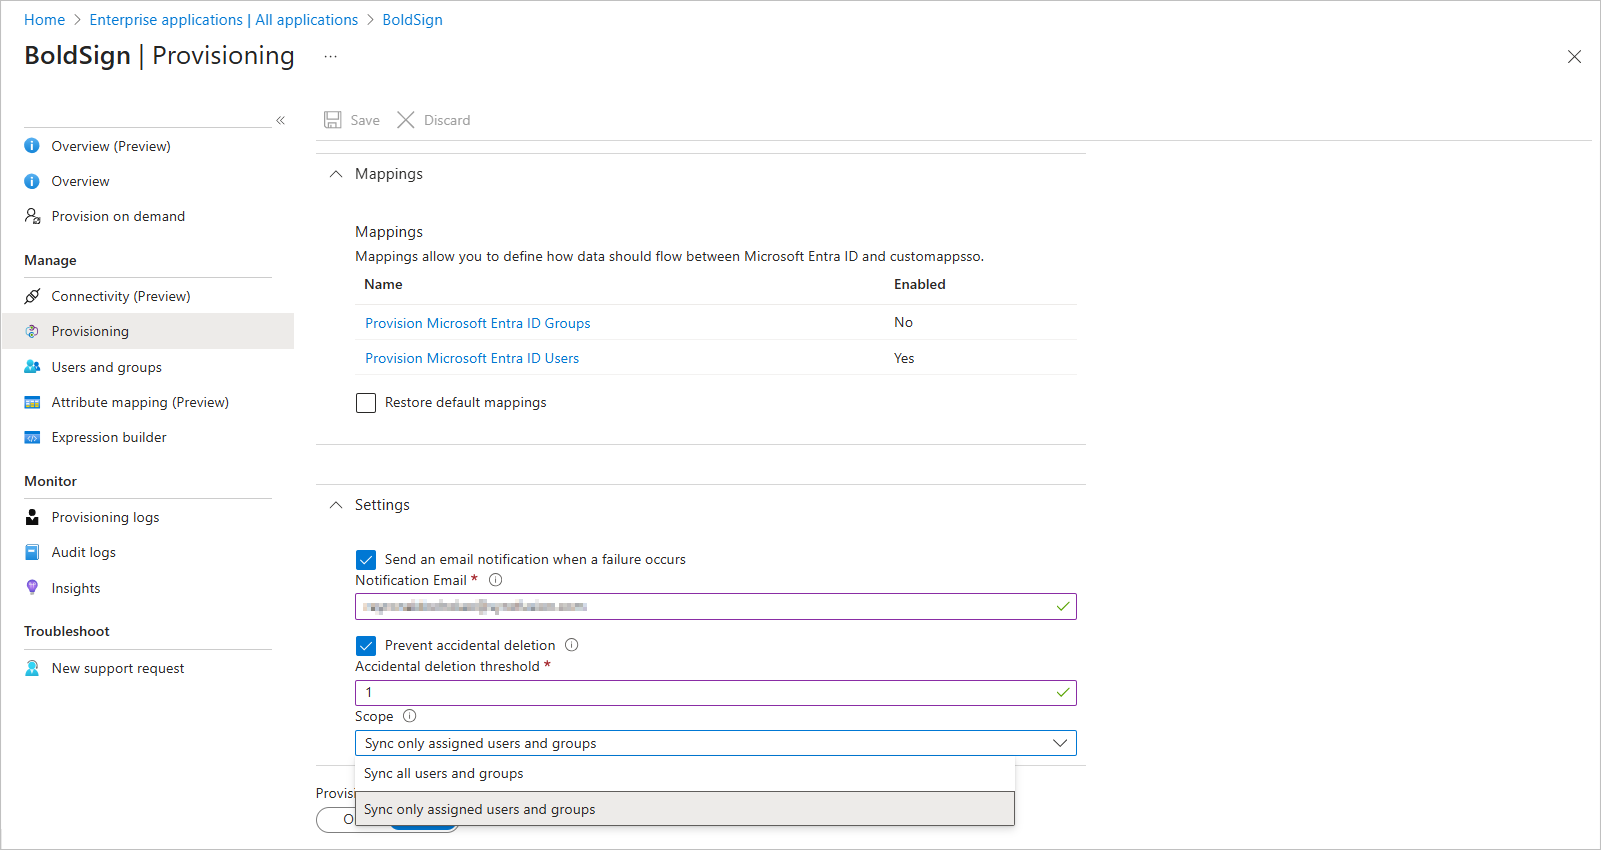
Syncing all users gives everyone the Member role. Syncing only assigned users lets you set a role for each person.
Step 6: Start provisioning
Go to the app’s Overview page and select Start provisioning. Entra ID then syncs changes to BoldSign about every 40 minutes by default.
How do you assign BoldSign roles from Entra ID?
Create app roles in Entra ID and assign people to them, and Entra ID sends each role through the roles attribute. This is role-based access control (RBAC), and it only works when you sync assigned users.
Create the app roles
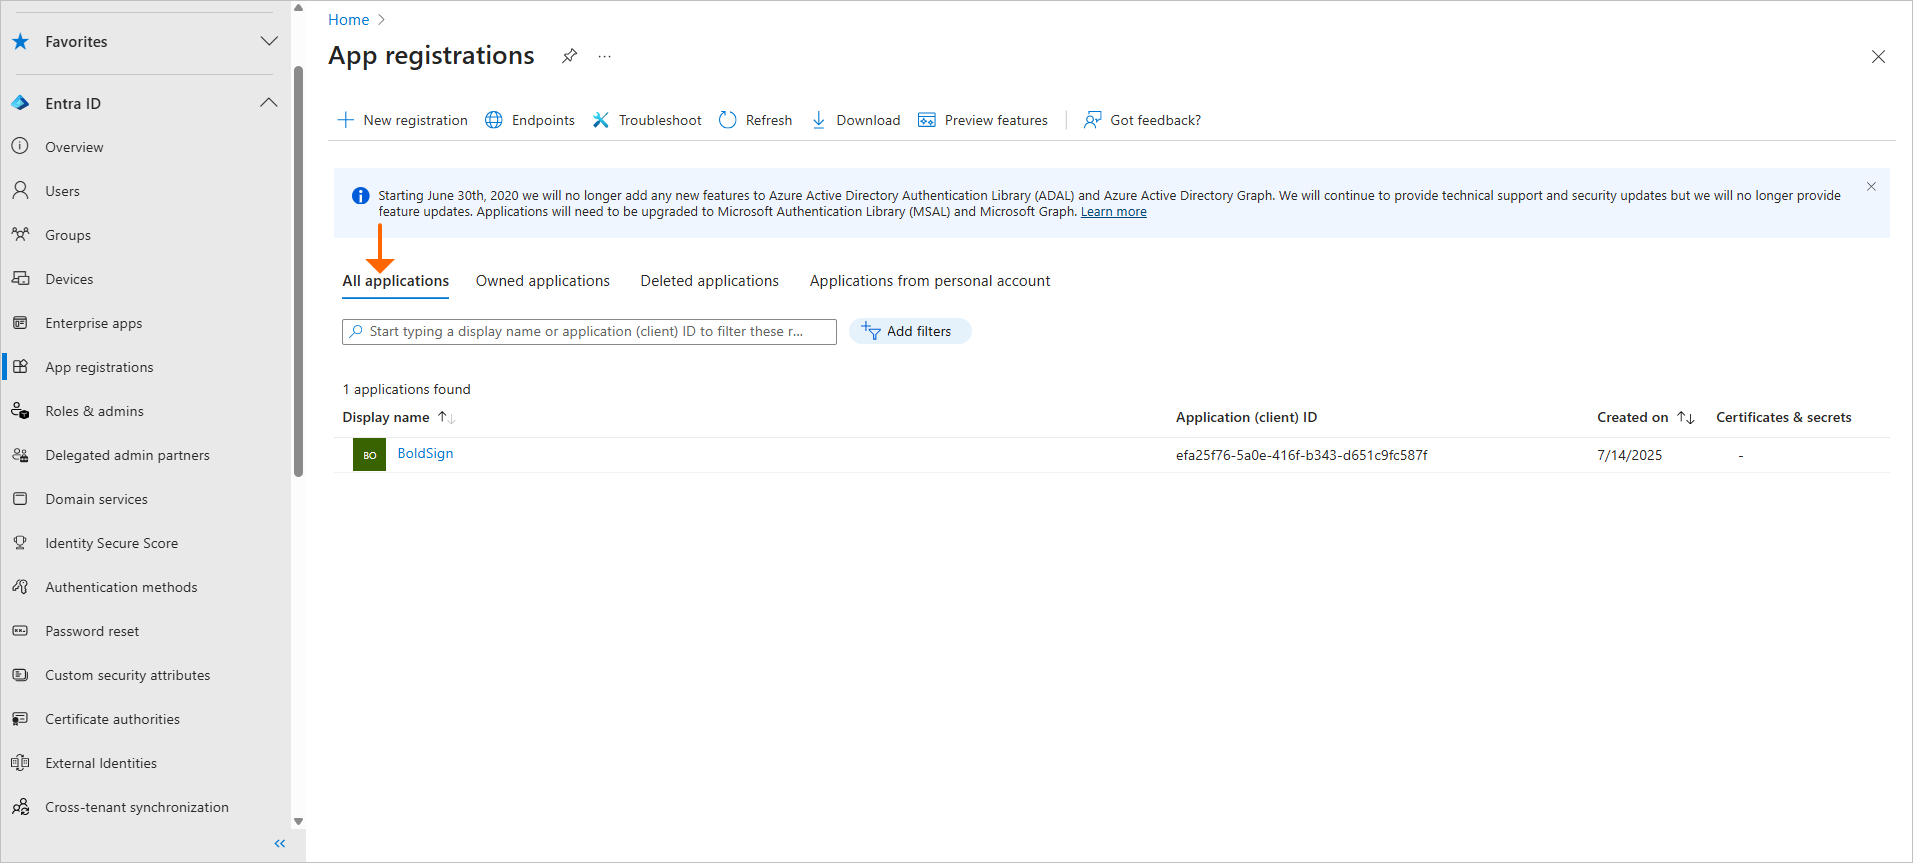
- Go to App registrations > All applications and open your BoldSign provisioning app.
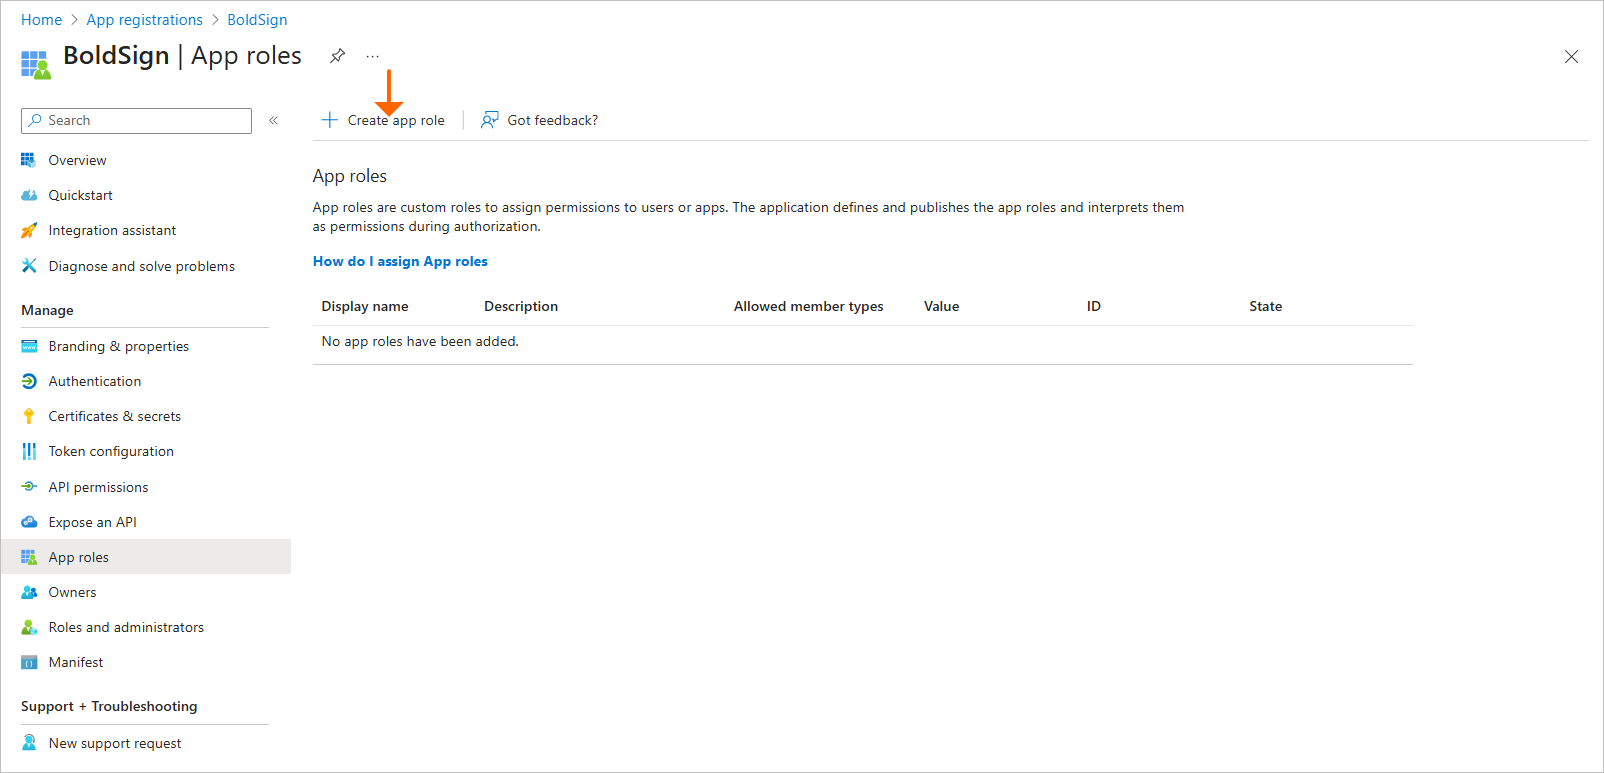
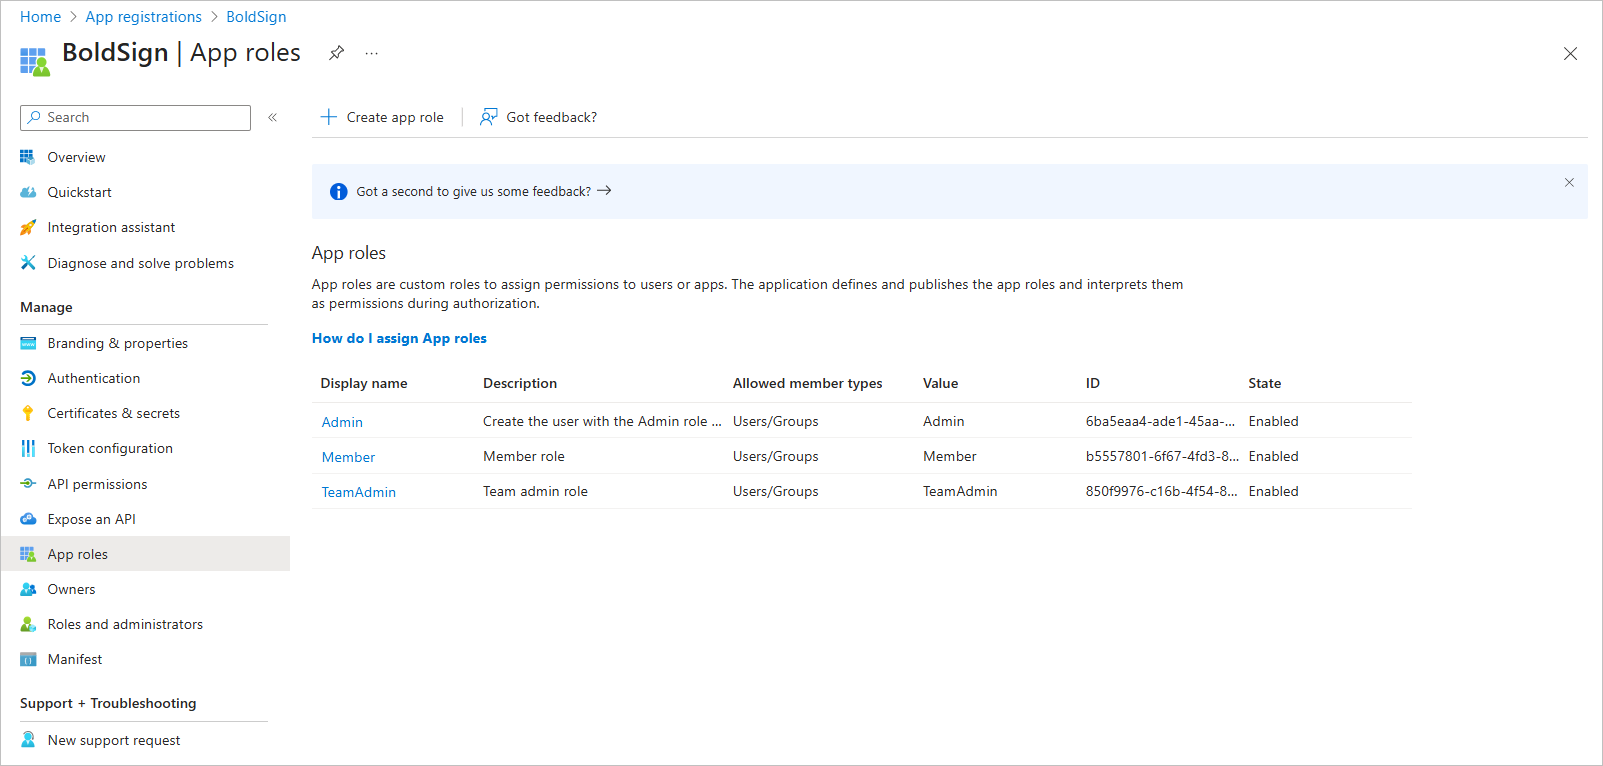
- Go to App roles > Create app role, and create Admin, Member and TeamAdmin.
- Make each value match its display name exactly, with the same case and no spaces.
Assign people to the roles
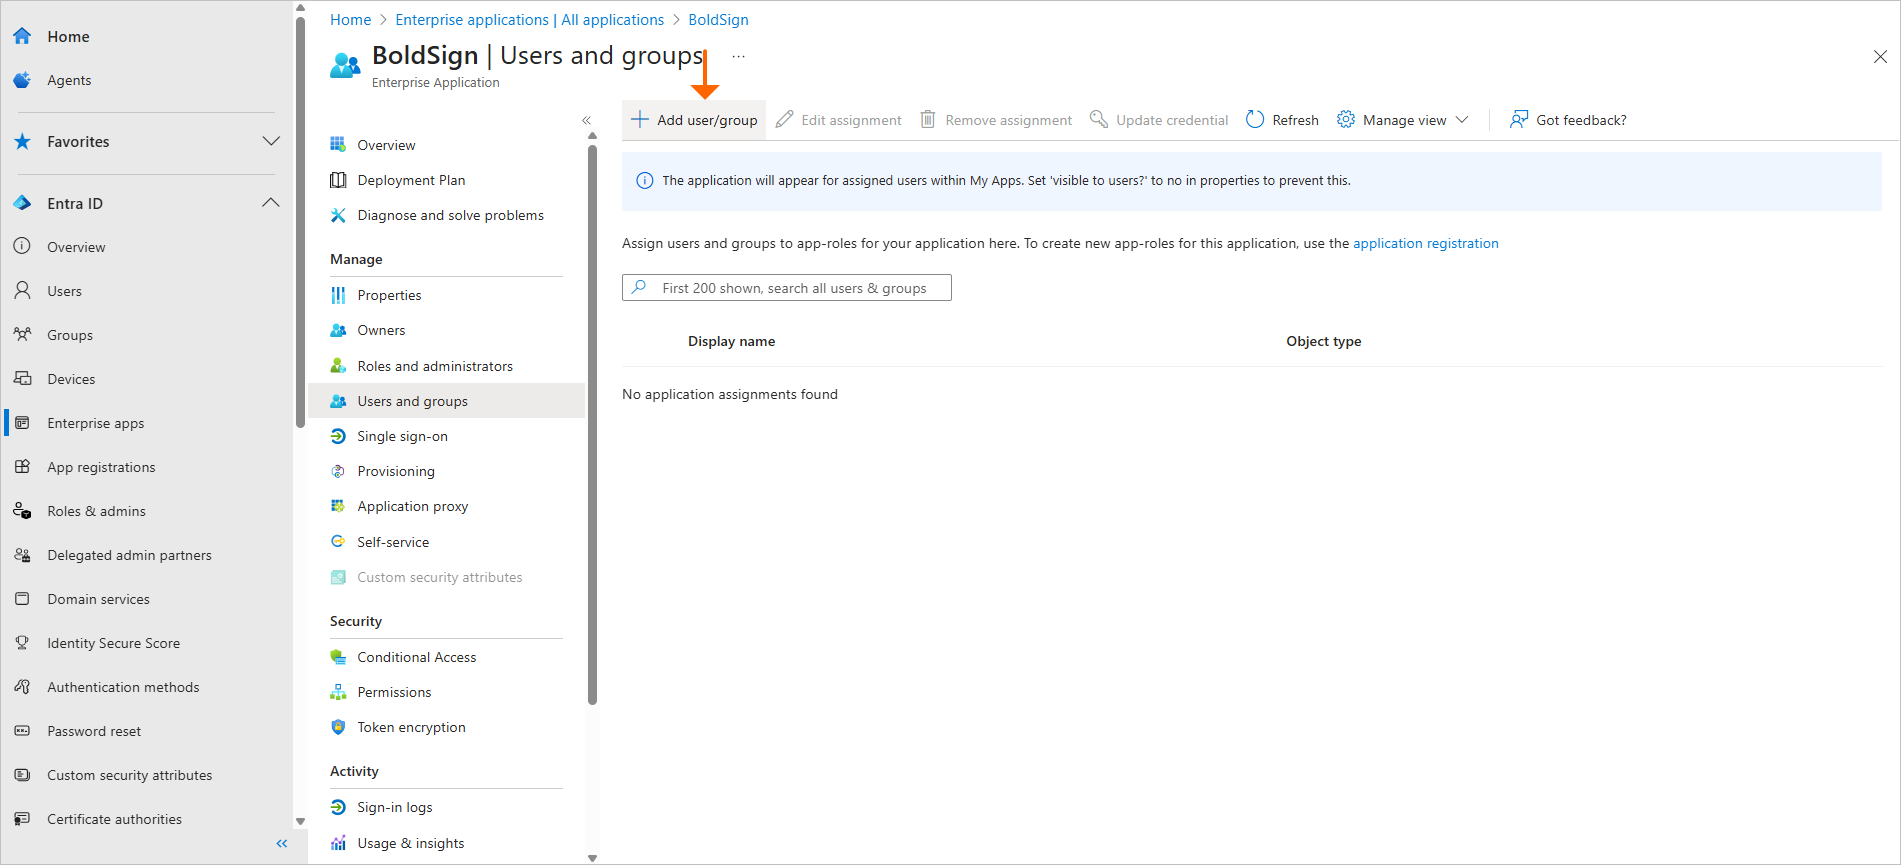
- In the enterprise app, go to Users and groups and select Add user/group.
- Select the users and groups to sync.
- Pick one of the three roles for them and save the assignment.
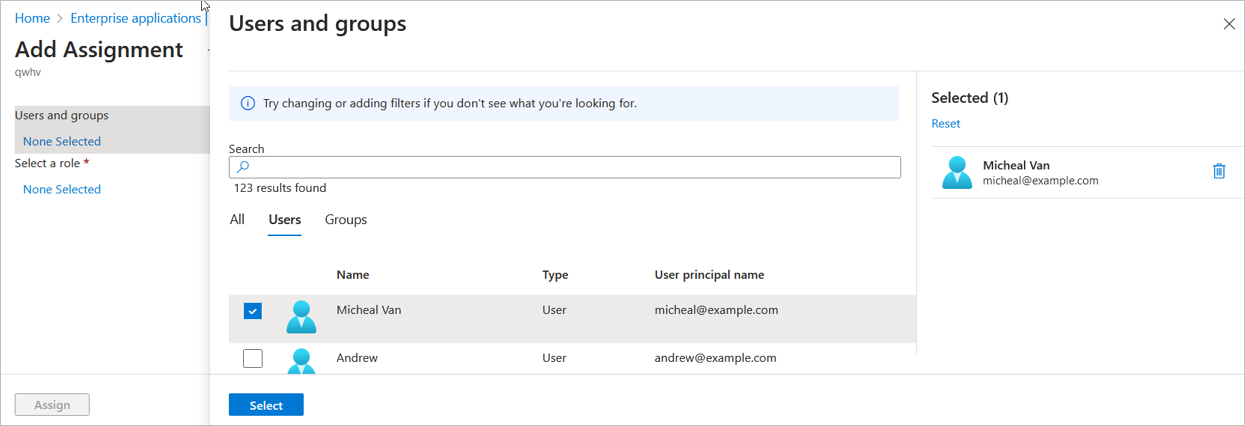
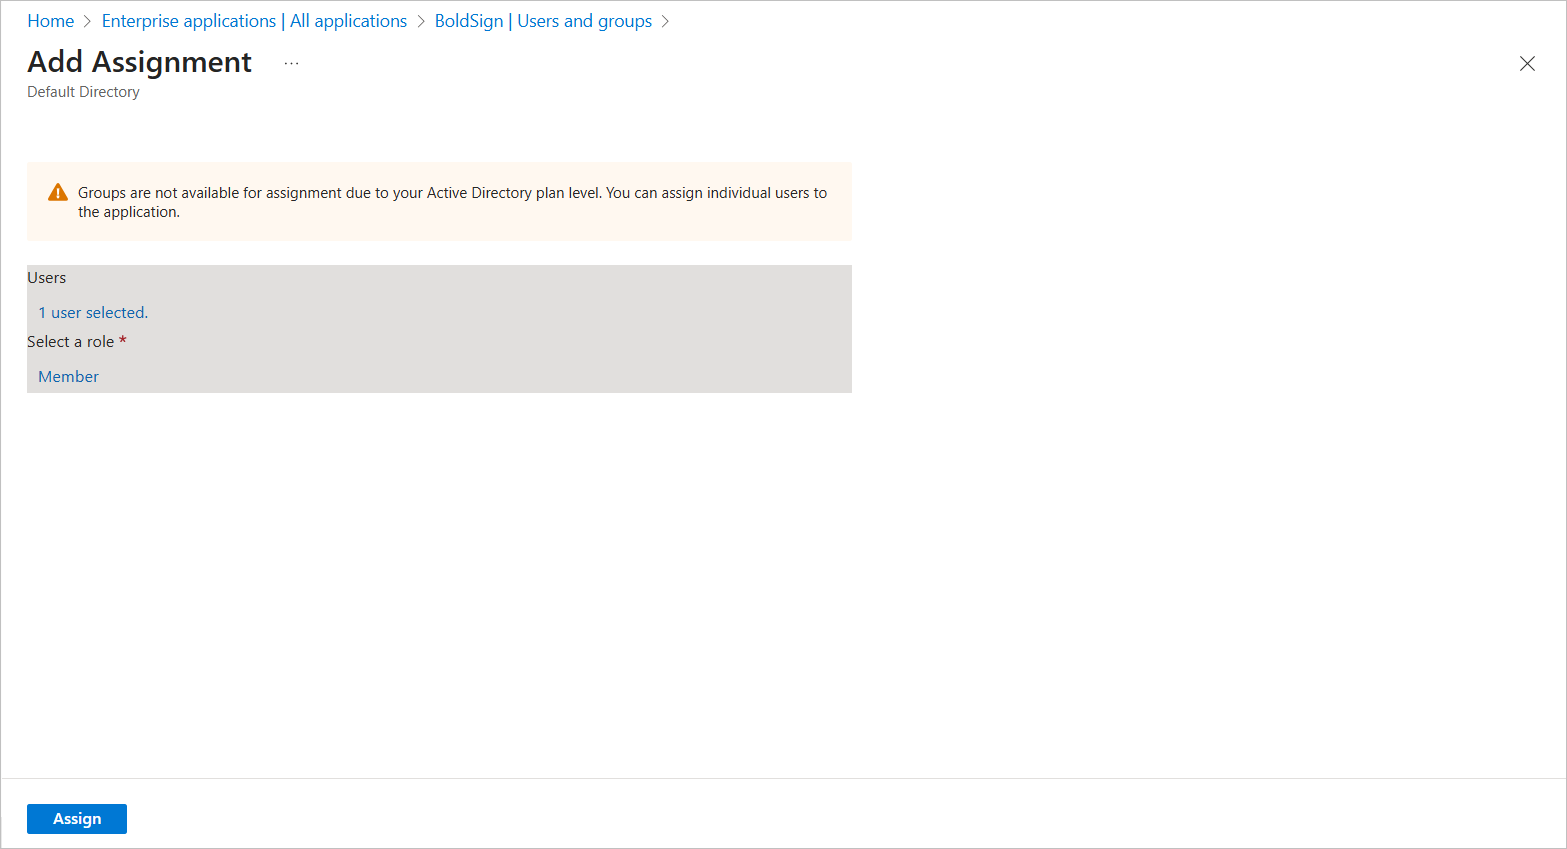
A person with no role picked gets Member in BoldSign.
How does BoldSign place new users in teams?
We use the department attribute to pick each user’s team. The department name decides where the person lands.
- A department that matches an existing team puts the user in that team.
- A department with no matching team makes us create a team with that name.
- An empty department puts the user in the Organization Admin team.
Each new user gets an invitation email and joins by signing in with their Microsoft account.
What happens when someone leaves?
Removing a person in Entra ID deactivates their BoldSign account on the next sync. The account stays in place, and the person loses access.
- Their documents stay in BoldSign until an admin moves them.
- Deleting a user who has not accepted the invitation cancels it.
- You can delete a user and transfer their documents in the web app.
Why does provisioning fail, and how do you fix it?
We email the organization admin when an invitation fails. The email points to one of four causes, each with its own fix.
- Your plan has reached its user limit: add seats, or narrow the sync scope.
- The secret token is wrong or deleted: generate a new one in BoldSign and paste it into Entra ID.
- A short network or sync problem: wait for the next run, then check the Entra ID provisioning logs.
- The person already exists in BoldSign or in another organization: resolve the duplicate account.
Which BoldSign plan do you need, and what does it cost?
User provisioning with Microsoft Entra ID is on the Business, Premium and Enterprise API plans. The Essential and Growth plans do not include it.
The Business plan costs $15 per user a month, and the Premium plan costs $99 a month for unlimited users. The Enterprise API plan starts at $30 a month with 40 envelopes. All prices are in USD and billed yearly, as listed on the BoldSign pricing page.
Custom roles are on the same three plans. A plan without provisioning shows an Upgrade prompt when you select Generate Token.
Where do you go next with user provisioning?
Once Entra ID runs your user list, you can turn to how your teams send and sign. Pick the next step that fits.
- Start a 30-day free trial and explore the admin settings.
- Book a demo to see provisioning and roles set up for your organization.
- Contact our support team with a question about your setup.
Frequently asked questions
What does SCIM provisioning mean?
It means your identity system creates, updates and turns off user accounts in another app for you. SCIM is the shared format both sides use to pass those changes.
How often does Microsoft Entra ID sync users to BoldSign?
Entra ID runs a sync about every 40 minutes by default. A change you make in Entra ID reaches BoldSign on the next run.
What happens to a BoldSign user I delete in Entra ID?
We deactivate the account, and the person can no longer sign in. The account and its documents stay until an admin moves the documents and deletes the user.
Where do I find the SCIM token in BoldSign?
Go to Settings, then Identity Management, then the User Provisioning tab, and select Generate Token. Copy it straight away, as we show it only once.
Can I have more than one SCIM token in BoldSign?
Yes. You can keep up to two active tokens at a time. A second token lets you rotate keys with no break in the sync.
What role does a provisioned user get in BoldSign?
A user gets Member unless you assign a role. Create the Admin, Member and TeamAdmin app roles in Entra ID to set roles from there.
Do provisioned users need to accept an invitation?
Yes. We email each new user an invitation link, and they accept it by signing in with their Microsoft account.
Which BoldSign plan includes user provisioning with Microsoft Entra ID?
The Business, Premium and Enterprise API plans include it. The Essential and Growth plans do not, and you need an account administrator to set it up.

Ranjitha Vazhivittan
Ranjitha is a skilled software developer with 3 years of experience at BoldSign. Alongside her technical expertise, she has a passion for writing and enjoys sharing thoughtful insights on technology and development. Beyond work, she stays curious by exploring emerging tools and trends, constantly seeking opportunities to learn and grow.
More posts by Ranjitha Vazhivittan