How to Embed an eSignature Solution into Your Python Application
 Jayaprakash Kamaraj
TL;DR: You can let customers sign contracts inside your Python app with the BoldSign API. Install our Python software development kit (SDK), send a document from a template, then load the signing link in an iframe on your page. Our embedded signing page shows what the signer sees.
You run a business and have just won a new customer. To close the deal, you need their signature on a contract. Sending them to another website to sign adds a step where they may stop.
This guide shows how to keep the whole signing step inside a Python web app built with Flask. You send the contract, show the signing page in your app, and save the signed copy.
What is embedded signing in a Python app?
Embedded signing puts the signing page inside your own app. Your customer reads and signs the contract without leaving your site.
Think of a shop that lets you pay at the counter instead of sending you to a bank across the street. The payment still goes through the bank, but you never leave the shop. Here, we handle the signature while your app keeps the customer on its own page.
What do you need before you start?
You need three things on your machine and one account. Gather them first so the steps run without breaks.
- Python 3.7+ installed on your system.
- Flask installed on your system.
- BoldSign API credentials.
How do you set up a BoldSign account and API key?
You can use a paid account or a free API sandbox account. Create one now if you do not have one yet.
Next, copy your API key from the API Key page. Your Python code sends this key with every call.
How do you install the BoldSign Python SDK?
Install our official Python SDK with pip. One command adds it to your project.
pip install boldsignThe package lives on the Python Package Index as boldsign - PyPI. Our BoldSign Python SDK Documentation covers setup, sign-in with your key and everyday calls.
How do you set up a Flask app?
Use your existing Flask app or build a new one. A new app takes three steps.
- Create a new directory for the app.
- Inside that directory, create a Python file named app.py.
- Open app.py and import the modules your Flask app needs, as in this sample.
from flask import Flask, request
app = Flask(__name__)

@app.route("/")
def home():
    return "Hello, World!"

if __name__ == "__main__":
    app.run(debug=True)
How do you create a template for the contract?
Create a BoldSign template that holds the contract and its form fields. Your app sends every new contract from this one template.
You can build it with the BoldSign APIs or in the BoldSign web application. Add the fields the contract needs, such as the customer name, company, email and contract details.
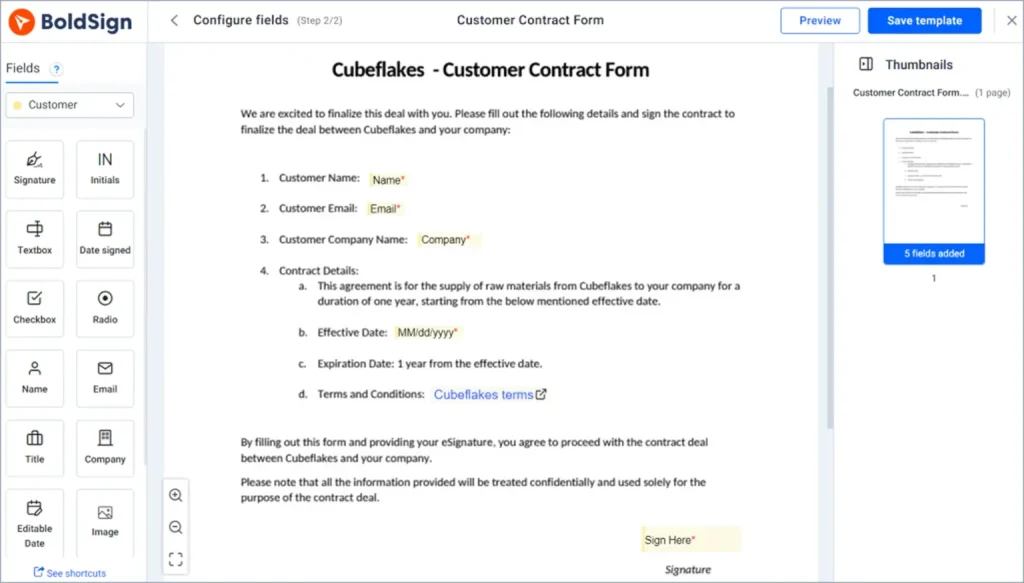
Note down the template ID once you save it. Your app needs it in the next three steps:
- Send the contract to the customer for signing.
- Show the signing page inside the app.
- Download the signed contract in the app.
How do you send the contract for signature from Python?
Call the BoldSign send API with the template ID and the form details. The call returns a document ID for the new contract.
The sample below runs in the app.py route “/”. You can find your template ID with the BoldSign List templates API.
@app.route("/", methods=("GET", "POST"))
def home(name=None):
    if request.method == "POST":
        data = {
            "templateId": "**templateId**",
            "customerName": request.form["customerName"],
            "companyName": request.form["companyName"],
            "customerEmail": request.form["customerEmail"],
            "contractDetails": request.form["contractDetails"],
            "apikey": "**api-key**",
            "baseUrl": request.url_root,
        }
        # here you will get the documentid
        documentId = getdocumentid(data)
def getdocumentid(data):
import boldsign
configuration = boldsign.Configuration(api_key=data["apikey"])
with boldsign.ApiClient(configuration) as api_client:
template_api = boldsign.TemplateApi(api_client)
role = boldsign.Role(
roleIndex=1,
signerName=data["customerName"],
signerEmail=data["customerEmail"],
signerRole="Manager",
existingFormFields=[
{"id": "CustomerName", "value": data["customerName"]},
{"id": "CompanyName", "value": data["companyName"]},
{"id": "CustomerEmail", "value": data["customerEmail"]},
{"id": "ContractDetails", "value": data["contractDetails"]},
],
)
send_for_sign = boldsign.SendForSignFromTemplateForm(
roles=[role], title="Customer Contract Signing", message="Please sign the contract"
)
response = template_api.send_using_template(data["templateId"], send_for_sign)
return response.document_idThe getdocumentid function fills the template fields from the web form and sends the contract. You need the document ID it returns to build the signing link.
How do you show the signing page inside your app?
Request a signing link with the document ID and the customer’s email through the getEmbeddedSignLink API. Then load that link in an iframe on your page.
The redirect URL sends the signer back to your app after they finish. Here is how the Python code can look.
def getsignlink(data):
    import boldsign
    from datetime import datetime, timedelta

    configuration = boldsign.Configuration(api_key=data["apikey"])
    with boldsign.ApiClient(configuration) as api_client:
        document_api = boldsign.DocumentApi(api_client)
        response = document_api.get_embedded_sign_link(
            document_id=data["documentId"],
            signer_email=data["customerEmail"],
            redirect_url=data["baseUrl"] + "response/",
        )
return response.sign_link<iframe width="100%" height="100%" src="{{ iframe }}"></iframe>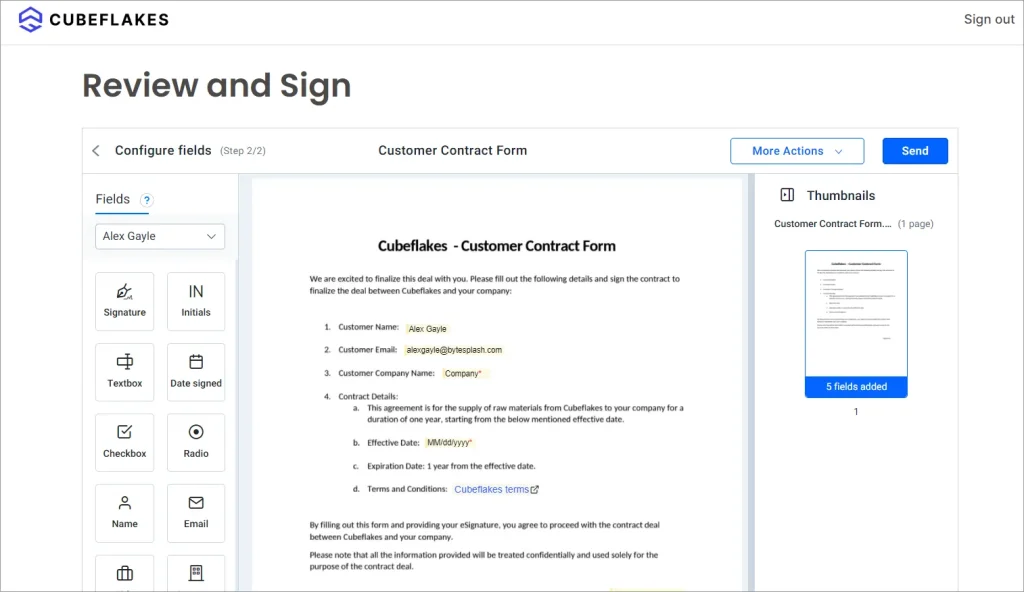
How do you download the signed document?
Call the download API with the document ID once signing is complete. The sample saves the signed contract as a PDF file for your records.
def downloadDocument(data):
    import boldsign

    configuration = boldsign.Configuration(api_key=data["apikey"])
    with boldsign.ApiClient(configuration) as api_client:
        document_api = boldsign.DocumentApi(api_client)
        file_bytes = document_api.download_document(document_id=data["documentId"])
        with open("FILE_NAME.pdf", "wb") as f:
            f.write(file_bytes)
        return "FILE_NAME.pdf"
Signing happens at the customer’s pace, so wait for the webhook completed event before you download. Our Webhooks documentation explains the events, and the Verify Webhook Events guide shows how to check that each event came from us.
What should you watch out for with embedded signing?
Check who the signer is before you show them the link. Our API documentation puts that check, and the record of it, on you as the sender.
- Use the signer email from the document; any other email returns an error.
- Set signLinkValidTill when you want the link to expire at a set time.
- Turn off our signing emails when customers sign only inside your app.
- Keep your API key on the server, never in the page your customer loads.
Which BoldSign plan do you need for embedded signing, and what does it cost?
Embedded signing, webhooks and live API access come with the Enterprise API plan. It starts at $30 a month with 40 envelopes, and extra envelopes cost $0.75 each.
You can build and test first in our free sandbox, with no credit card. Sandbox documents carry a test watermark and are deleted after 14 days. Prices are in USD, as listed on the BoldSign pricing page in November 2026.
Where do you go next with eSignatures in Python?
Our API documentation lists every call, including ones that track the status of each request. You can also try our live API demos and the sample code in our GitHub repo.
- Create a free API sandbox account and run the Flask sample.
- Schedule a demo to walk through your signing flow with our team.
- Open a ticket in our support portal with a question about your integration.
Frequently asked questions
Can I add eSignatures to a Python app?
Yes. Install our Python software development kit (SDK) with pip, send a document with your API key, and load the signing link in an iframe on your page.
Does the BoldSign Python SDK work with Flask?
Yes. The SDK is a plain Python package, so you can call it from a Flask route. This guide uses Flask for the sample app.
What is an embedded signing link?
It is a web address that opens the signing page for one signer of one document. You request it with the document ID and the signer's email, then show it inside your app.
Do my customers need a BoldSign account to sign?
No. Your customer signs on the page you show them in your app. Only you, as the sender, need an account and an API key.
How long does an embedded signing link stay valid?
You can set it with the signLinkValidTill parameter when you request the link. Give it a date and time in the format our API documentation shows.
How do I know when a document is ready to download?
Listen for the completed event from our webhooks. Signing happens at the signer's pace, so the event tells you when the signed file exists.
Can I test the BoldSign API for free?
Yes. Our free sandbox gives you full API access with no credit card. Sandbox documents carry a test watermark and are deleted after 14 days.
Which BoldSign plan includes embedded signing?
Embedded signing and webhooks come with the Enterprise API plan, which starts at $30 a month with 40 envelopes, billed in USD.

Jayaprakash Kamaraj
Jayaprakash Kamaraj is a Product Manager at Syncfusion. He is passionate about front-end technologies and has been active in web development since 2014. Connect with him on LinkedIn.
More posts by Jayaprakash Kamaraj