Node.js eSignature Integration Checklist for Go-Live
 Vallary Achieng Otieno
TL;DR: A Node.js eSignature integration is ready for go-live when it handles real signers, repeated webhooks, failed requests and signed file storage. A test send alone proves little. This checklist walks through each check in order. Our eSignature API page shows what you can build with us.
Your first test send worked. The document arrived, you signed it, and the status changed. That proves the API call works, but your workflow still faces real use.
In production, webhooks can arrive twice. A signer may give up halfway on a phone. Your app may still show “pending” after the document is signed.
What is a Node.js eSignature integration checklist?
A Node.js eSignature integration checklist is a list of checks you run before real users depend on your signing flow. It covers setup, signers, webhooks, storage, failure cases and support.
Think of the walk-around a pilot does before take-off. The plane flew fine yesterday, yet the pilot still checks each part. A go-live checklist does the same for your code.
Why does an eSignature integration need a go-live checklist?
An eSignature integration touches many parts of your app at once. A weak spot in any one of them can break the whole flow for a signer.
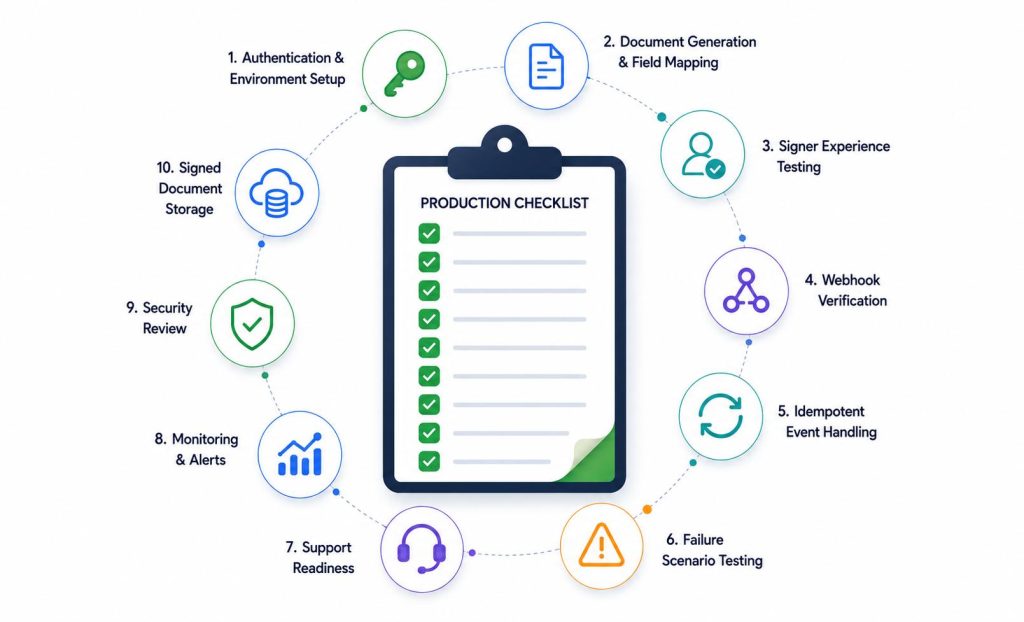
A typical flow covers these parts:
- API keys and access for each environment
- Building documents and placing signer fields
- Sending, signing and the signer’s screens
- Webhook updates, then signed file storage
A signer may finish while your app shows the request as open. A failed webhook may never update your records. Support may not know whether the fault sits in your code or in the request.
How do you set up keys and environments?
Keep your test and live setups fully apart. Store every secret outside your code and load it from the environment.
Check that you have:
- Separate keys for the sandbox and for live use
- Keys stored in environment variables, never in the repository
- Access to live secrets limited to the people who need it
- Callback and return addresses set for each environment
Environment configuration:
ESIGN_API_KEY=your_live_api_key
WEBHOOK_SECRET=your_webhook_secret
APP_BASE_URL=https://yourapp.com
Loaded in Node.js:
const esignApiKey = process.env.ESIGN_API_KEY;
const webhookSecret = process.env.WEBHOOK_SECRET;
const appBaseUrl = process.env.APP_BASE_URL;
Mixed-up environments cause many launch issues. A test callback address left in live settings makes a working flow look broken.
How do you check documents and signer fields?
Many live issues come from document setup rather than the API link itself. Test with real-looking data, not tidy sample values.
Before go-live, confirm that:
- The right PDF or template goes out
- Names and email addresses map to the right signer
- Each field belongs to the right recipient
- Required fields block signing until someone fills them in
For several signers, also test signing order, CC (carbon copy) recipients, reminders, expiry and declines. A request can send without error and still fail a person who gets the wrong field.
Should you use templates or build each document in code?
Templates suit agreements you send often, with fixed roles and fields that stay in place. Building in code suits deals where the content changes a lot each time.
Templates lower the risk of fields landing in the wrong spot. Documents built in code give you more freedom, but they need stronger checks. More parts come together at run time, so more parts can go wrong.
With us, you can send from saved templates or create each document through the API.
How do you test the signer experience?
A good API response is only the start. You also need to walk the real signer journey on desktop and on mobile.
Check these points:
- The email arrives and the message is clear
- The signing page loads fast on a phone
- The redirect after signing lands in the right place
- An expired or used link shows a helpful message
With embedded signing, test the full trip from your app to the signing page and back. Be clear about who starts it, how your app learns it is done, and what happens when a signer closes the tab. Real signers switch devices, miss emails and come back days later.
How should you handle eSignature webhooks?
Webhooks tell your app when a document is viewed, signed, declined or changed. Treat them as a core part of the integration, not an extra.
Events can arrive late, out of order or more than once. Your webhook handler should check that each event is real, log it, update your records and avoid acting twice. Keep slow work out of the handler and pass it to a background job.
We send document events such as Sent, Viewed, Signed, Completed, Declined and Expired. See the full list of available webhook events in our developer docs.
How do you stop duplicate webhook events from causing harm?
Store an ID for each event you handle, and skip any event you have seen before. Track changes by document ID and event type when no event ID exists.
Picture a signed document that starts an onboarding email. A retried webhook should not send that email twice. The same event can arrive many times, but your business step should run once.
The webhook lifecycle guide explains how retries and event IDs work.
Where should signed documents and audit data live?
A signing flow is done when your app has stored the signed file and its details, not when the last person signs. Decide where each piece goes before launch.
A common setup includes:
- Durable file storage for the signed PDF and the audit trail
- Database records that link document IDs, signers and files
- Rules for how long you keep each file
- Access controls for sensitive agreements
Test this end to end. One manual download does not prove your storage is ready. Our guide on how to download a signed document through the API shows the call.
What failure paths should you plan for?
Your happy path may work well. A live flow depends on what happens when things go wrong.
Which failures should you test?
- A signer email address that bounces
- A request that expires or that a signer declines
- A webhook endpoint that times out
- A short API outage or a failed upload
What should you decide for each failure?
- What the user sees on screen
- What your support team sees and what gets logged
- Whether a retry is safe
- Whether someone gets an alert
A good eSignature flow does more than succeed cleanly. It also fails in a clear way.
What security checks belong in the checklist?
Security belongs in go-live checks from day one. Review how you store keys, check events and log data.
Review at least these points:
- Live keys reach only the services that need them
- Every callback and app address uses encrypted connections
- Your handler checks the signature on each webhook
- Only the right staff can open signed files
Watch what your logs hold. Leave out signing links, full personal details and raw document content. Check retention and legal rules with your legal team when you work in a regulated field or across regions.
How do you monitor and reconcile document status?
Your team should answer simple questions fast. Was the request created, delivered, viewed and signed, and did the file reach storage?
Which signals should you watch?
- Requests that fail to create
- Webhook events that fail to process
- Documents stuck in a pending state
- Signed files that fail to download
Structured logs and job alerts in Node.js make these issues much easier to trace.
Why run a reconcile job?
Even good webhook systems can miss an event now and then. A scheduled job can compare your open records with the live status from the API and fix any gaps.
A reconcile job matters most when a signed document starts billing, onboarding or a contract. Never let one webhook event be your only source of truth.
How do you get support teams ready for launch?
A go-live checklist is not only for developers. Your support team needs a short guide to the signing flow before the first real user arrives.
Your support guide should explain:
- What each document state means
- How to tell when a signer is stuck
- How to resend or restart a request
- When to bring in an engineer
Before release, run one last round with real cases. Try one signer, several signers in order, mobile signing, a closed browser and a repeated webhook. This final pass often finds the gaps that standard testing misses.
What is on the final go-live checklist?
Run through this list on launch day. Each line maps to a section above.
Build checks
- Test and live keys are kept apart
- Signer fields map to the right people
- Your template or in-code approach is decided
- Signing works on desktop and mobile
Run checks
- Webhooks are verified and safe to repeat
- Signed files are stored and tested end to end
- Failure cases have a clear outcome
- Monitoring covers the whole signing journey
- Support knows how to fix common issues
How does BoldSign fit a Node.js eSignature integration?
Our Node.js software development kit (SDK) covers the checks above, from sending to tracking and download. You install it with npm install boldsign and set your API key on each API class.
Every webhook we send carries an X-BoldSign-Signature header. Our guide to verify webhook events shows how to check it in JavaScript.
For a first build, read our step-by-step guide to the BoldSign Node.js SDK. Our walkthrough on adding eSignatures to a Node.js app shows a full sample flow.
Which BoldSign plan do you need to go live?
Live API calls, webhooks and embedded signing need the Enterprise API plan, from $30 a month with 40 envelopes. Each extra envelope costs $0.75, as listed on the BoldSign pricing page in November 2026.
Prices are in USD.
You can build and test the whole checklist in the free API sandbox before you pay for anything. Move to live keys once each check passes.
How do you take your Node.js integration live?
Start in the sandbox, work through the checklist, then switch to live keys.
- Create a free API sandbox account and run each check before launch.
- Book a demo to talk through your Node.js signing flow with our team.
- Explore the eSignature API to see every feature you can add next.
Frequently asked questions
What should I test before launching a Node.js eSignature integration?
Test the real signer journey as well as the API calls. Check keys, field mapping, webhook handling and signed file storage, then try the failure cases, such as a declined or expired request.
Why are webhooks important in an eSignature integration?
Webhooks tell your app when a document is viewed, signed, declined or expired. Without them, your records can drift away from the real state of each document.
Can the same webhook event arrive twice?
Yes, so plan for it. Store each event you have handled and skip repeats, so a retried event never sends a second email or creates a second record.
Should I use templates or build each document in code?
Use templates for agreements you send often with the same fields and roles. Build documents in code when the content changes a lot from one deal to the next.
How do I store signed documents after completion?
Most teams download the signed file to their own storage and keep its details in their database. Link the file to the document ID and the user so support can find it later.
How do I verify a BoldSign webhook in Node.js?
Read the X-BoldSign-Signature header and compare it with a signature you compute from the raw body and your webhook secret. Our developer guide shows a JavaScript example.
Is there a Node.js SDK for BoldSign?
Yes. Install it from npm with npm install boldsign, then set your API key on each API class you use, such as DocumentApi.
Which BoldSign plan do I need to go live with the API?
Live API calls and webhooks need the Enterprise API plan, from $30 a month with 40 envelopes. You can build and test first in a free API sandbox account.

Vallary Achieng Otieno
Vallary Achieng Otieno is a growing content writer focused on creating clear, engaging, and user-centered content. She specializes in simplifying complex ideas into practical insights that are easy for readers to understand and apply. With a growing interest in technical writing, Vallary develops well-structured articles that prioritize clarity, consistency, and value. Through her writing, she aims to help readers navigate concepts effectively while maintaining a strong, customer-focused approach.
More posts by Vallary Achieng Otieno