How to Set Up Two-Factor Authentication (2FA) for Your BoldSign Account
 Lakshmi Priya Soundar Rajan
TL;DR: Two-factor authentication (2FA) asks for a second proof after your password, such as a code from your phone. In BoldSign, you turn it on from Settings > My Profile, and admins can require it for the whole team. Our two-factor authentication help article lists every method.
Your BoldSign account holds contracts, templates and the names of everyone who signs them. A password on its own guards all of that. One leaked or reused password is enough for someone else to sign in.
A second step closes that gap. This guide shows how to set up each method, how to require it for your team, and what to do when you lose your phone.
What is BoldSign 2FA?
BoldSign 2FA is a second check that runs after you enter your email and password. You type a short code sent to a method you chose, so a stolen password is not enough on its own.
A bank card works the same way. The card alone does not let anyone take cash out. They also need the personal identification number (PIN), which only you know.
Which two-factor authentication methods does BoldSign support?
We support three methods that send or create a code, plus passkeys. You can turn on more than one and pick between them at sign-in.
- Authenticator app: an app such as Google Authenticator creates the code.
- Text message (SMS): we send the code to your mobile number.
- Recovery email: we send the code to an email address you choose.
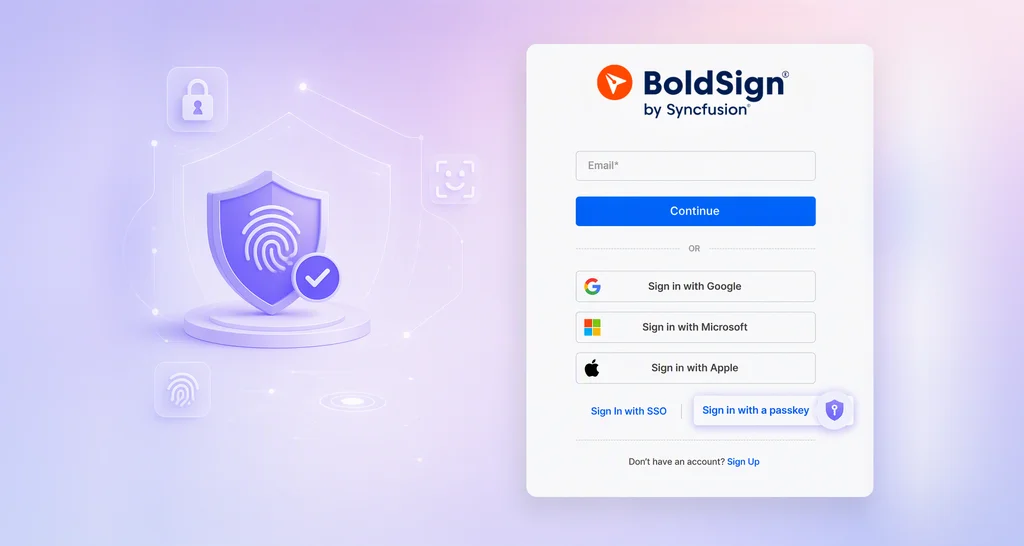
- Passkey: your fingerprint, face or device PIN replaces the code.
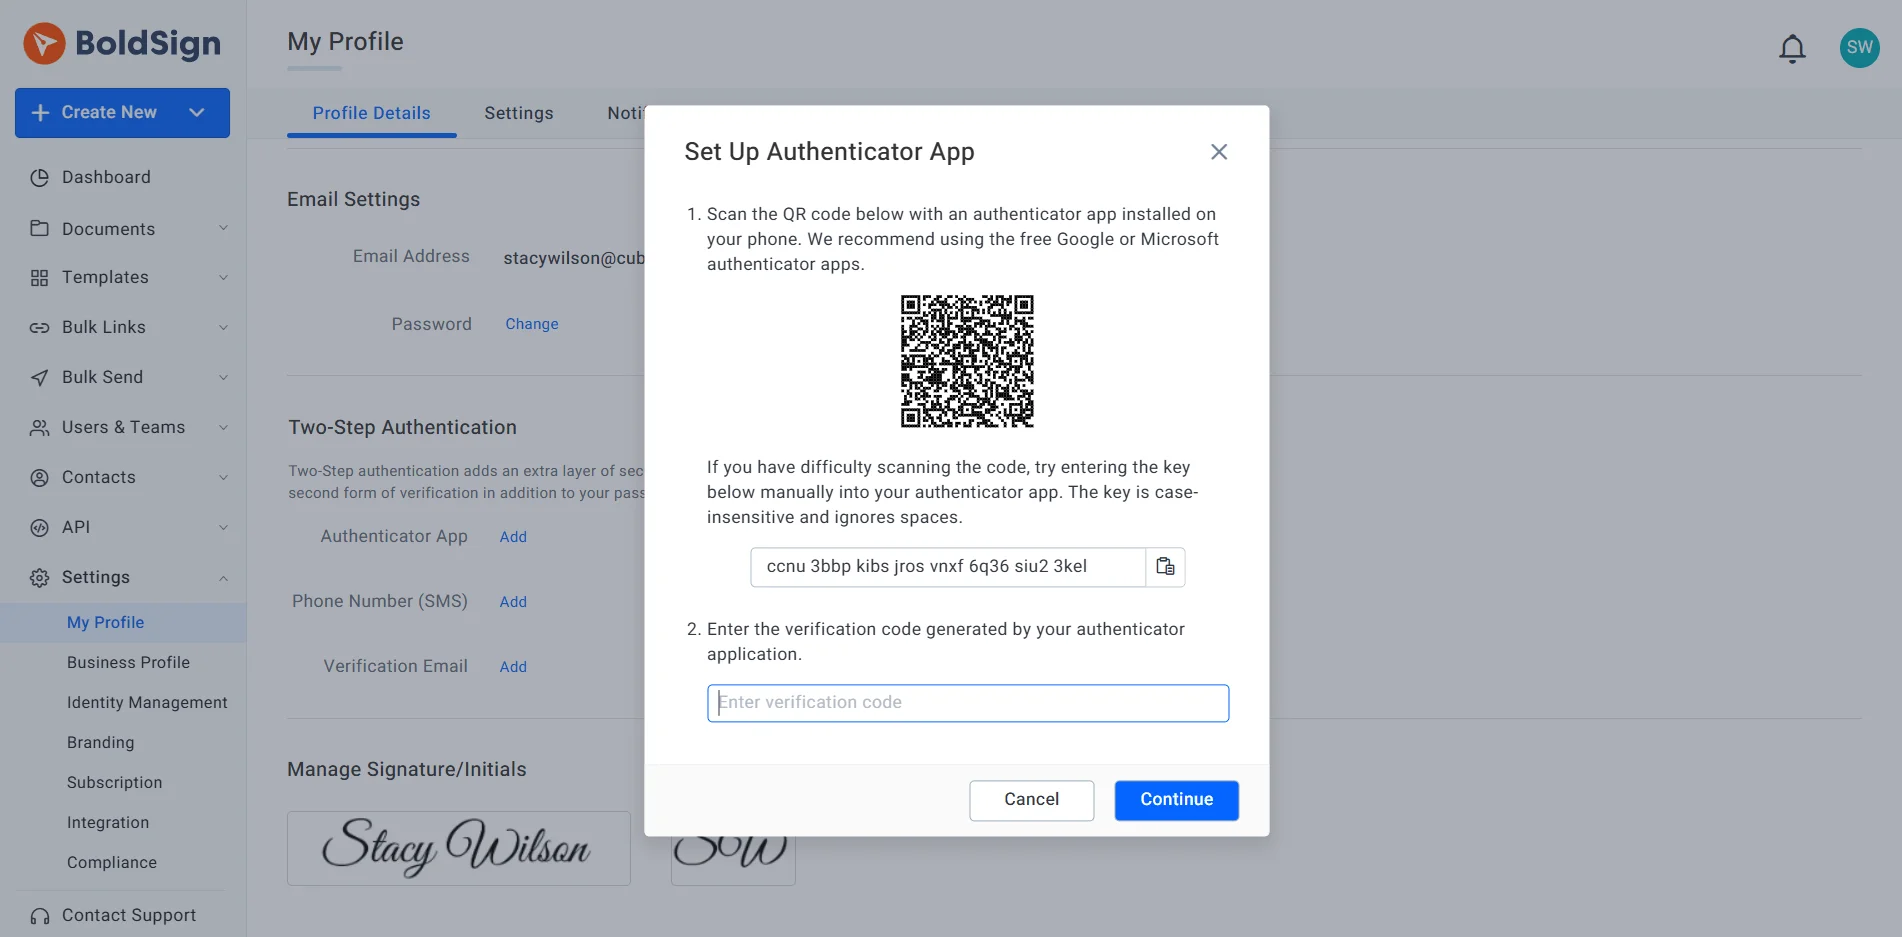
How do you set up 2FA with an authenticator app?
An authenticator app works without a phone signal, so it suits most people. Our help article on how to enable two-factor authentication covers each method.
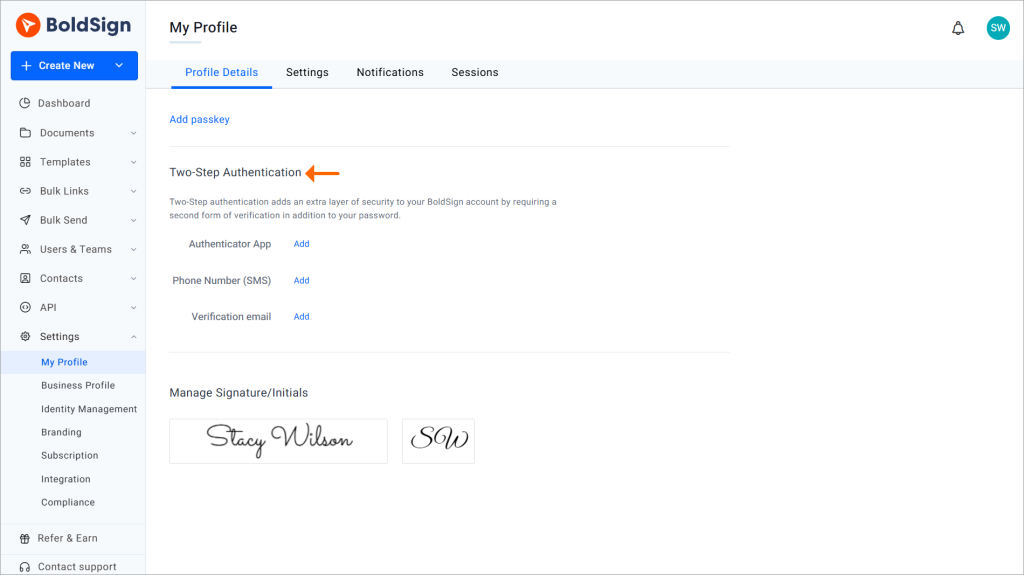
- Go to Settings and select My Profile.
- In the two-factor authentication section, select Add next to Authenticator app.
- Scan the quick response (QR) code with Google Authenticator or Microsoft Authenticator.
- Type the code from the app into Enter verification code, then select Continue.
- Select Continue again in the confirmation box.
How do you turn on text message (SMS) authentication?
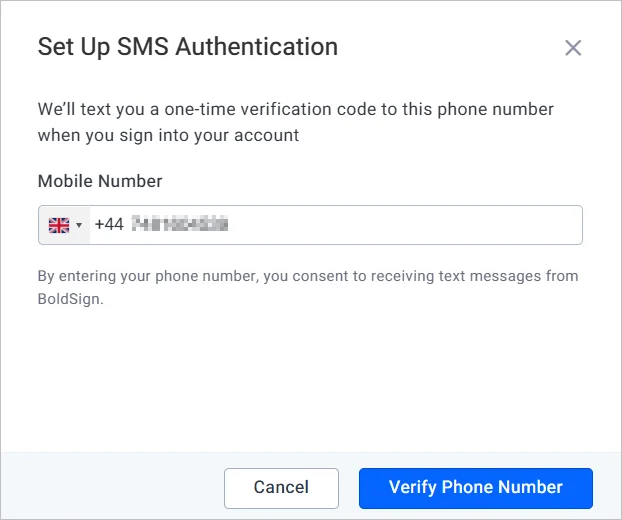
With SMS, we text a code to your phone each time you sign in. You only need a phone that can receive texts.
- In My Profile, select Add next to Phone Number.
- In the Set Up SMS Authentication box, enter your number and select Verify Phone Number.
- Type the code from the text into Enter verification code and select Verify.
- Select Continue in the confirmation box.
How do you add a recovery email?
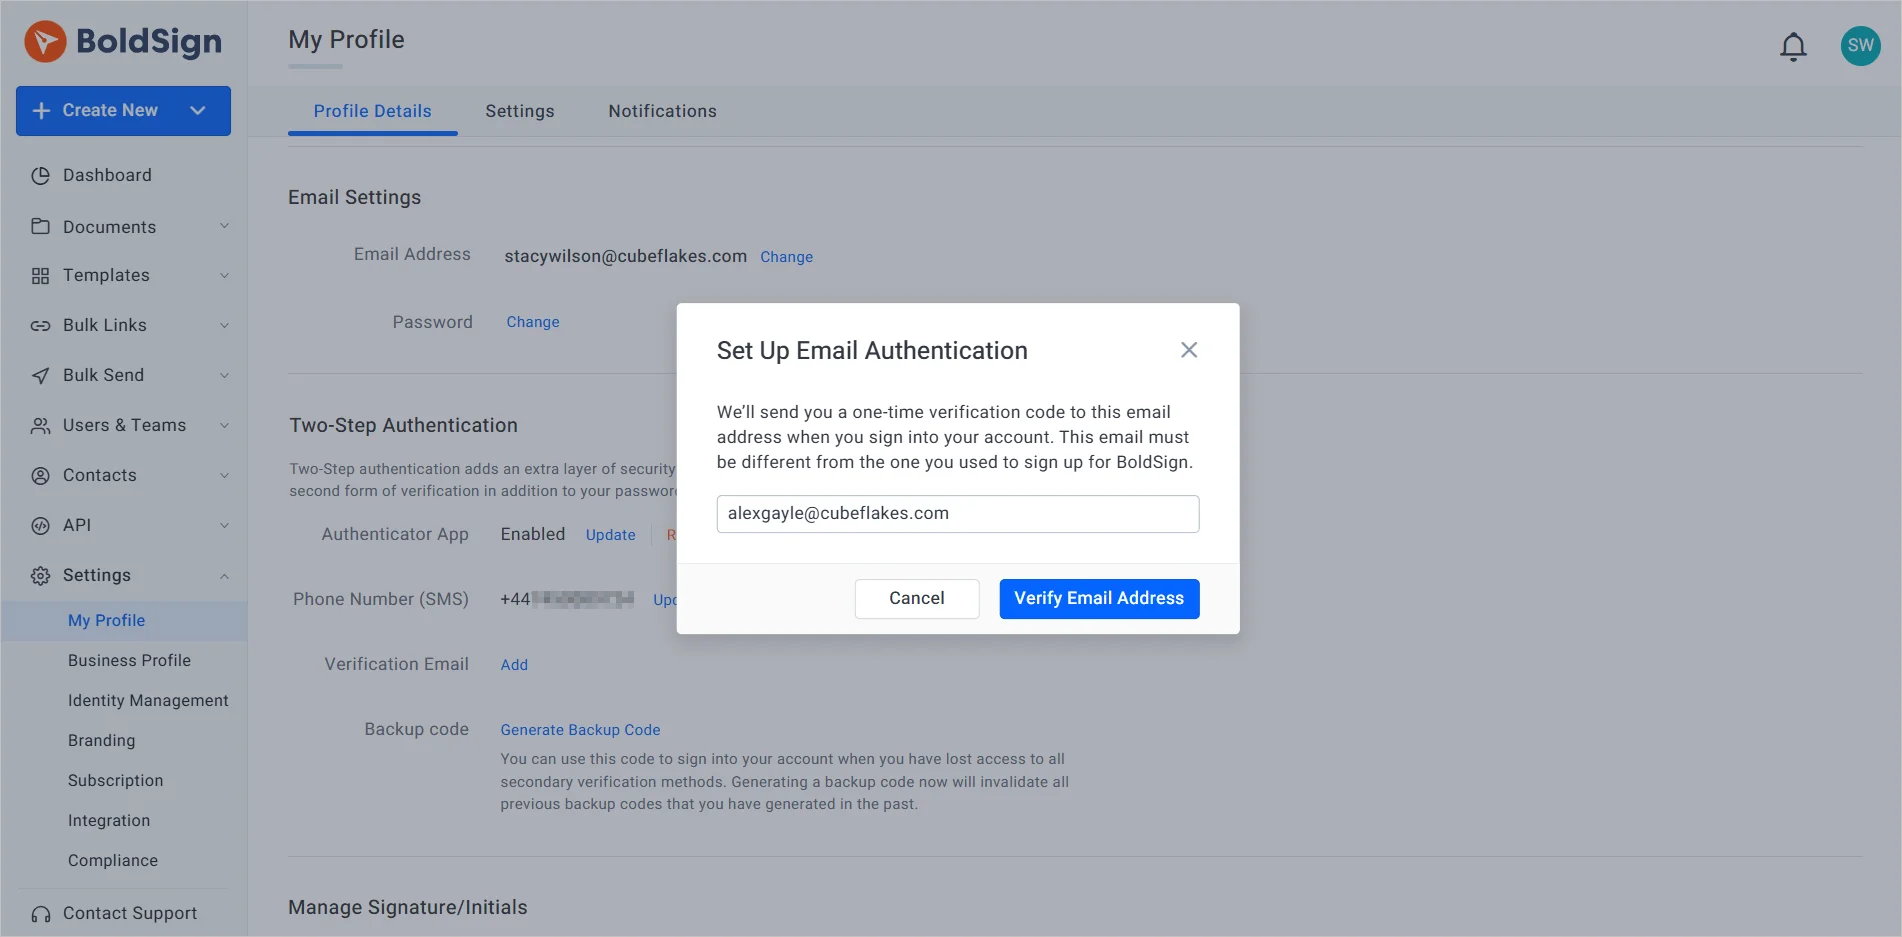
A recovery email gives you a code by email. Pick an address other than your sign-in email, so one lost inbox does not lock you out.
- In My Profile, select Add next to Recovery Email.
- In the Set Up Email Authentication box, enter the address and select Verify Email Address.
- Type the code from that inbox and select Verify.
- Select Continue in the confirmation box.
How do you add a passkey as your second step?
A passkey lets you prove who you are with something your device already checks. That can be your fingerprint, your face, your device PIN or a security key.
Our guide to passkey authentication explains how passkeys work. The steps below register one.
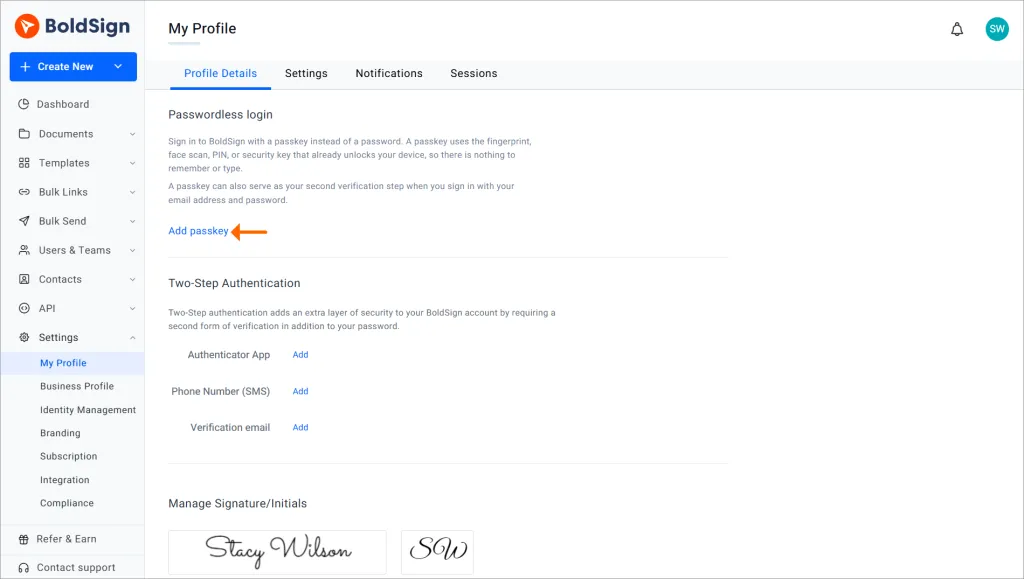
Start the passkey set-up
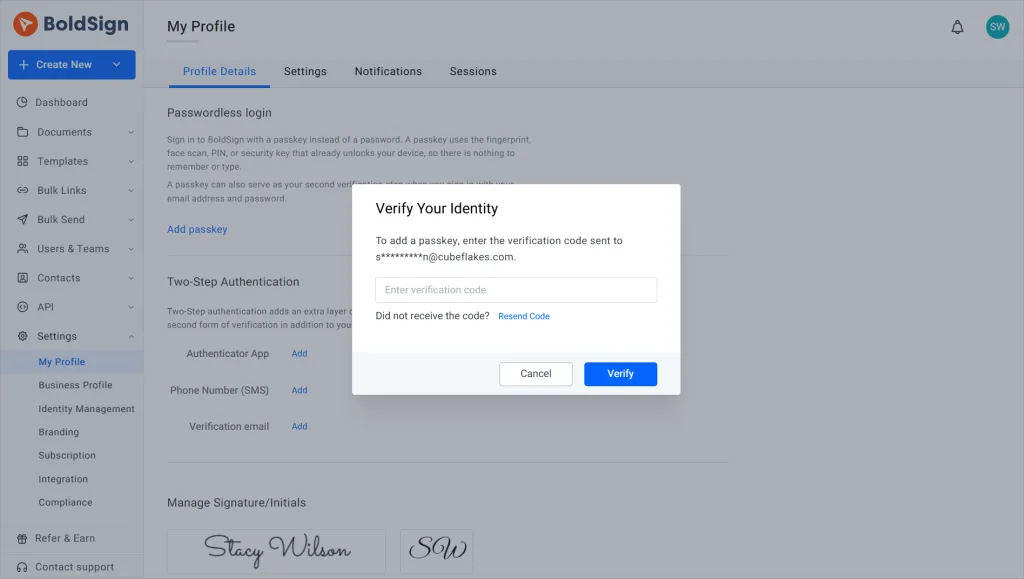
- Go to Settings > My Profile > Passwordless login.
- Select Add passkey.
- Verify your identity with your 2FA method or the code sent to your email.
Create and name the passkey
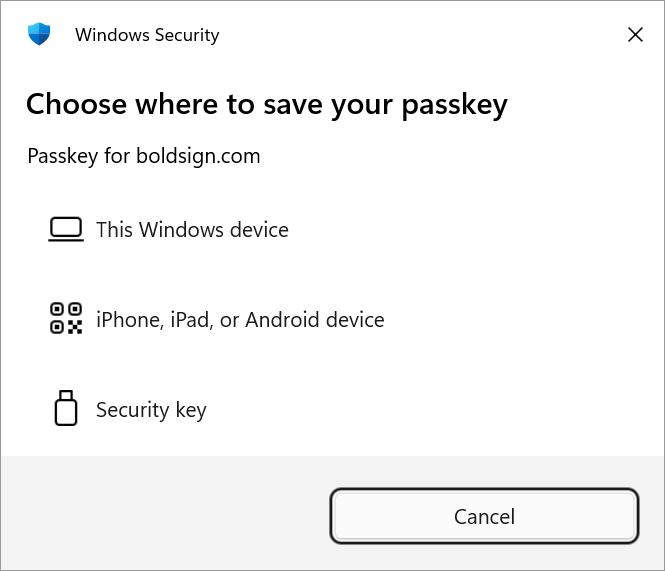
- Choose where to save the passkey, then select Continue.
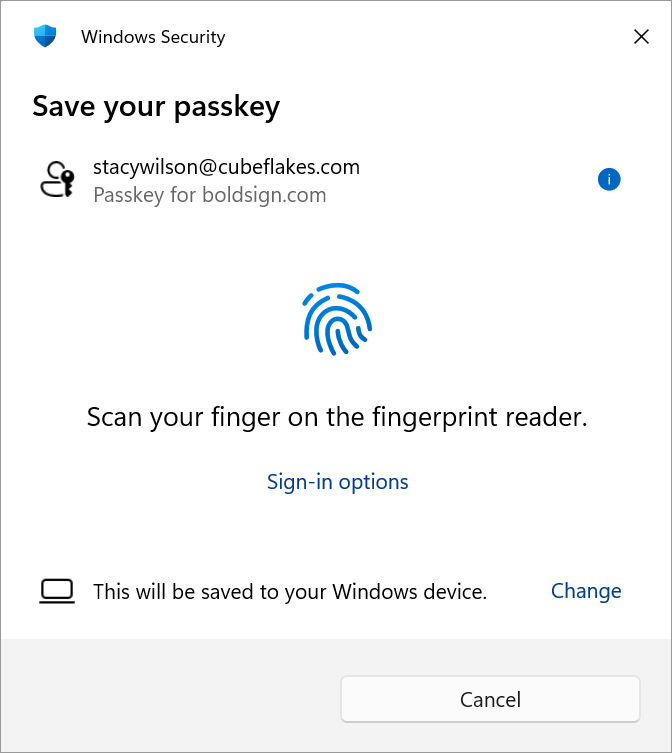
- Confirm with your fingerprint, face, device PIN, phone or security key.
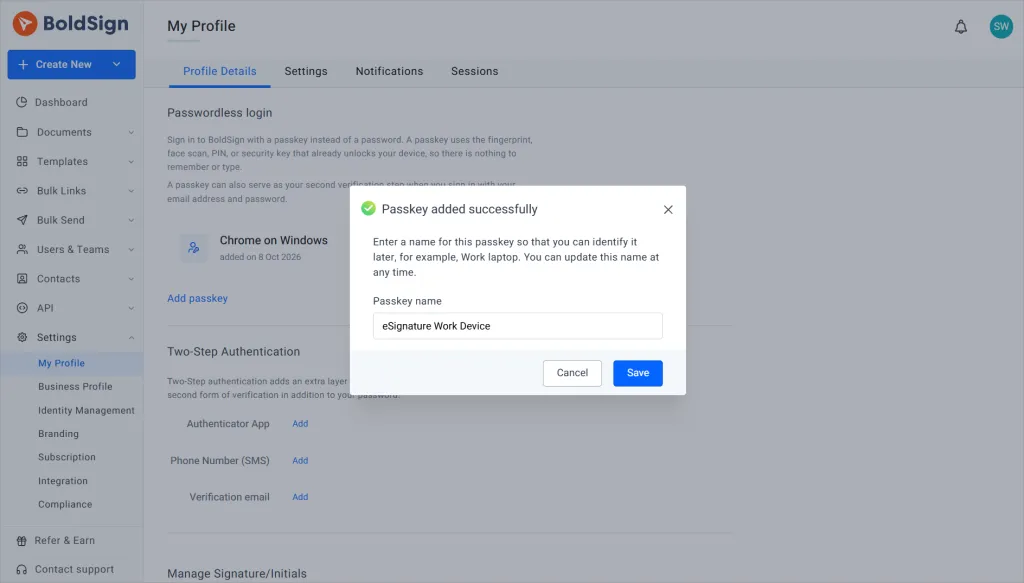
- Enter a name for the passkey and save it.
How do you change your 2FA settings later?
Go back to Settings > My Profile and update the method there. Do it as soon as you get a new phone or change your email address.
Keep at least two methods turned on. Then a lost phone or a closed inbox does not stop you from signing in.
How do you enforce two-factor authentication for your team?
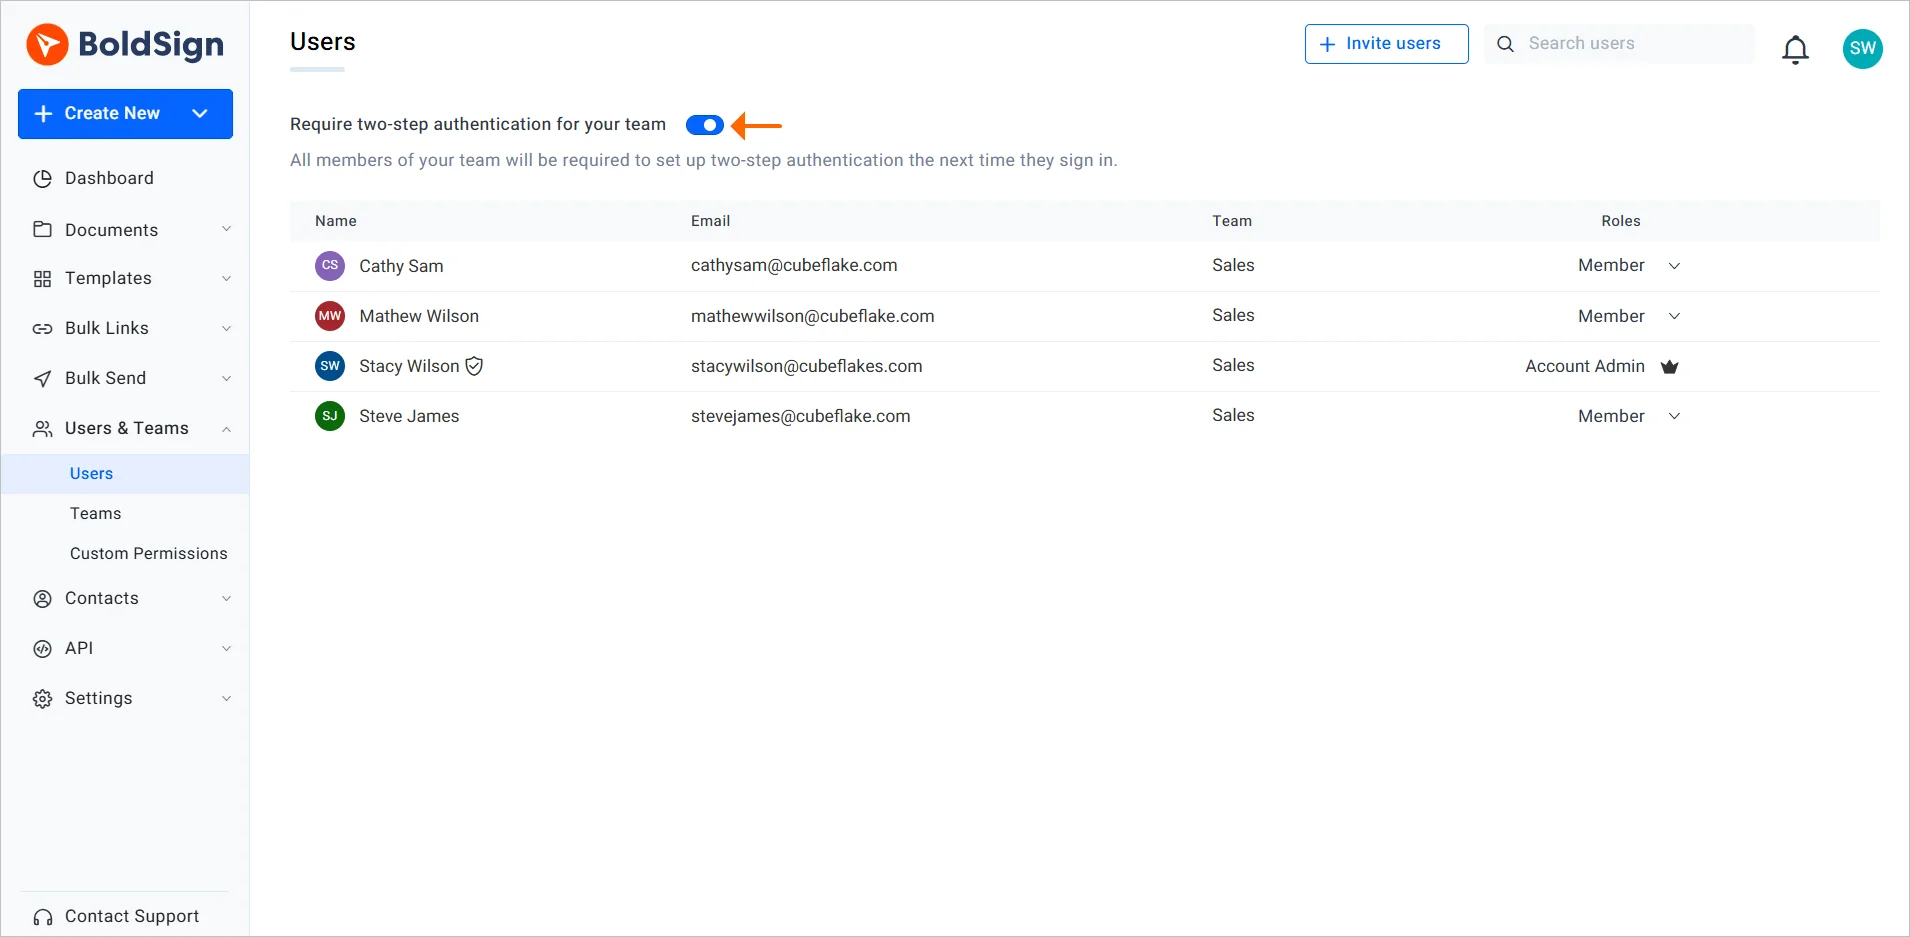
Account admins can require two-step authentication for the team. Every user must then set up a second step before they can use their account.
- Open the Users & Teams menu and select Users.
- At the top of the page, turn on Require two-step authentication for your team.
What does each team member see?
At their next sign-in, each person sees a box with three choices. They must set up one of these:
- Authenticator app
- Phone number
- Email (a verification email address)
From then on, they enter a code from that method every time they sign in.
How do you sign in with two-factor authentication?
You sign in with your email and password, then enter one code. Our help article on how to sign in with two-factor authentication shows each screen.
- Go to the BoldSign login page.
- Enter your email ID and password, then select Sign In.
- Enter the code sent to your chosen method and select Verify.
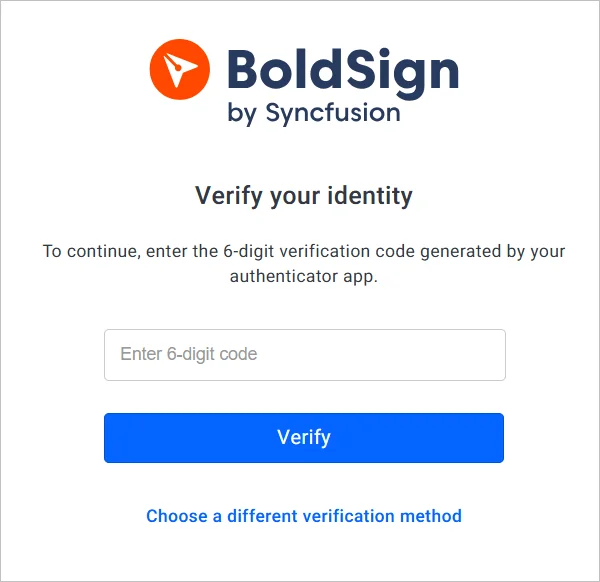
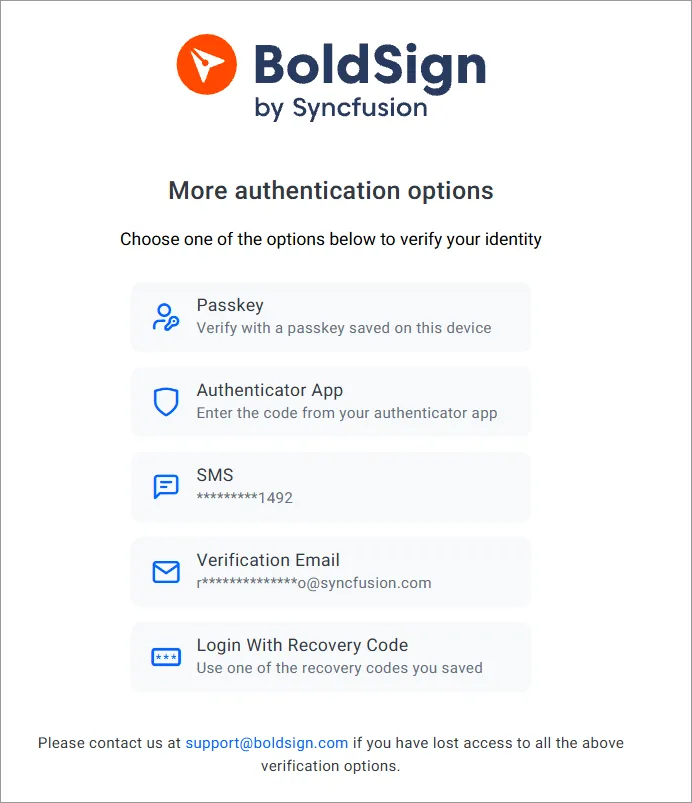
Want the code sent somewhere else? Select Choose a different verification method and pick another one. With a passkey registered, you can choose Passkey on the Verify your identity page instead.
What if you lose access to every 2FA method?
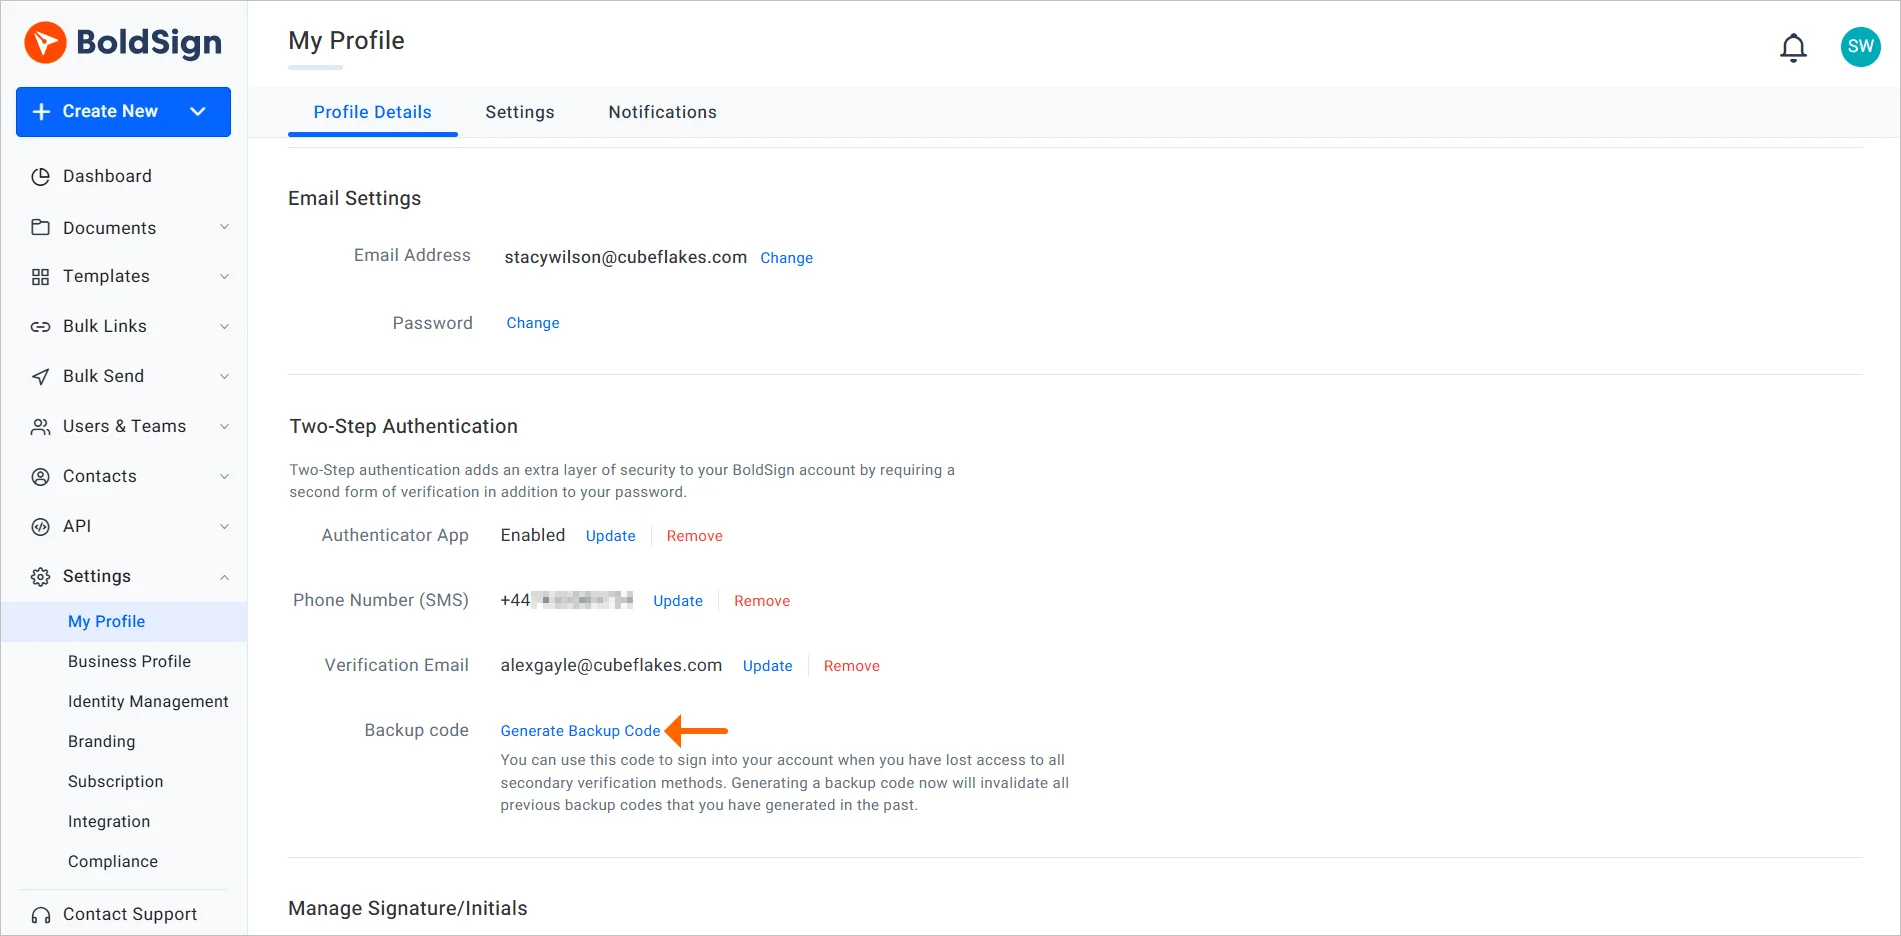
Use a backup code. Create it now, while your methods still work, and store it somewhere safe.
- Go to Settings and select My Profile.
- In the two-step authentication section, find Backup code and select Generate Backup code.
- Choose one of your methods and enter the code sent to it.
- Select Verify and save the backup code that appears.
To use it, select Choose a different verification method at sign-in, then Login with Recovery Code. You then set up a method again, and we show you a new backup code to save.
Is account 2FA the same as two factor authentication for document signing?
No, they protect different people. Account 2FA guards your own sign-in, and signer authentication checks the person who opens the document you sent.
Both matter for sensitive contracts. With signer authentication, the signer must pass a check before the document opens. The check can be an email code, an access code, a text message code or ID verification.
ID verification compares the signer’s photo ID with a live selfie. Our guide to signer authentication methods helps you pick one for each kind of document.
Which BoldSign plan includes 2FA and signer checks?
Passkey sign-in comes with every plan, including our free plan. Our help articles for account 2FA name no plan limit.
Signer checks by email code or access code are free on every plan. Text message codes for signers and ID verification need the Business or Premium plan, where they are pay-as-you-go add-ons.
Business costs $15 per user a month, billed yearly, and prices are in USD. The BoldSign pricing page lists each plan.
Where do you go next to secure your BoldSign account?
Turn on 2FA today, then add signer checks to the documents that need them.
- Start a 30-day free trial and set up 2FA on your new account.
- Book a demo to see team 2FA and signer checks set up for your documents.
- Visit our support portal with a question about your sign-in.
Frequently asked questions
What is BoldSign 2FA?
It is two-factor authentication for your BoldSign account. After your password, you enter a code from a second method, such as an app on your phone. A stolen password alone is then not enough to get in.
Which authenticator apps work with BoldSign?
Apps such as Google Authenticator and Microsoft Authenticator work. You scan the code BoldSign shows, then type the code the app creates.
Can I turn on more than one 2FA method?
Yes. You can add an authenticator app, a phone number and a recovery email. At sign-in, you choose which one gets the code.
How to enforce two-factor authentication for sensitive document signings?
Turn on two-step sign-in for your whole team from Users & Teams, so every sender proves who they are. Then add signer authentication, such as an email code, to each sensitive document before you send it.
How to set up two-factor identity verification for contract signing?
Add a check to the signer when you prepare the contract, such as an email code or an access code. For higher risk deals, ID verification compares the signer's photo ID with a live selfie.
Are documents signed with two-factor checks legally binding?
Yes, when the signing meets the usual rules for electronic signatures, such as consent to sign electronically. An extra check adds proof of who signed, and the audit trail records it.
What happens if I lose my phone?
Sign in with another method you set up, such as your recovery email. If you have lost every method, use your saved backup code, then set up a new method.
Can a passkey replace the verification code?
Yes, once you have registered one. On the Verify your identity page, choose Passkey and confirm with your fingerprint, face or device PIN.

Lakshmi Priya Soundar Rajan
Lakshmi Priya Soundar Rajan is a Technical Writer at BoldSign. With expertise in simplifying complex concepts, she contributes to the comprehensive documentation and user-friendly content at BoldSign. Lakshmi’s commitment to quality ensures users have access to clear and helpful information. Connect with her on LinkedIn.
More posts by Lakshmi Priya Soundar Rajan