How to Automatically Add Document Fields by Using Text Tags
 Gopinath Kannusamy
TL;DR: Text tags are short codes, such as
{{sign|1|*}}, that you type into a document where a field should go. Send the document through the BoldSign eSignature API withUseTextTagsset to true, and we turn each tag into a form field. You never have to measure x and y coordinates.
Placing form fields through an API usually means giving each field exact x and y coordinates. Finding those numbers takes trial and error, and a small layout change can move every field.
Text tags skip that step. You mark each field in the document itself, and our API finds the tags when you send it. This guide covers the syntax, the API call, the supported fields and the settings to check.
What are text tags?
Text tags are placeholders you type into a document. BoldSign turns them into form fields when you send the document.
Think of the sticky notes that say “sign here” on a paper contract. A text tag does the same job, except the software reads the note and draws the field for you.
Say you send sales orders to customers for signature. Each order needs a signature, a date and the customer’s name. Put the three tags into your sales order once, and every copy you send gets its fields in the same places.
How is a text tag written?
A text tag starts with {{, ends with }} and uses a pipe (|) between its parts. The parts always come in this order:
- Field type, such as
sign,dateortext(required). - Signer index, starting from 1 for the first signer (required).
- Required flag: an asterisk (
*) makes the field required. - Field label, shown as the placeholder in text boxes (optional).
- Field ID, made of letters, numbers, hyphens and underscores (optional).
To skip a part, leave it empty and keep the pipes in place. For example, {{text|1| |signer_1_name}} sets a field ID with no label.
How do you add fields with text tags in BoldSign?
You add the tags to your file, then send it with one extra setting. The steps below use a sales order with three fields.
Step 1: Put the tags in your document
Type a tag wherever a field should appear. For a signature, a date and the customer’s name, the tags look like this:
{{sign|1|*| |sign_field_1}}
{{date|1|*| |date_field_1}}
{{text|1|*|Customer Name|text_field_1}}
Step 2: Send the document with UseTextTags set to true
Upload and send the document through the BoldSign API with the UseTextTags property set to true. The API then reads the tags and turns them into form fields, so you can skip listing fields for each signer.
curl -X 'POST' \
  'https://api.boldsign.com/v1/document/send' \
  -H 'accept: application/json' \
  -H 'X-API-KEY: {your API key}' \
  -H 'Content-Type: multipart/form-data' \
  -F 'Title="Sales Order"' \
  -F 'UseTextTags=true' \
  -F 'Signers={
  "name": "John Doe",
  "emailAddress": "johndoe@example.com",
  "signerType": "Signer",
  "signerRole": "Customer",
  "locale": "EN"
}' \
  -F 'Files=@{your file}'
Step 3: Check the fields in the sent document
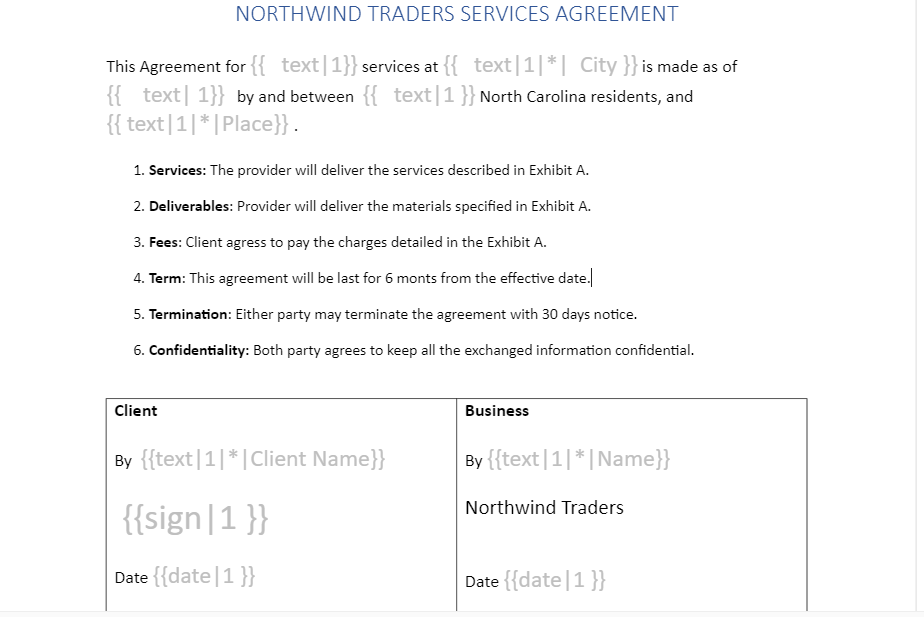
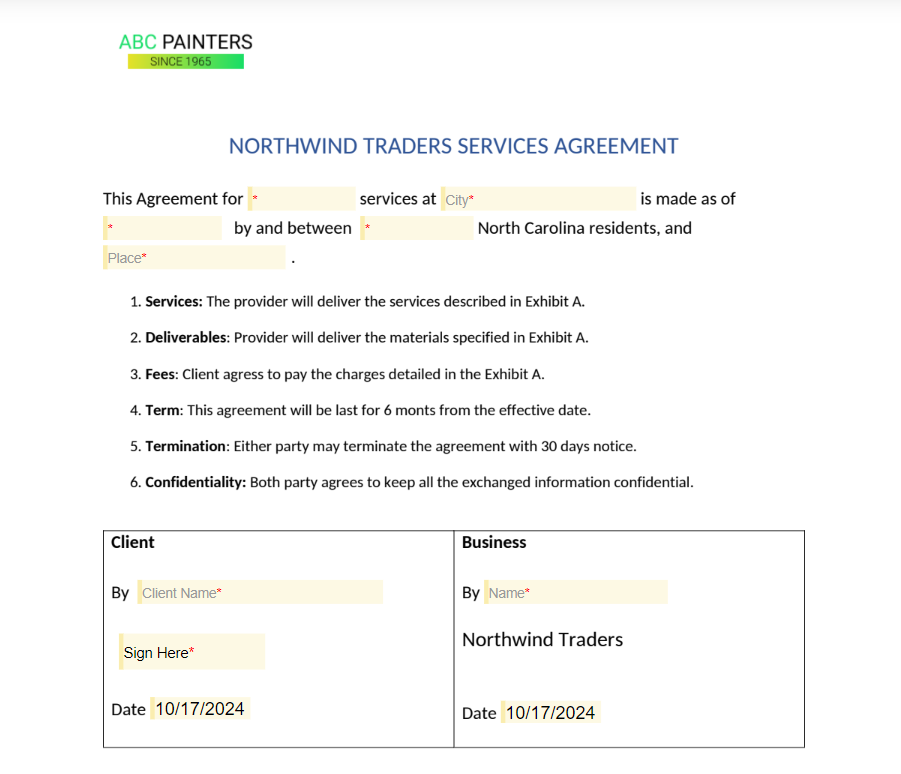
Compare your file before and after sending. The first image shows a sample document with the tags typed in. The second shows the same document with form fields in their place.
Which fields do text tags support?
Text tags cover seven field types. Each example below makes a required field for the first signer, with its own field ID.
| Form field | Tag example | What it creates |
|---|---|---|
| Signature | {{sign|1|*| |sign_1}} |
A required signature field |
| Initials | {{init|1|*| |init_1}} |
A required initials field |
| Date signed | {{date|1|*| |date_1}} |
A required date signed field |
| Editable date | {{editdate|1|*| |editdate_1}} |
A required date field the signer can change |
| Text box | {{text|1|*|Customer Name|text_1}} |
A required text box with a placeholder |
| Title | {{title|1|*| |title_1}} |
A required job title field |
| Company | {{company|1|*| |company_1}} |
A required company field |
The field label shows as a placeholder in text boxes only. An editable date can take a date format in its fourth part, such as yyyy,MMM dd, which is also the default.
When should you use definition tags?
Use definition tags for checkboxes and radio buttons, or when a field needs more settings than fit in a short tag. The tag in the document holds only an ID, and your API request carries the field’s settings.
To write one, type @ and then the definition ID from the TextTagDefinitions list in your send request. Here the ID is tag1:
{{@tag1}}Then describe the field in the send request. This one makes a required email text box for the first signer on page 1, 300 by 50 pixels in size.
curl -X POST \
  'https://api.boldsign.com/v1/document/send' \
  -H 'X-API-KEY: {your-api-key}' \
  -F 'Title=Sales Order with Definitions' \
  -F 'Signers[0][Name]=John Doe' \
  -F 'Signers[0][EmailAddress]=johndoe@example.com' \
  -F 'Signers[0][SignerType]=Signer' \
  -F 'UseTextTags=true' \
  -F 'TextTagDefinitions[0][DefinitionId]=tag1' \
  -F 'TextTagDefinitions[0][Type]=TextBox' \
  -F 'TextTagDefinitions[0][SignerIndex]=1' \
  -F 'TextTagDefinitions[0][IsRequired]=true' \
  -F 'TextTagDefinitions[0][FieldLabel]=Email' \
  -F 'TextTagDefinitions[0][FieldId]=email_1' \
  -F 'TextTagDefinitions[0][Size][Width]=300' \
  -F 'TextTagDefinitions[0][Size][Height]=50' \
  -F 'TextTagDefinitions[0][Placeholder]=Enter your email' \
  -F 'TextTagDefinitions[0][PageNumber]=1' \
  -F 'Files=@{your file};type=application/pdf'
Keep every ID in the document matched to one in your request. A missing definition stops the document from sending, and the reason goes to your webhook. The advanced usage guide lists every setting a definition can hold.
What should you watch out for with text tags?
A few habits keep tags from showing up in the signed copy or creating the wrong field size.
- The tag text stays in the document, so match its font color to the page, usually white on white.
- Add spaces right after
{{or right before}}to make a field wider. - Use a larger font size on the tag to make its field taller.
- Give each field its own field ID, and never reuse one.
- Set UseTextTags to true on every send, since it is false by default.
Text tags differ from document tags, which are labels you add to a document. Those labels help you find and list documents later.
Which BoldSign plan includes text tags, and what does it cost?
Text tags need the Enterprise API plan. It starts at $30 a month with 40 envelopes, and each extra envelope costs $0.75, as listed on the BoldSign pricing page in November 2026.
Prices are in USD. Our other plans leave text tags out.
You can test text tags first in a free API sandbox, with no credit card required. Sandbox documents carry a test watermark, and we delete them after 14 days.
Where do you go next with text tags?
Try the tags on a sample document before you add them to your own forms.
- Create a free API sandbox account and send a test document with text tags.
- Book a demo to see text tags set up for your documents.
- Open the text tags demo sample to watch tags turn into fields.
Ask our team through the support portal when a tag does not turn into a field.
Frequently asked questions
What is a text tag in BoldSign?
A text tag is a short code in double curly braces that you type into a document. We turn each tag into a form field when you send the document through our API with UseTextTags set to true.
Which form fields can I create with text tags?
Text tags create text boxes, signatures, initials, date signed fields, editable dates, titles and company fields. Checkboxes and radio buttons need definition tags.
Do text tags stay visible in the signed document?
Yes, the tag text stays in the document after we add the fields. Set the tag's font color to match the page background, usually white on white, so signers cannot see it.
How do I make a text tag field wider or taller?
Add spaces right after the opening braces or right before the closing braces to widen the field. Use a larger font size on the tag to make it taller.
What is a definition tag?
A definition tag, such as {{@tag1}}, points to a field you describe in the TextTagDefinitions list of your send request. Use one when a field needs more settings than fit in a short tag.
Can I use text tags in templates?
Yes. Our developer documentation states that text tags work when you send a document and when you create a template.
How do I mark a text tag field as required?
Put an asterisk (*) in the third part of the tag, after the signer index. For example, {{text|1|*}} makes a required text box for the first signer.
Which BoldSign plan includes text tags?
Text tags come with the Enterprise API plan, which starts at $30 a month with 40 envelopes. You can test them first in a free API sandbox account.

Gopinath Kannusamy
Gopinath is a passionate software developer with 2 years of experience at BoldSign. He is an avid writer and enjoys sharing his insights on technology and development. In his free time, he enjoys exploring new technologies and learning new things. Connect with him on LinkedIn.
More posts by Gopinath Kannusamy