Integrate Electronic Signatures into Your Blazor Application
 Gopinath Kannusamy
TL;DR: You can add electronic signatures to a Blazor Server app with the BoldSign NuGet package in four steps. Register the API clients and send a document from a template. Then show the signing link in an iframe and download the signed PDF when a webhook fires. Our embedded signing page shows what signers see.
Say your Blazor app collects consent forms or contracts. Today your users print them, or you send them to another site to sign. Each hop away from your app is a chance for the signer to give up.
With our API, the whole flow stays inside your app. You send the document, the signer signs on your page, and your server saves the signed file. This guide walks through each step with working C# code.
What does this Blazor signature example build?
The example builds one Blazor page that asks for a signer’s name and email, then shows a document to sign. A small controller downloads the signed PDF once everyone has signed.
You get four pieces:
- API clients set up once in Program.cs
- A method that sends a document from a saved template
- A signing page that shows the document in an iframe
- A webhook controller that saves each signed PDF
What do you need before you start?
You need a BoldSign account with API access, the dotnet command-line tool and an API key. You can test the whole Blazor signature free of charge in a free API sandbox account.
Our Getting Started with BoldSign guide explains the set-up in more depth. Create a Blazor Server app from your terminal:
dotnet new blazorserver -o BlazorEsignAppMove into the project folder and install the BoldSign API NuGet package:
dotnet add package BoldSign.ApiThen create an API key in the BoldSign web app. Our guide to API credentials shows where to find it.
How do you set up the BoldSign API clients?
Register the API clients as services in Program.cs. Every page and controller can then ask for them by type.
using BoldSign.Api;

var builder = WebApplication.CreateBuilder(args);

// Add BoldSign services
var apiKey = "YOUR_API_KEY";
var apiClient = new ApiClient("https://api.boldsign.com/", apiKey);
builder.Services.AddSingleton(apiClient);
builder.Services.AddSingleton(new DocumentClient(apiClient));
builder.Services.AddSingleton(new TemplateClient(apiClient));

builder.Services.AddControllers();
builder.Services.AddRazorPages();
builder.Services.AddServerSideBlazor();

var app = builder.Build();

if (!app.Environment.IsDevelopment())
{
    app.UseExceptionHandler("/Error");
    app.UseHsts();
}

app.UseHttpsRedirection();
app.UseStaticFiles();
app.UseRouting();
app.MapControllers();

app.MapBlazorHub();
app.MapFallbackToPage("/_Host");

app.Run();
The code creates an ApiClient with the BoldSign API address and your API key. It then registers DocumentClient and TemplateClient as singletons, so the app shares one copy of each.
Keep the real key out of your code in a live app. Read it from your app settings or a secret store instead.
How do you send a document from a template?
Call SendUsingTemplate with the template ID and one role for each signer. A template holds the file and its fields, so each send needs only the signer’s details.
Templates make for a fast Blazor signature flow, since you place the fields once and reuse them. You can create one in the BoldSign web app or through the template API. Our eSignature templates page explains what a template can hold.
We email each signer by default. Set disableEmails to true when the signer will sign inside your app instead. Add a method like this to your Blazor component or service:
private async void SendDocumentUsingTemplate()
{
    var templateRole = new Roles(
        roleSignerIndex: 1,
        roleSignerName: signerName,
        roleSignerEmailAddress: signerEmail,
        locale: Locales.EN);

    var roles = new List<Roles>
    {
        templateRole,
    };
    var templateDetails = new SendForSignFromTemplate(
        templateId: "Your Template ID",
        title: "Document from Template",
        disableEmails: true,
        roles: roles,
        message: "This document description"
    );

    var createdDocumentResult = TemplateClient.SendUsingTemplate(templateDetails);
}
The templateId is the ID of the saved template. The title and message tell the signer what the document is.
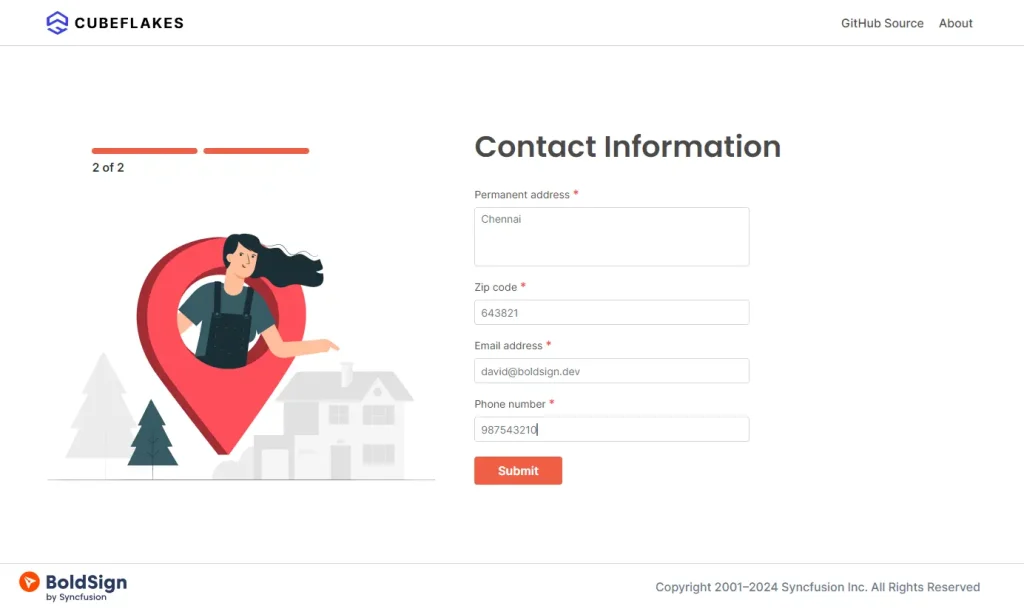
How do you collect the signer’s details?
Add a short form to your page for the signer’s name and email. Your method then places those values in the role before it sends the document.
How do you build a Blazor custom signature page?
Ask for an embedded signing link with the document ID that SendUsingTemplate returns. Then load that link in an iframe on your own page.
Our guide to the embedded signing link covers every option. This method creates a link that works for 10 minutes and returns the signer to your app afterwards:
private async Task GenerateSignLinkAsync(string documentId, string signerEmail)
{
    var signLinkBase = NavigationManager.BaseUri;
    EmbeddedSigningLink embeddedSigningLink = await DocumentClient
        .GetEmbeddedSignLinkAsync(documentId, signerEmail,
            DateTime.Now.AddMinutes(10),
            $"{signLinkBase}response").ConfigureAwait(false);

    signlink = embeddedSigningLink.SignLink;
}
How do you show the signing link in your page?
Put the link in an iframe and style the page around it. This full page joins the form, the send method and the signing link:
@page "/"
@using BoldSign.Api
@using BoldSign.Model
@inject NavigationManager NavigationManager
@inject TemplateClient TemplateClient
@inject DocumentClient DocumentClient

<h2 class="title">Integrate eSignature functionality using BoldSign in your Blazor application</h2>
<p>The BoldSign API provides an easy and clean interface to integrate a complete eSignature workflow into your app in a matter of minutes. </p>

<div class="form-container">
<div class="form-group">
<label for="signerName">Signer Name:</label>
<input type="text" id="signerName" @bind="signerName" placeholder="Enter signer's name" class="input-field" />
</div>
<div class="form-group">
<label for="signerEmail">Signer Email:</label>
<input type="email" id="signerEmail" @bind="signerEmail" placeholder="Enter signer's email" class="input-field" />
</div>
<button class="sign-button" @onclick=@SendDocumentUsingTemplate>Sign Document</button>
</div>

@if (!string.IsNullOrEmpty(signlink))
{
    <div class="document-container">
    <h5>Sign the document:</h5>
    <iframe id="iframeID" src="@signlink" height="600" width="100%" class="document-frame"></iframe>
    </div>
}

<style>
    .title {
        color: #0565FF;
        font-family: Arial, sans-serif;
    }
.form-container {
    margin-top: 20px;
    padding: 20px;
    border: 1px solid #ccc;
    border-radius: 5px;
    width: 100%;
    max-width: 500px;
}
.form-group {
    margin-bottom: 15px;
}
.input-field {
    width: 100%;
    padding: 8px;
    margin-top: 5px;
    box-sizing: border-box;
    border: 1px solid #ccc;
    border-radius: 4px;
}
.sign-button {
    background-color: #0565FF;
    color: white;
    border: none;
    padding: 10px 15px;
    text-align: center;
    text-decoration: none;
    display: inline-block;
    font-size: 16px;
    margin-top: 10px;
    cursor: pointer;
    border-radius: 4px;
    width: 100%;
}
.sign-button:hover {
    background-color: #004cbf;
}
.document-container {
    margin-top: 30px;
    padding: 20px;
    border: 1px solid #ccc;
    border-radius: 5px;
}
.document-frame {
    border: none;
    border-radius: 4px;
}
</style>

@code {
    private string signlink = string.Empty;

    private string signerName;
    private string signerEmail;

    private async void SendDocumentUsingTemplate()
    {
        var templateRole = new Roles(
            roleSignerIndex: 1,
            roleSignerName: signerName,
            roleSignerEmailAddress: signerEmail,
            locale: Locales.EN);

        var roles = new List<Roles>
        {
            templateRole,
        };
        var templateDetails = new SendForSignFromTemplate(
            templateId: "Your Template Id",
            title: "Document from Template",
            disableEmails: true,
            roles: roles,
            message: "This document description"
        );

        var createdDocumentResult = TemplateClient.SendUsingTemplate(templateDetails);
        await GenerateSignLinkAsync(createdDocumentResult.DocumentId, signerEmail).ConfigureAwait(false);
    }

    private async Task GenerateSignLinkAsync(string documentId, string signerEmail)
    {
        var signLinkBase = NavigationManager.BaseUri;
        EmbeddedSigningLink embeddedSigningLink = await DocumentClient
            .GetEmbeddedSignLinkAsync(documentId, signerEmail,
                DateTime.Now.AddMinutes(10),
                $"{signLinkBase}response").ConfigureAwait(false);

        signlink = embeddedSigningLink.SignLink;
        InvokeAsync(StateHasChanged);
    }
}
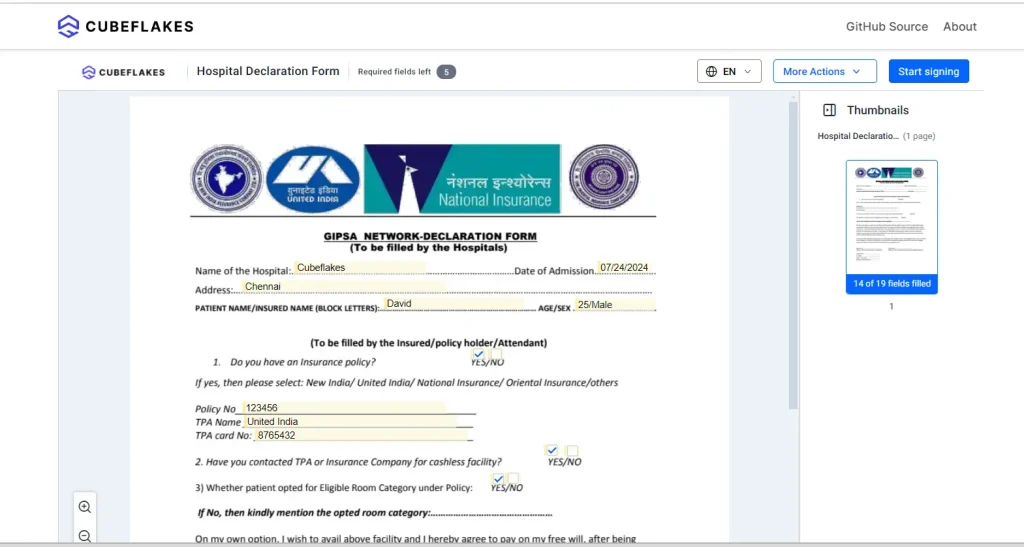
The signer sees our full signing user interface (UI) inside your page. You get a Blazor signature with rich UI without building the signing screen yourself, and you still own the page around it.
How do you download Blazor signature documents after signing?
Add a webhook endpoint and listen for the Completed event. We send that event once every signer has signed and the final PDF is ready.
Our webhooks introduction shows how to add a webhook to your account. The controller below checks each request, then downloads the signed PDF:
using BoldSign.Api;
using BoldSign.Model;
using BoldSign.Model.Webhook;
using Microsoft.AspNetCore.Mvc;
using Microsoft.AspNetCore.Mvc.ViewFeatures;
using Microsoft.Extensions.Caching.Distributed;

namespace BlazorEsignApp.Controllers;

[ApiController]
[Route("webhook")]
public class WebhookController: Controller
{
    private readonly DocumentClient _documentClient;

    public WebhookController(DocumentClient documentClient)
    {
        _documentClient = documentClient;
    }

    [HttpPost]
    public async Task<IActionResult> HandleWebhookCallback()
    {
        var sr = new StreamReader(Request.Body);
        var json = await sr.ReadToEndAsync();

        if (Request.Headers[WebhookUtility.BoldSignEventHeader] == "Verification")
        {
            return Ok();
        }

        var SECRET_KEY = "YOUR_SECRET_KEY";

        try
        {
            WebhookUtility.ValidateSignature(
                json,
                Request.Headers[WebhookUtility.BoldSignSignatureHeader],
                SECRET_KEY);
        }
        catch (BoldSignSignatureException ex)
        {
            Console.WriteLine(ex);
            return Forbid();
        }

        var eventPayload = WebhookUtility.ParseEvent(json);

        if (eventPayload.Event.EventType == WebHookEventType.Completed)
        {
            var documentEvent = eventPayload.Data as DocumentEvent;
            if (documentEvent != null)
            {
                await DownloadCompletedDocument(documentEvent.DocumentId);
            }
        }

        return Ok();
    }

    private async Task DownloadCompletedDocument(string documentId)
    {
        try
        {
            var documentStream = await _documentClient.DownloadDocumentAsync(documentId);

            if (documentStream != null)
            {
                var downloadsPath = @"C:\Downloads"; // Specify the path where the document should be saved

                if (!Directory.Exists(downloadsPath))
                {
                    Directory.CreateDirectory(downloadsPath);
                }

                var filePath = Path.Combine(downloadsPath, $"{documentId}.pdf");
                await using var fileStream = new FileStream(filePath, FileMode.Create, FileAccess.Write, FileShare.None);
                await documentStream.CopyToAsync(fileStream);

                Console.WriteLine($"Document {documentId} downloaded successfully.");
            }
            else
            {
                Console.WriteLine($"Error downloading document {documentId}: Document stream is null.");
            }
        }
        catch (Exception ex)
        {
            Console.WriteLine($"Error downloading document {documentId}: {ex}");
        }
    }
}
Point the webhook URL in your BoldSign account at this endpoint, for example https://yourapp.com/webhook. Our guide on how to download documents with webhooks goes further.
What should you watch out for?
Most problems come from secrets in code, old signing links or skipped checks. Keep these points in mind as you move from the sandbox to a live app.
- Store your API key and webhook secret in settings, never in source control.
- Create a new signing link each time a signer opens the page.
- Always check the webhook signature before you act on an event.
- Save signed files to storage your server can reach, not a local folder.
Which BoldSign plan do you need for the API?
You can build and test in the free API sandbox, and you need the Enterprise API plan to go live. Embedded signing, webhooks and live API calls are part of that plan.
The Enterprise API plan starts at $30 a month in USD and includes 40 envelopes. Each extra envelope costs $0.75, as listed on the BoldSign API pricing page in November 2026.
Sandbox documents carry a “This is a test document” watermark and are deleted after 14 days. You need no credit card to start.
Where can you go from here?
You now have a Blazor app that sends, signs and saves documents. Pick the next step that fits your project.
- Create a free API sandbox account and run this sample.
- Read about our software development kit (SDK) for C# to see more of what the package can do.
- Open a ticket in our support portal with questions about your set-up.
Frequently asked questions
Can I add eSignatures to a Blazor app for free?
Yes, for testing. Our free API sandbox needs no credit card, and you can run every step of this guide in it. Sandbox documents carry a test watermark and are deleted after 14 days.
Is a Blazor digital signature the same as an electronic signature?
Not quite. An electronic signature records that a person agreed to a document. A digital signature is a certificate seal on the file, and we add one to every signed document and its audit trail.
Does this work with Blazor WebAssembly?
Keep the API calls on a server. Your API key must stay secret, so a WebAssembly app should call your own server, which then calls BoldSign and returns the signing link.
Can signers sign without leaving my Blazor app?
Yes. Send the document with disableEmails set to true, then show the embedded signing link in an iframe on your page. The signer stays on your page the whole time.
How long does an embedded signing link stay valid?
You choose. The GetEmbeddedSignLinkAsync method takes a signLinkValidTill date, and the sample in this guide sets it to 10 minutes from now. Create a fresh link each time the signer opens the page.
How do I know when a document has been signed?
Subscribe to the Completed webhook event. We send it to your endpoint once every signer has signed and the final PDF is ready to download.
Can I use a document without a template?
Yes. The DocumentClient can send an uploaded file with its own fields. Templates save time when you send the same form often, since the fields are placed once.
Which BoldSign plan do I need to go live with the API?
You need the Enterprise API plan, which starts at $30 a month with 40 envelopes. Until then, you can build and test in the free API sandbox.

Gopinath Kannusamy
Gopinath is a passionate software developer with 2 years of experience at BoldSign. He is an avid writer and enjoys sharing his insights on technology and development. In his free time, he enjoys exploring new technologies and learning new things. Connect with him on LinkedIn.
More posts by Gopinath Kannusamy