BoldSign Team
TL;DR: OAuth lets your app act inside a user’s BoldSign account with short-lived tokens the user approves. A sender identity lets you send documents in another person’s name after they approve by email. Use OAuth to connect apps, and sender identities to send on someone’s behalf.
Say your sales app sends contracts through BoldSign. Some customers want to connect their own accounts. Your account manager also wants contracts to go out under the sales director’s name.
You are looking at two different jobs. OAuth handles the first, and sender identities handle the second. This guide explains both in plain terms, then shows how to set each one up with working code.
What is the difference between OAuth and sender identities?
OAuth controls what an app may do with someone’s account. A sender identity controls whose name appears as the sender on a document.
Think of a hotel. OAuth is the key card the front desk gives you: it opens only your room, and it stops working at checkout. A sender identity is more like a signed note from your manager that lets you post letters in their name.
What is OAuth?
OAuth is an open standard that lets an app use your account without ever seeing your password. The app gets a token that unlocks a limited set of actions for a limited time.
How does OAuth work?
- The user signs in to their account, for example with a Google login.
- They approve what the app may do, such as read documents or send them.
- The app receives a temporary access token, never the user’s password.
- The token unlocks only the actions the user approved.
Our guide on API key vs OAuth compares OAuth with the other way to call the BoldSign API.
How does BoldSign use OAuth?
We use OAuth 2.0 so your app can call the BoldSign API for a user, without their password. You pick one of three flows, depending on where your app runs.
- Authorization code flow with PKCE (Proof Key for Code Exchange), for apps with a server
- Client credentials flow, for server-to-server jobs with no user present
- Implicit flow, for single-page apps that run only in the browser
Every flow starts with an OAuth app in BoldSign. Go to API, select OAuth Apps, then Create App. Copy the Client ID and Client Secret Key after you save.
How does the authorization code flow work in BoldSign?
The user signs in and approves your app, and your server swaps the returned code for tokens. PKCE adds a one-time secret, so a stolen code is useless on its own.
How do you get the user’s approval?
1. Create an OAuth app in BoldSign and add the redirect URL that BoldSign returns users to.
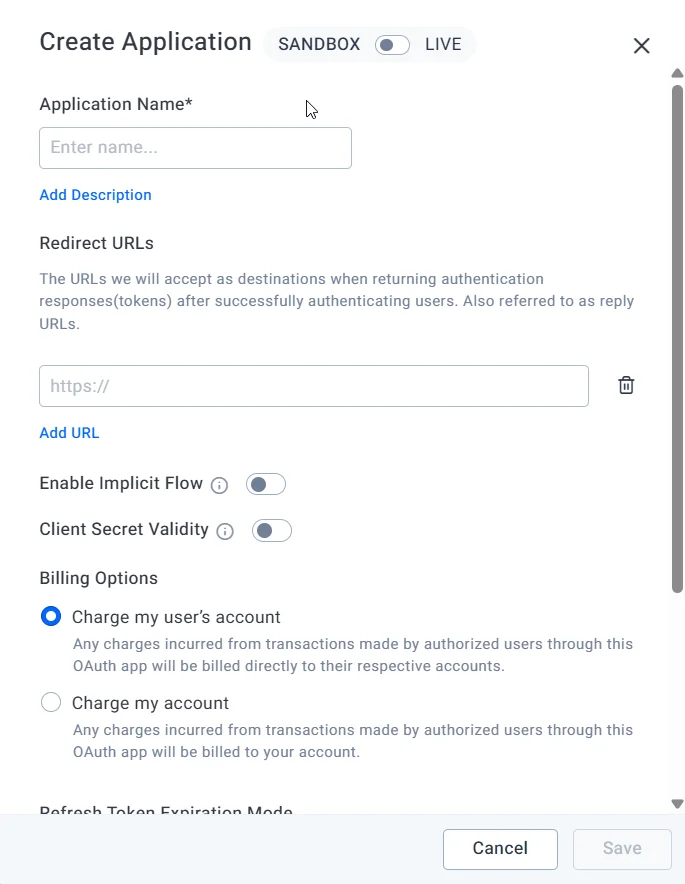
2. Send users to the BoldSign sign-in page to approve your app.
https://account.boldsign.com/connect/authorize?response_type=code
&client_id=YOUR_CLIENT_ID
&state=YOUR_REQUEST_STATE
&scope=YOUR_SPACE_DELIMITED_SCOPES
&code_challenge=YOUR_CODE_CHALLENGE
&code_challenge_method=S256
&redirect_uri=YOUR_REDIRECT_URI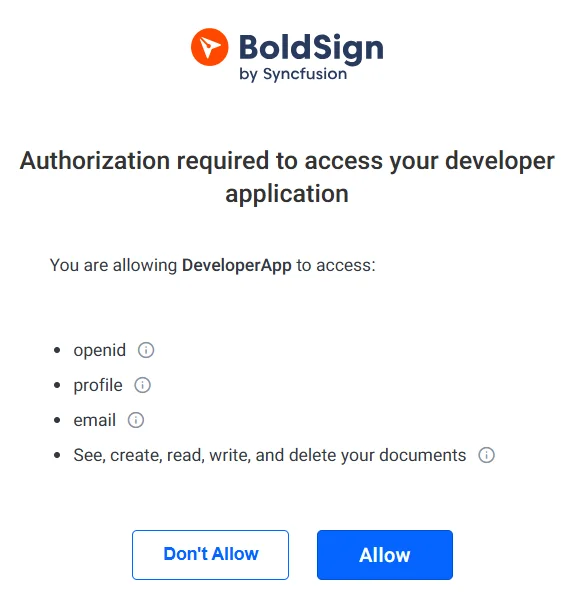
3. After the user approves, we send a temporary authorization code to your redirect URL.
https://yourapp.com/callback?state=<your_requested_state>&code=<authorization_code_received>&scope=<your_space_delimited_scopes>&session_state=<session_state_value>
How do you swap the code for tokens?
4. Your app sends the code, client ID, client secret and redirect URL to get an access token and a refresh token.
POST 'https://account.boldsign.com/connect/token'
-H 'Content-Type: application/x-www-form-urlencoded'
-d 'grant_type=authorization_code'
-d 'client_id=<your_client_id>'
-d 'client_secret=<your_client_secret>'
-d 'code=<your_auth_code>'
-d 'redirect_uri=<your_redirect_uri>'
-d 'code_verifier=<your_code_verifier>'
5. We return an access token for API calls. The refresh token arrives when you ask for the offline_access scope.
{
  "id_token": "<id_token_value>",
  "access_token": "<access_token_value>",
  "expires_in": 3600,
  "token_type": "Bearer",
  "refresh_token": "<refresh_token_value>",
  "scope": "<your_space_delimited_scopes>"
}
How do you call the API and keep access?
6. Use the access token to call the BoldSign API. The Node.js sample below runs the whole flow and sends a document for signature.
const express = require("express");
const axios = require("axios");
const qs = require("querystring");
require("dotenv").config();
const crypto = require("crypto");
function generatePkcePair() {
  // Generate a code verifier
  const codeVerifier = crypto.randomBytes(32).toString("base64url");
  // Create a code challenge based on codeVerifier
  let codeChallenge = crypto.createHash("sha256").update(codeVerifier).digest("base64url");
  // Return both the code verifier and the code challenge
  return { codeVerifier, codeChallenge };
}
const app = express();
const PORT = process.env.PORT || 3000;

// BoldSign OAuth credentials (stored in .env)
const CLIENT_ID = process.env.BOLDSIGN_CLIENT_ID;
const CLIENT_SECRET = process.env.BOLDSIGN_CLIENT_SECRET;
const REDIRECT_URI = "http://localhost:3000/callback";
const AUTH_URL = "https://account.boldsign.com/connect/authorize";
const TOKEN_URL = "https://account.boldsign.com/connect/token";
const API_URL = "https://api.boldsign.com/v1/document/send";
const { codeVerifier, codeChallenge } = generatePkcePair();

// Middleware to parse URL-encoded bodies
app.use(express.urlencoded({ extended: true }));

// Step one: Redirect to BoldSign® authorization URL
app.get("/login", (req, res) => {
  const authUrl = `${AUTH_URL}?response_type=code&client_id=${CLIENT_ID}&redirect_uri=${REDIRECT_URI}&scope=openid profile email offline_access BoldSign.Documents.All&code_challenge=${codeChallenge}&code_challenge_method=S256`;
  res.redirect(authUrl);
});

// Step two: Handle callback and exchange code for token
app.get("/callback", async (req, res) => {
  const { code } = req.query;
  if (!code) {
    return res.status(400).send("Authorization code not provided");
  }
  try {
    const response = await axios.post(
      TOKEN_URL,
      qs.stringify({
        grant_type: "authorization_code",
        code,
        redirect_uri: REDIRECT_URI,
        client_id: CLIENT_ID,
        client_secret: CLIENT_SECRET,
        code_verifier: codeVerifier,
      }),
      { headers: { "Content-Type": "application/x-www-form-urlencoded" } },
    );
    const { access_token } = response.data;

    // Step three: Use the access token to send a signature request
    const signatureRequest = await sendSignatureRequest(access_token);
    res.send(`Document sent for signature! Request ID: ${signatureRequest.documentId}`);
  } catch (error) {
    console.error(error.response?.data || error.message);
    res.status(500).send("Error during authorization");
  }
});

// Function to send a signature request using the BoldSign® API
async function sendSignatureRequest(accessToken) {
  const documentData = {
    title: "Customer Agreement",
    files: ["data:application/{{fileType}};base64,{{base64FileContent}}"], // Your file in base64 format
    signers: [
      {
        name: "Customer Name",
        emailAddress: "customer@example.com",
        signerOrder: 1,
        formFields: [
          {
            id: "signature1",
            fieldType: "Signature",
            pageNumber: 1,
            bounds: { x: 100, y: 100, width: 200, height: 50 },
            isRequired: true,
          },
        ],
      },
    ],
  };

  const response = await axios.post(API_URL, documentData, {
    headers: { Authorization: `Bearer ${accessToken}`, "Content-Type": "application/json" },
  });
  return response.data;
}

// Start the server
app.listen(PORT, () => {
  console.log(`Server running on http://localhost:${PORT}`);
});
7. Use the refresh token to get a new access token when the current one expires. Each refresh token works once, and every refresh returns a new one.
POST 'https://account.boldsign.com/connect/token'
     -H 'Content-Type: application/x-www-form-urlencoded'
     -d 'grant_type=refresh_token'
     -d 'client_id=<your_client_id>'
     -d 'client_secret=<your_client_secret>'
     -d 'refresh_token=<your_refresh_token>'
By default, a refresh token expires 30 days after we issue it. You can switch your OAuth app to sliding expiration, which extends it by 30 days on each refresh.
How does the client credentials flow work in BoldSign?
Your server gets a token with its own client ID and secret, and no user signs in. Use it for automated jobs, such as sending onboarding documents from your HR system.
1. Create an OAuth app in BoldSign to get a client ID and client secret. You can set up sandbox and live credentials separately.
2. Send a request to the BoldSign token endpoint with the client ID, client secret and scopes, such as BoldSign.Documents.All.
POST 'https://account.boldsign.com/connect/token'
     -H 'Content-Type: application/x-www-form-urlencoded'
     -d 'grant_type=client_credentials'
     -d 'client_id=<your_client_id>'
     -d 'client_secret=<your_client_secret>'
     -d 'scope=<your_scopes>'
3. We check your credentials and return an access token that lasts for a limited time.
{
  "access_token": "<access_token_value>",
  "expires_in": 3600,
  "token_type": "Bearer",
  "scope": "<your_scopes>"
}
4. Use the access token in API requests, for example to send documents or check their status.
const axios = require("axios");

// Configuration
const clientId = "your-client-id"; // Replace with your BoldSign Client ID
const clientSecret = "your-client-secret"; // Replace with your BoldSign Client Secret
const tokenUrl = "https://account.boldsign.com/connect/token";
const apiUrl = "https://api.boldsign.com/v1/document/send";

// Function to get access token using the Client Credentials flow
async function getAccessToken() {
  try {
    const authString = Buffer.from(`${clientId}:${clientSecret}`).toString("base64");
    const response = await axios.post(
      tokenUrl,
      new URLSearchParams({
        grant_type: "client_credentials",
        scope: "BoldSign.Documents.All BoldSign.Templates.All",
        client_id: clientId,
        client_secret: clientSecret,
      }),
      {
        headers: {
          Authorization: `Basic ${authString}`,
          "Content-Type": "application/x-www-form-urlencoded",
        },
      },
    );
    return response.data.access_token;
  } catch (error) {
    console.error("Error fetching access token:", error.response?.data || error.message);
    throw error;
  }
}

// Function to create and send a document
async function createAndSendDocument(accessToken) {
  try {
    const response = await axios.post(
      apiUrl,
      {
        title: "Customer Agreement",
        files: ["data:application/{{fileType}};base64,{{base64FileContent}}"], // Your file in base64 format,
        signers: [
          {
            name: "Customer Name",
            emailAddress: "customer@example.com",
            signerOrder: 1,
            formFields: [
              {
                id: "signature1",
                fieldType: "Signature",
                pageNumber: 1,
                bounds: { x: 100, y: 100, width: 200, height: 50 },
                isRequired: true,
              },
            ],
          },
        ],
      },
      { headers: { Authorization: `Bearer ${accessToken}`, "Content-Type": "application/json" } },
    );
    console.log("Document created successfully:", response.data.documentId);
    return response.data.documentId;
  } catch (error) {
    console.error("Error creating document:", error.response?.data || error.message);
    throw error;
  }
}

// Main function to execute the flow
async function automateDocumentProcessing() {
  try {
    // Step 1: Get access token
    const accessToken = await getAccessToken();
    // Step 2: Create and send document
    const documentId = await createAndSendDocument(accessToken);
    console.log("Document processing initiated. Document ID:", documentId);
  } catch (error) {
    console.error("Automation failed:", error);
  }
}
// Run the automation
automateDocumentProcessing();
5. Ask for a new access token with your client ID and secret when the current one expires. This flow returns no refresh token.
How does the implicit flow work in BoldSign?
The implicit flow hands the access token straight to the browser, so it suits single-page apps with no server. Your app never holds a client secret, so keep its scopes narrow.
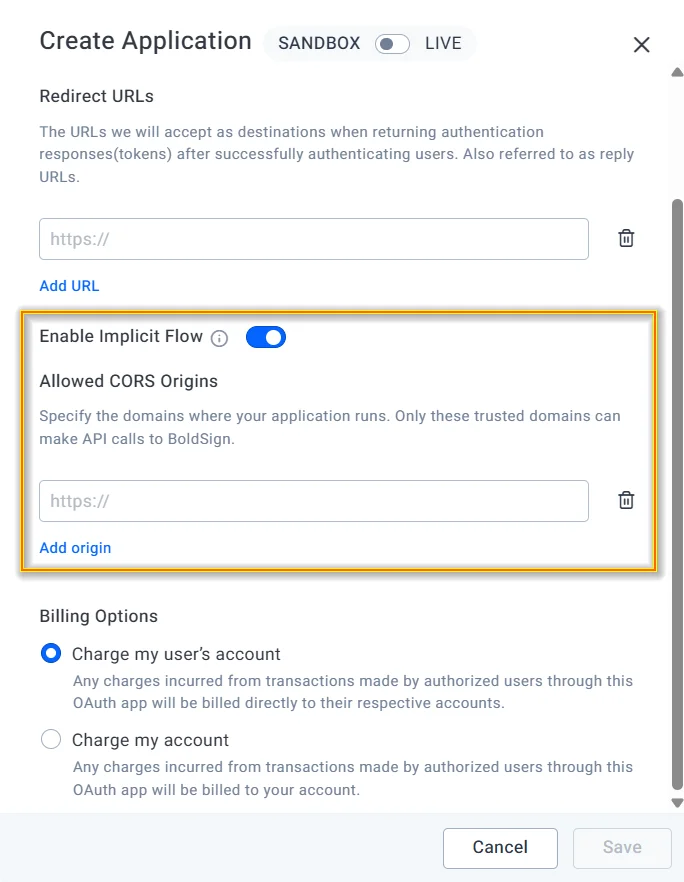
1. Create an OAuth app in BoldSign with a redirect URL. Add the web addresses allowed to call the API under CORS (cross-origin resource sharing).
2. Send the user to the BoldSign authorization page with response_type=token, your scopes and a nonce value.
https://account.boldsign.com/connect/authorize
?response_type=token
&client_id=<your_client_id>
&state=<your_request_state>
&scope=<your_space_delimited_scopes>
&redirect_uri=<your_redirect_uri>
&nonce=<your_nonce_value>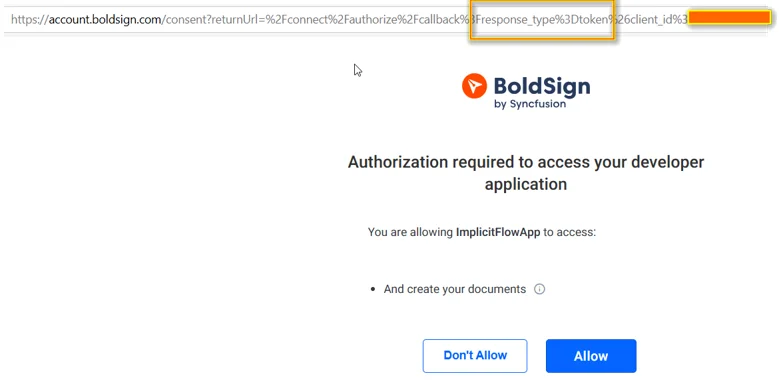
3. After the user approves, we redirect to your app with the access token in the fragment of the address.

4. Read the access token from the address and use it for API requests. The sample below opens a signing page in a new tab.
<!DOCTYPE html>
<html lang="en">
<head>
   <meta charset="UTF-8">
   <meta name="viewport" content="width=device-width, initial-scale=1.0">
   <title>BoldSign Quick Signature Widget - OAuth Implicit Flow</title>
   <style>
      #signature-widget { width: 100%; height: 400px; border: none; }
      button { padding: 10px 20px; margin: 10px 0; }
   </style>
</head>
<body>
   <h2>Quick Signature Widget with BoldSign</h2>
   <button onclick="startOAuthFlow()">Sign Document</button>
   <iframe id="signature-widget" style="display: none;"></iframe>

   <script>
       // BoldSign OAuth settings
       const clientId = ''; // Replace with your BoldSign OAuth client ID
       const redirectUri = 'http://localhost:3000/callback'; // Replace with your registered redirect URI
       const scope = 'BoldSign.Documents.Create'; // Scope for creating documents
       const authorizeUrl = 'https://account.boldsign.com/connect/authorize';
       const documentId = 'e94ef46d-abf6-4a57-a87e-71bdb3e14352'; // Replace with your document ID.

       // Step 1: Start OAuth Implicit Flow
       function startOAuthFlow() {
           const authUrl = `${authorizeUrl}?response_type=token&client_id=${clientId}&redirect_uri=${redirectUri}&scope=${scope}&state=xyz123&nonce=abc456`;
           window.location.href = authUrl; // Redirect to BoldSign for user consent
       }

       // Step 2: Handle the redirect and extract access token from URL fragment
       function handleCallback() {
           const hash = window.location.hash.substring(1); // Remove the '#' from URL fragment
           const params = new URLSearchParams(hash);
           const accessToken = params.get('access_token');

           if (accessToken) {
               openSignatureWidget(accessToken);
           } else {
               console.error('No access token found in URL');
           }
       }

       // Step 3: Open the BoldSign® Signature Widget in a new tab with the access token
       function openSignatureWidget(accessToken) {
           const widgetUrl = `https://app.boldsign.com/document/sign?access_token=${accessToken}&documentId=${documentId}`;
           window.open(widgetUrl, '_blank');
       }

       // Check if this is the callback page
       if (window.location.hash) {
           handleCallback();
       }
   </script>
</body>
</html>
What are sender identities?
A sender identity is a person you are approved to send signature requests for. Signers see that person’s name and email as the sender, while you run the process.
How do sender identities work?
- You add the person’s name and email as a sender identity.
- We email them a request, and they approve or decline it.
- Once approved, you send documents in their name through the API.
- The owner can withdraw your access at any time.
Nothing goes out in their name until they approve. That makes sender identities a good fit for an assistant who sends contracts for a manager.
How do you create a sender identity in the BoldSign web app?
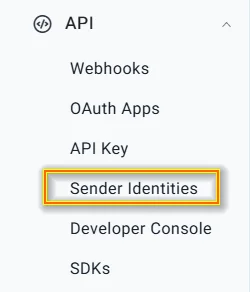
Go to API, then Sender Identities, and enter the person’s name and email. We then ask them to approve your request by email.
1. Sign in to the BoldSign web app.
2. Go to API > Sender Identities.
3. Enter the sender’s name and email.
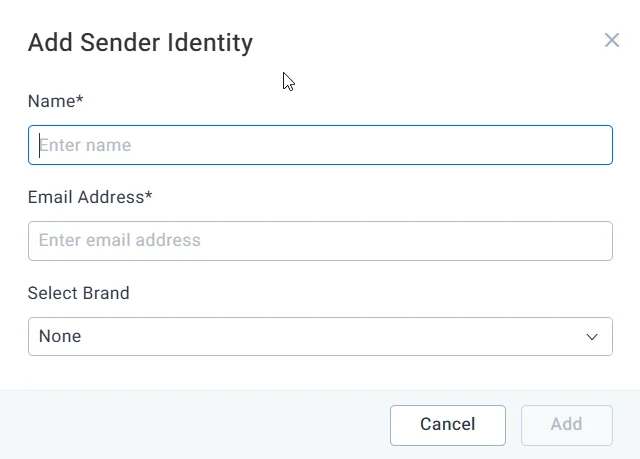
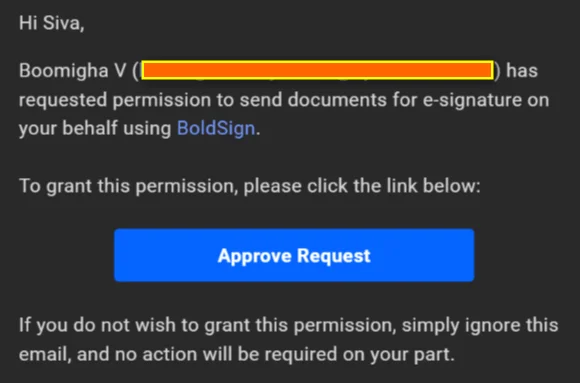
4. We email the person a link to review your request.
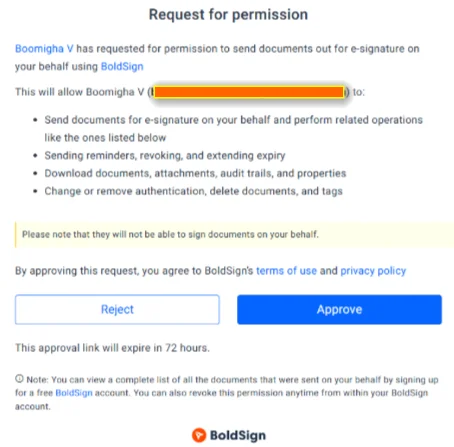
5. They see the actions you are asking for, then approve.
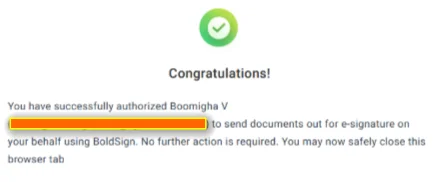
6. You get an email once they approve.
The web app lists documents sent on someone’s behalf, but the sending itself happens through the API.
How do you create a sender identity with the BoldSign API?
Send a request to the create sender identity endpoint with the person’s name and email. Only the name and email are required.
Optional fields set a redirect URL, your brand and the language of the emails. Notification settings choose which events the owner hears about, such as viewed or completed.
- Send the request with your API key and the sender’s details.
- The sender approves the request from their email.
- The identity is ready to use in your app.
curl -X 'POST' \
  'https://api.boldsign.com/v1/senderIdentities/create' \
  -H 'accept: */*' \
  -H 'X-API-KEY: {your API key}' \
  -H 'Content-Type: application/json' \
  -d '{
  "name": "Luther Cooper",
  "email": "luthercooper@cubeflakes.com",
  "redirectUrl": "https://yourapp.com",
  "brandId": "{brandID}",
  "notificationSettings": {
    "viewed": true,
    "sent": false,
    "completed": true
  }
}'
How do you send documents on behalf of someone else?
Add the approved person’s email to the onBehalfOf field when you send. The document then goes out in their name.
The request can be JavaScript Object Notation (JSON) or form data. Once approved, you can also send reminders, revoke documents and download audit logs for that person.
curl --location --request POST \
  'https://api.boldsign.com/v1/template/send?templateId=' \
  --header 'X-API-KEY: {your API key}' \
  --header 'Content-Type: application/json' \
  --data-raw '{
  "onBehalfOf": "luthercooper@cubeflakes.com"
}'
Our developer guide shows how to send a document on someone’s behalf. Our post on sending documents on behalf of others with APIs walks through a full example.
How do OAuth and sender identities compare side by side?
OAuth answers “what may this app do?”, and a sender identity answers “whose name goes on this document?”. The table shows where they differ.
| Aspect | OAuth | Sender identities |
|---|---|---|
| Purpose | Let an app use a BoldSign account | Send documents in another person’s name |
| Controls | Which API actions the app may take | Who appears as the sender |
| Set-up | OAuth app, redirect URL and tokens | Name and email, in the web app or API |
| Approval | User signs in and consents | Owner approves by email |
| Ends when | Tokens expire and are not refreshed | The owner withdraws access |
| Fits | Apps that connect user accounts | Assistants and teams sending for someone |
When should you use OAuth vs sender identities?
Use OAuth when your app acts inside other people’s BoldSign accounts. Use sender identities when you send from your own account but in someone else’s name.
- An HR app connects to each manager’s account with OAuth to send and track their contracts.
- A nightly job sends onboarding packs with the client credentials flow.
- An assistant sends contracts under the director’s name with a sender identity.
- A platform sends for many clients, each approved as a sender identity.
What should you watch out for with each method?
Both methods need care in different places. OAuth asks more of your code, and sender identities ask more of your process.
What to watch with OAuth
- Store the client secret on your server, never in browser code.
- Plan for token expiry, and save each new refresh token after every refresh.
- Ask only for the scopes your app needs.
What to watch with sender identities
- Sending waits until the owner approves, so ask early.
- Only the user who created an identity can use it.
- An email can be a sender identity in one BoldSign account only.
Which BoldSign plan do you need for OAuth and sender identities?
You can build and test both for free in the API sandbox. Live API calls and sender identities need the Enterprise API plan.
The Enterprise API plan starts at $30 a month with 40 envelopes, and each extra envelope costs $0.75. Sandbox documents carry a watermark and are deleted after 14 days. Prices are in USD as of November 2026, and our pricing page lists every plan.
How do you start testing OAuth and sender identities?
The quickest way to compare them is to try both in the sandbox. Here are three next steps.
- Create a free API sandbox account and register your first OAuth app.
- Request a demo to talk through your integration with our team.
- Read our guide to OAuth 2.0 application integration for more detail on each flow.
Frequently asked questions
What is the difference between OAuth and sender identities?
OAuth decides what your app may do with a user's BoldSign account. A sender identity decides whose name a document goes out under. One controls access, the other controls the sender shown to signers.
Which OAuth flows does BoldSign support?
We support three OAuth 2.0 flows. Authorization code with PKCE (Proof Key for Code Exchange) suits server apps, client credentials suits automation, and implicit suits browser-only apps.
Does the client credentials flow return a refresh token?
No. Your app asks for a new access token with its client ID and client secret when the old one expires.
How long does a BoldSign refresh token last?
By default, a refresh token expires 30 days after we issue it. You can switch your OAuth app to sliding expiration, which adds another 30 days each time you get a new access token.
Can I send on behalf of someone from the BoldSign web app?
You can create a sender identity in the web app, but sending on someone's behalf works through the API only. The web app lists the documents sent that way.
Can the person behind a sender identity take back access?
Yes. The identity owner can withdraw your access at any time. Documents already sent keep their original sender details.
Can my teammates use a sender identity I created?
No. Only the user who created a sender identity can see it or send with it. Teammates and admins each need their own approved identity.
Can I create a sender identity for my own email address?
No. The API refuses an identity for your own email. Each email address can also be a sender identity in one BoldSign account only.

BoldSign Team
The official team behind BoldSign—the simple, secure eSignature solution trusted by businesses worldwide. Our platform helps individuals and teams create, sign, and manage documents effortlessly while maintaining full compliance. Experience BoldSign yourself with a free trial or request a personalized demo to see it in action.
More posts by BoldSign Team