Supporting Document Upload for Claims and Verification Workflows
 Preethi Loganathan
TL;DR: Insurance claims stall on missing proof far more often than on missing signatures. Add an attachment field to the claim form, and the claimant uploads the estimate, photo or report in the same session as they sign. Our insurance eSignature page shows more claim workflows.
A claimant signs the claim form within an hour. The repair estimate shows up four days later, in a different inbox, with the wrong date on it. Someone on your team now has to match the file to the claim and ask again.
The usual fix adds more channels: an upload portal, an email thread, a reminder list. Each one is another status to track for a single claim. This guide shows how to ask for the proof and the signature in one step.
Why do insurance claims stall on supporting documents?
Claims stall because the proof travels through a different channel from the signature. The signed form comes back fast, while the estimate or photo waits in someone’s inbox.
The first report is quick. The claimant gives the policy number, the date and what happened. The slow part starts when you ask for evidence and track it in a second place.
What is a supporting document upload in a claim form?
A supporting document upload is a box on the claim form where the claimant attaches a file before signing. We call it an attachment field.
Think of a parcel that only ships once the label and the contents are both in the box. The claim form works the same way: the signature and the proof leave together. You check one status instead of two.
Our help article on how to request attachments from signers covers the field in detail.
Which documents should a claims verification request ask for?
Ask for the exact document that proves the claim, by name. “Upload document” tells a claimant nothing, so they send whatever they have.
Common claim documents include:
- A contractor’s repair estimate
- Photos of the damage
- A police or incident report
- A hospital discharge summary or medical bill
Write each title the way you would say it on the phone. A title such as “Upload the contractor’s repair estimate from the last 30 days” names the exact file you need. Our guide on how to collect supporting documents before signing has more title examples.
How do you set up a claims document request in BoldSign?
Build the request once, then save it as a template for each claim type. Each new claim then starts from the same fields and titles.
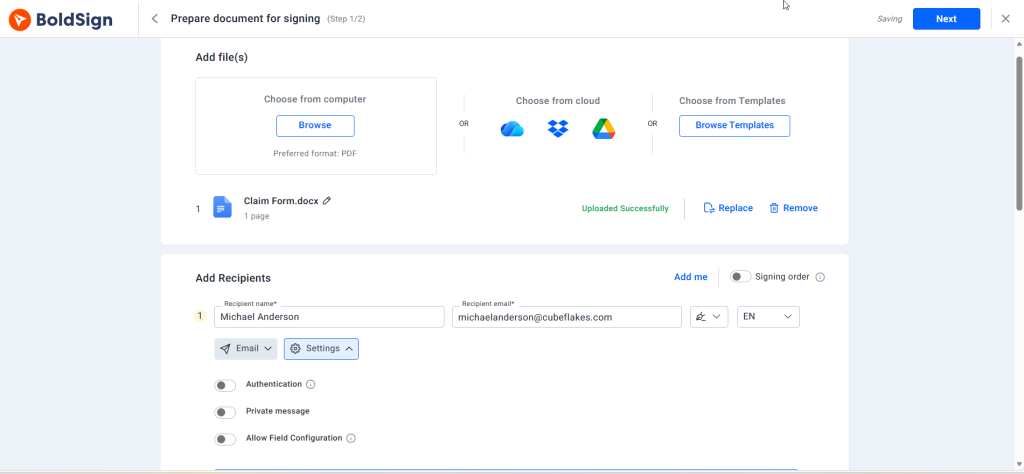
- Log in, then upload the claim form or pick a saved template for that claim type.
- Add the claimant and any other signers, such as a contractor.
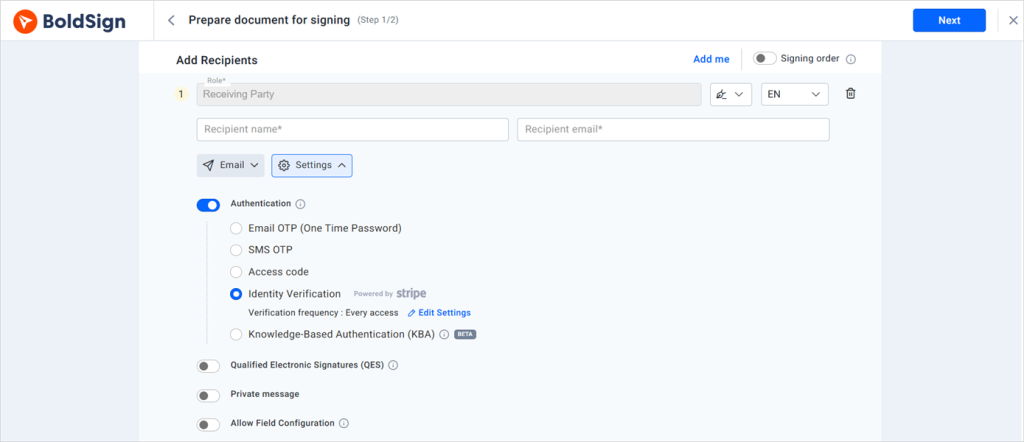
- Open each signer’s settings and choose an authentication method that fits the claim.
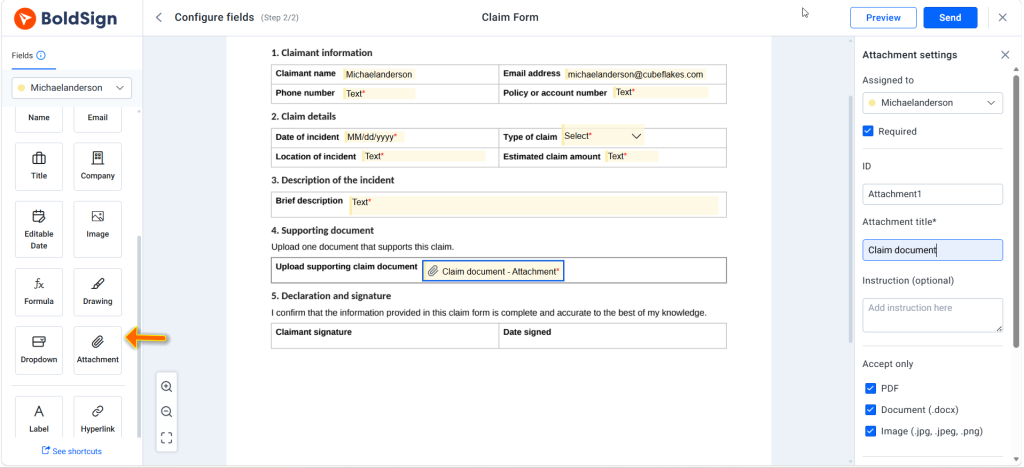
- On the fields page, drag an Attachment field onto the form for each document.
- Set the Attachment title, the Accept only file types and Required, then add the signature field and send.
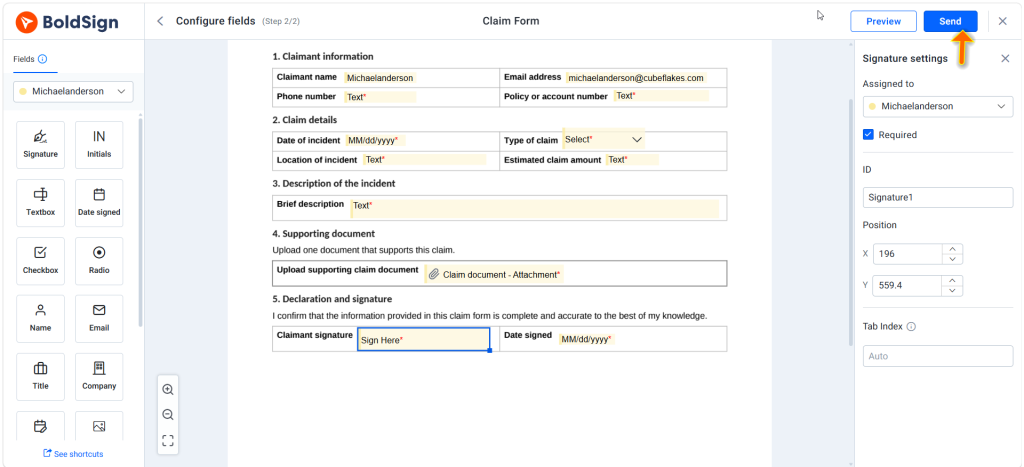
Once everyone signs, download the attachments, the signed form and the audit trail from My Documents. Our help article on how to download the attachments shows each option.
How do you confirm who is submitting a claim?
Add a signer check before the document opens. A photo of a license shows that a file was sent, but it does not show who sent it.
Pick the check by the claim’s risk:
- ID verification checks a passport, driver’s license or national ID, and can match a selfie.
- Knowledge-based authentication (KBA) asks US signers questions drawn from public records.
- An access code or a code sent by text message suits lower-risk claims.
Our signer authentication page compares each method.
What does the upload step check, and what is left to you?
The attachment field checks two things: the file type, and whether a required file was uploaded. The claimant cannot finish signing until both pass.
The field does not judge whether a document is genuine. Virus scans, duplicate checks and fraud review belong to your claims system once the file lands there. Keep a person in charge of that review.
The audit trail helps that person. It records who signed and at what time. It also notes the device and how each signer was verified.
How do you follow up when a claim document is missing?
Resend the same template with one attachment field for the missing item. The claimant sees exactly what is still needed.
A fresh email with loose wording is how a claim loses another week. A named field keeps the follow-up short, and the new file joins the same claim record. Our guide on how a signer attaches a document while signing shows the claimant’s side.
What should you keep once a claim is decided?
Keep the signed form, the attached proof and the audit trail together. A person or a claims system decides the claim, but the record is what you pull up later.
Store all three in one claim file from the start. You then avoid digging through old emails if a claim is questioned months on. Teams that build claims software can set the same field through the attachment field API.
Which BoldSign plan do you need for claims, and what does it cost?
Attachment fields come with every plan, including the free Essential plan. Signer checks and higher template limits decide which plan suits a claims team.
- Essential is free with 2 templates. Growth is $5 per user a month with 10 templates.
- Business is $15 per user a month and adds unlimited templates, ID verification, KBA and text-message codes.
- Premium is $99 a month for unlimited users, with the same signer checks as Business.
Signer checks by text message, ID verification and KBA need the Business or Premium plan.
ID verification costs $2 per verification and KBA $1.50 per attempt as add-ons, per our pricing page in November 2026. All plan prices are in USD and billed yearly.
Teams that call the BoldSign API from their own claims software use the Enterprise API plan, from $30 a month with 40 envelopes.
How do you start collecting claim documents with signatures?
Pick one claim type you handle often and build its request with one attachment field per document. Send it to yourself first to see the claimant’s view.
- Start a 30-day free trial and build your first claim request.
- Book a demo to see a claim workflow set up for your team.
- Read how to show accident damage on insurance claim forms with signer-added images.
Frequently asked questions
What file types can a claimant upload?
A claimant can upload PDF files, Word documents and image files. You choose which of these types each attachment field accepts.
Does the claimant need a BoldSign account to sign and upload?
No. The claimant opens the link in our email, uploads the files and signs in the same session, with no account to create.
Can I ask for more than one claim document in one request?
Yes. One document can hold several attachment fields. Give each field its own title, such as repair estimate or police report, so the claimant knows which file goes where.
What happens when a claimant skips a required upload?
The claimant cannot finish signing. A required attachment field holds the whole document until a file is uploaded. The signed form and its proof then arrive together.
Can a contractor upload their own estimate in the same claim?
Yes. Add the contractor as a second signer and assign an attachment field to them. Each signer fills only the fields assigned to them.
Who can download claim attachments after signing?
The sender, the signers and any CC (carbon copy) recipients can download the attachments once signing is complete. They can do it from their BoldSign account or from the completion email.
Does an uploaded ID photo prove who submitted the claim?
No. An upload shows that a file arrived, not who sent it. Add ID verification, which checks a government ID and can match a selfie before the document opens.
Does this setup work for warranty or expense claims too?
Yes. Any claim that needs a signed form plus proof works the same way: one attachment field per document, sent with the signature request.

Preethi Loganathan
Preethi is a Digital Marketing Executive at BoldSign who develops precise, research-driven content on eSignatures, compliance, and digital signing workflows. She works closely with product and engineering teams to ensure every article is accurate, validated, and aligned with industry best practices. Connect with her on LinkedIn.
More posts by Preethi Loganathan